Did you know that the right preparation of your calligraphy pen can transform your writing experience? Whether you’re a seasoned calligrapher or just starting, the tools you use can greatly impact your results. Properly preparing your pen not only ensures smooth ink flow but also enhances your control and precision, making your final work more beautiful and effortless. Many aspiring artists overlook this crucial step, leading to frustration and uneven lines. In this guide, we’ll walk you through the essential steps to ready your calligraphy pen, so you can focus on expressing your creativity without the distraction of technical issues. Get ready to unlock a smoother, more enjoyable writing experience on your path to mastering calligraphy!
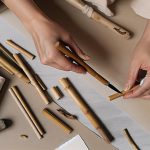
Preparing Your Calligraphy Pen: Essential Tools and Materials
Getting the right tools ready for calligraphy is essential to ensure you have a smooth and enjoyable writing experience. A well-prepared calligraphy pen can make all the difference between frustration and flow. Whether you’re a beginner or a seasoned scribe, knowing what you need to have on hand will enhance your practice.
Start with your choice of pen. Calligraphy pens come in various styles, from traditional dip pens to modern fountain pens. Each type requires specific preparations. For dip pens, ensure you have a selection of nibs-different styles create different effects. Similarly, if you use a fountain pen, check that you have compatible cartridges or a filling mechanism ready to go.
Essential Materials:
- Nibs: Gather different nibs for varied effects; fine, broad, and flexible nibs are great options.
- Ink: Choose high-quality ink that’s suitable for your pen type. Remember to have a blotter or paper towel for cleaning excess ink.
- Papers: Use smooth, bleed-proof paper designed for calligraphy to avoid feathering.
- Light Box or Tracing Paper: These are invaluable for planning and practicing your strokes before committing to the final piece.
Always remember to clean your pen before starting a new session. This can save you from potential ink contamination and uneven flow. For dip pens, a simple rinse in water followed by a thorough dry can do wonders. If you’re using a fountain pen, wash the nib and feed according to the manufacturer’s guidelines to maintain optimal performance.
Establishing a consistent routine in preparing your calligraphy pen and materials will not only increase your efficiency but also kick-start your creativity. Having all your tools organized and easily accessible can help you stay focused on what truly matters: bringing your artistic vision to life. Start with the right preparations, and you’ll find the ink just flows better, allowing your calligraphy skill to shine!
Choosing the Right Calligraphy Ink for Your Artwork
Choosing the right ink for your calligraphy can dramatically affect both the appearance and the experience of your writing. Not all inks are created equal; they come in a variety of types, colors, and properties that can change your artwork’s outcome. It’s essential to understand these differences to make informed choices that align with your personal style and the intended use of your pieces.
Start by considering the type of paper you’ll be using. If you’re working with smooth surfaces, such as watercolor paper or calligraphy paper, opt for inks that flow easily and dry quickly to minimize smudging. For more textured papers, use thicker, more viscous inks that can stand up to the surface’s irregularities. Inks are generally broken down into several categories:
- Dye-based inks: These are vibrant and come in a myriad of colors. They flow easily and are excellent for detailed work but may not be as water-resistant.
- Pigment-based inks: Known for their richness and lightfastness, these inks offer excellent durability. They tend to be more opaque and are less affected by water.
- Iron gall inks: A traditional choice that offers a unique historical touch. These inks darken over time and provide a beautiful finish for archival works.
- Specialty inks: Including metallic, glitter, and fluorescent options, these can add exciting effects to your work but may require special handling and maintenance.
When selecting your ink, also think about your nib. Different nibs can handle different ink thicknesses. For example, finer nibs work better with lighter, more fluid inks, while broader nibs can manage thicker, creamier inks without clogging. Experiment to find the combinations that feel right for you; there’s no single “best” ink, as it often boils down to personal preference and the artistic effects you want to achieve.
Finally, testing is a crucial step before committing to a project. Use an ink swatch card to evaluate how various inks behave on your chosen paper. Observe the drying time, how the ink interacts with water, and how it looks under different lighting. This practice will not only refine your ink choices but also enhance your overall calligraphy experience, resulting in pieces that truly reflect your artistic vision.
Setting Up Your Workspace for Calligraphy Success
Creating a productive workspace is essential for any calligrapher, whether you’re just starting out or have been honing your craft for years. A clutter-free, well-organized area can significantly enhance your focus and creativity. Here’s how to set up the perfect environment for your calligraphy practice.
First, consider your workspace location. Choose a spot with good natural light, as this can greatly improve your visibility and reduce strain on your eyes. Position your table or workspace near a window if possible. If natural light isn’t available, invest in bright but soft lighting to mimic daylight, ensuring your space is well-lit without harsh shadows.
Next, organize your tools and materials. Keep your pens, inks, and papers within easy reach to minimize interruptions during your work. Use trays, drawers, or containers to categorize your supplies. For example:
- Pens and Nibs: Separate them by type or size, ensuring you know exactly where to find what you need.
- Inks: Store them upright (caps on the top) to prevent spills and keep them organized by color or type.
- Papers: Keep a designated area for different weights and sizes to streamline your selection process.
Maintaining a comfortable seating arrangement is also vital. Your chair should provide proper support to prevent fatigue during long writing sessions. Adjust the height of your chair or table as necessary to keep your arms at a comfortable angle while writing. Consider adding a cushion for additional support if needed.
Lastly, display your inspiration. Surrounding yourself with fonts or styles that inspire you can ignite creativity. Pin up examples of your favorite calligraphy pieces or keep a sketchbook handy for jotting down ideas and experimenting with new styles.
By thoughtfully setting up your workspace, you’re not just preparing a physical location; you’re fostering an environment that encourages creativity and focus, vital components in the art of calligraphy.
Cleaning and Maintaining Your Calligraphy Pen
To keep your calligraphy pen in top condition, regular cleaning and maintenance are essential. A clean pen not only ensures smooth ink flow but also extends the lifespan of your tools. If you want your calligraphy to shine, start with these simple yet effective practices.
First, the right cleaning solution makes all the difference. Use lukewarm water for water-based inks. If you’re working with more stubborn inks, consider a gentle soap solution. Avoid harsh chemicals, as they can damage the nib. After using your pen, it’s crucial to rinse it immediately if you’re switching colors or finishing a session. This prevents ink from drying and clogging the nib.
The cleaning process is straightforward. Begin by disassembling your pen if possible. Soak the nib in the cleaning solution for a few minutes. Then gently scrub it with a soft brush or cloth to remove any residual ink. Rinse it thoroughly under running water until it runs clear. Remember to clean the ink reservoir and any other parts, too, to prevent old ink from compromising new projects.
Once clean, allow your pen to air dry completely before reassembling. Storing your pen in a protective case or bag will keep it safe from dust and damage. Taking care of your calligraphy pen can drastically improve your writing experience and preserve the quality of your art.
Different Types of Calligraphy Pens Explained
Different types of calligraphy pens can profoundly affect your writing experience and the styles you can achieve. Choosing the right pen depends largely on your personal preferences and the effects you want to create. Here’s a dive into some of the most popular types of calligraphy pens that every calligrapher should consider.
Dip Pens
Dip pens are classic tools that many calligraphers swear by. They consist of a handle and interchangeable nibs, allowing for versatility in line thickness and style. To use a dip pen, you dip the nib into ink, which can be a beautiful experience since it gives you control over ink flow and allows for detailed work. Just remember, they require regular dipping, so they’re perfect for slow-paced, careful writing rather than quick notes.
Fountain Pens
Fountain pens offer convenience with a built-in ink reservoir. They are fantastic for those who want to combine ease-of-use with elegance. While they may not provide the same range of line variation as dip pens, many fountain pens come with flexible nibs that can produce beautiful strokes. They are ideal for everyday writing and offer a smoother flow, making them suitable for longer sessions.
Brush Pens
For a more free-form style, brush pens are a must-try. These pens feature flexible bristles that can create a range of strokes, from thick to thin, much like a traditional paintbrush. They are fantastic for modern calligraphy styles and are often favored for their ease of use and portability. They generally use water-based ink, which makes for easy cleanup, but be cautious of drying out-remember to keep the cap on between uses!
Gel Pens and Markers
Gel pens and markers have carved out a niche in the calligraphy world thanks to their vibrant colors and ease of use. These are particularly great for beginners who want to experiment without the mess of traditional ink. Though they might not provide the same authentic feel as dip pens, they allow for a great deal of creativity and are perfect for addressing envelopes or adding decorative touches to your projects.
In summary, each type of calligraphy pen has its unique strengths. Whether you prefer the traditional feel of a dip pen, the convenience of a fountain pen, the versatility of a brush pen, or the vibrant explosion of colors from markers, what’s essential is finding the pen that feels best in your hand. As you practice and experiment with these tools, your calligraphy style will undoubtedly flourish.
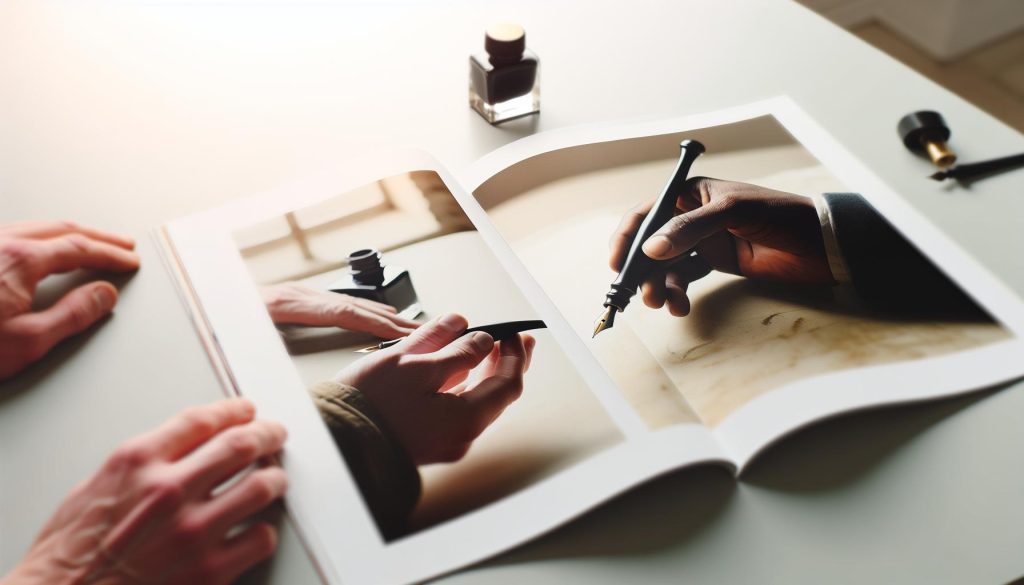
How to Load Ink into Your Calligraphy Pen
Loading ink into your calligraphy pen is a straightforward process, but doing it correctly can make a world of difference in your writing experience. Whether you’re using a dip pen, a fountain pen, or a brush pen, each type comes with its own method for ink application. The good news? With a little practice, you’ll get the hang of it in no time.
For dip pens, the most common approach is to dip the nib directly into the ink. Here’s how to do it effectively:
- Choose a suitable ink well that’s deep enough for the nib to be fully submerged without touching the bottom.
- Dip the nib in at an angle, making sure to coat the edges and the tip but avoid over-saturation, which can lead to drips. After dipping, tap off any excess on the side of the ink bottle.
- Test the flow on a scrap piece of paper – this allows you to ensure the ink is flowing smoothly before you begin your masterpiece.
When it comes to fountain pens, the method varies based on whether you’re using a cartridge, converter, or piston mechanism. If you’re using cartridges, simply push the cartridge into the nib section until it clicks. For converters, pull the plunger back, dip the nib into the ink bottle, and push the plunger to draw ink up. With piston-fill pens, submerge the nib into the ink and twist the back end until it fills. Always make sure to wipe any excess ink off the nib before writing to prevent smudging.
If you’re using brush pens, the process is a bit different as many come pre-filled with ink. However, if you’re using a refillable brush pen, simply open the ink reservoir and use a dropper to fill it according to the product’s instructions. Make sure to avoid overfilling as it might leak.
Finally, allow the ink to settle into the nib for a few moments before you start writing. This gives you a consistent flow right from the first stroke. Don’t rush the process; loading ink is as much a part of the art as the writing itself. By mastering this technique, you’ll be setting yourself up for success in your calligraphy journey.
Tips for Practicing Calligraphy with Your New Pen
Starting your journey into calligraphy with a new pen can be exhilarating, but it can also be a little overwhelming. The good news? With the right approach, you can turn practice into progress. Here are some essential tips to make sure your sessions are productive and enjoyable.
First things first, embrace the warm-up. Just like musicians tune their instruments, calligraphers should spend time warming up their hands and pen. Start with basic strokes. Practice circles, lines, and different angles. This not only helps you get a feel for the pen but also builds muscle memory. Remember, the softer the pressure, the smoother your strokes will be; don’t grip the pen too tightly.
Next, find your flow by keeping a consistent practice schedule. This doesn’t mean hours every day; even short, focused sessions can be incredibly beneficial. Aim for 15 to 30 minutes several times a week. Consistency beats intensity here. You’ll notice improvement quicker than you think. Plus, setting small, achievable goals-like mastering a single letter or stroke-can be incredibly motivating.
Don’t forget to experiment with different paper types. The surface smoothness can affect how the ink flows and can dramatically change your writing experience. While some prefer thin, smooth paper for clean lines, others might enjoy the texture of heavier, textured paper to complement their styles. Don’t be afraid to try out a few different options until you find what suits your preferences best.
Lastly, always keep an open mind and don’t shy away from making mistakes. Each error is a chance to learn something new. Joining a calligraphy community, either online or in-person, can provide you with invaluable feedback, inspiration, and motivation. Share your progress, learn from others, and celebrate your successes. Remember, every master was once a beginner-so enjoy the journey!
By warming up your hands, establishing a regular practice routine, experimenting with different papers, and embracing mistakes, you’ll find yourself becoming more comfortable and skilled with your new pen in no time. Happy writing!
Common Mistakes When Preparing Calligraphy Pens
Getting started with calligraphy can be thrilling, but many beginners stumble right at the starting line, particularly in the preparation of their pens. Avoiding common pitfalls not only enhances your writing experience but also sets the foundation for developing your skills. Here are the most frequent mistakes you might encounter when preparing your calligraphy pen.
One of the biggest mistakes is neglecting to adjust the nib before use. Many new calligraphers assume their pen is ready to go right out of the box. However, it’s essential to test and fine-tune the nib for optimal flow. Check for any manufacturing residue or imperfections. Sometimes a simple rinse or wipe with a damp cloth can enhance performance. If the nib feels too scratchy against the paper, try gently smoothing it with a finer grit sandpaper.
Another common error is not considering ink compatibility with the pen type. Each pen-in particular, fountain pens, dip pens, and brush pens-works best with specific inks. Using the wrong ink can lead to clogged nibs or inconsistent flow. Make sure to choose ink designed for your pen. For instance, if you’re using a dip pen, opt for thick, viscous inks that can sit well in the nib without bleeding excessively.
Mismanaging ink loading is also a frequent problem. Many beginners are too eager and plunge the nib too deep into the ink, causing it to overload and create blobs when writing. A gentle tap in the ink, followed by a quick wipe along the edge of the ink container, is a better approach to ensure you have just the right amount.
Lastly, overlooking proper pen grip and posture can lead to poor results. Holding the pen too tightly or at an awkward angle can produce uneven lines and fatigue your hand quickly. Always maintain a relaxed grip and position your wrist and arm in a way that allows fluid movement. When you take the time to practice your grip and positioning, your calligraphy will naturally improve, enhancing both comfort and style.
In summary, to achieve beautiful calligraphy, take care when preparing your pen. Adjust the nib, choose the right ink, load it mindfully, and maintain a comfortable grip. By avoiding these mistakes, you’ll find yourself well on your way to mastering the art of calligraphy!
Advanced Techniques for Pen Manipulation
Mastering your pen manipulation can elevate your calligraphy from basic to breathtaking. The way you control your pen directly influences the aesthetics of your writing, allowing you to express your unique style. Here are some advanced techniques to enhance your calligraphy experience.
Pressure Control
One of the most crucial aspects of pen manipulation is mastering pressure control. By adjusting how much pressure you apply when writing, you can create varied line thicknesses, adding depth and personality to your letters. Start practicing with simple strokes; press down harder on the downstrokes and lighten up on the upstrokes. This contrast is key to achieving that beautiful, classic calligraphy look. Use practice sheets to track your pressure application; it makes a noticeable difference when you see the results on paper.
Angle Adjustments
Changing the angle at which you hold your pen can dramatically alter your letter forms. Experiment with adjusting the nib’s angle relative to the paper. A typical angle is around 30 to 45 degrees, especially with pointed nibs. Try tilting your pen more or less as you draw different letters. This exploration helps you discover which angles create the most pleasing shapes for your specific style. Document your findings to create a reference for yourself as you continue to refine your technique.
Fluid Movement
Aim for fluid, continuous motions when writing. A common pitfall for many beginners is pausing or hesitating as they form letters. This can lead to uneven strokes and a choppy appearance. To combat this, practice writing entire words or phrases in one stroke without lifting your pen. This approach not only improves your flow but also helps build muscle memory. Use warm-up exercises with repetitive motions or connect letters in practice words to integrate this fluidity into your writing style.
Mixing Techniques
Don’t be afraid to blend different techniques to create a unique flair in your calligraphy. Combine the traditional strokes with modern flair by incorporating flourishing practices-like adding decorative swirls or embellishments to your letters. Try out different nibs or ink colors to see how they affect your writing. Each element can contribute to your style, so allow yourself room for exploration.
By fine-tuning your pen manipulation skills through these advanced techniques, you’ll not only enhance your calligraphy but also gain confidence in your artistic expression. Keep practicing and don’t be afraid to make mistakes; they often lead to your best discoveries.
Inspiring Calligraphy Styles to Try with Your Pen
There’s something magical about transforming ink and paper into art, and calligraphy stands at the forefront of that creative journey. From elegant script to bold modern styles, the possibilities are endless when you dive into different calligraphy styles. Experimenting with various styles not only freshens your approach but also allows you to express your personality and artistic voice. Let’s explore some inspiring styles that will both challenge you and awaken your creativity.
Traditional Copperplate
Copperplate is renowned for its elegant, flowing curves and delicate loops. This style is often characterized by its use of a pointed nib, which allows for variable line widths through pressure control. To get started, focus on mastering the basic strokes that form the letters. Practice each letter in isolation, then move onto connecting them into words. Copperplate can be an excellent introduction for novices-its grace can make even simple text look extraordinary.
Modern Brush Calligraphy
If you’re drawn to a more contemporary look, modern brush calligraphy might be your style. This technique employs a brush pen and allows for a looser, more expressive aesthetic. With brush calligraphy, experimenting with pressure creates beautiful thick and thin transitions. This style embraces imperfections and invites personal flair-no two pieces will look exactly alike. Start by sketching out simple words and try to incorporate swirls and flourishes for an eye-catching effect.
Gothic and Blackletter
For those who lean toward the dramatic, Gothic or Blackletter calligraphy presents a striking option. This style features angular letters and dense forms, conveying a sense of history and tradition. It requires precision, but the results can be stunning and impactful. To dive into this style, spend some time studying the shapes and practicing the unique angles of the letters. Gothic calligraphy works beautifully for invitations or formal documents.
Flourishing Styles
Once you’re comfortable with foundational techniques, don’t shy away from embellishments! Flourishing involves adding decorative swirls and loops around your letters, giving them a sense of movement and elegance. This style is all about creativity; you can even personalize your flourishes to reflect your unique style. Start by practicing simple flourishes in isolation, then gradually integrate them into your scripts.
Don’t hesitate to switch between these styles and let your mood guide you. Each offers a different challenge and can enhance your overall calligraphy skills. Remember, the beauty of calligraphy lies not just in the final interpretation but in your personal journey as you explore these diverse styles. Enjoy the process, celebrate your growth, and let your creativity flow!
Where to Find Calligraphy Pen Accessories
Finding the right accessories for your calligraphy pen can make all the difference in your writing experience. With various options available, it’s essential to know where to look to enhance your calligraphy journey. Local art supply stores often carry a range of calligraphy pens, inks, and maintenance tools. It’s worth visiting these shops not only to shop but also to engage with knowledgeable staff who can offer expert advice tailored to your needs.
Online marketplaces like Amazon and dedicated craft websites are treasure troves for calligraphy enthusiasts. You can find everything from specialized nibs to elegant ink bottles. For nibs, look for brands like Nikko and Hunt, known for their consistency and quality. Don’t forget to read reviews; they provide valuable insights from fellow calligraphers. Additionally, you might want to check out sites that focus specifically on calligraphy supplies, which can offer unique items not found in more general stores.
If you’re keen to explore creative tools, don’t overlook specialty shops that cater to artists. Many of these shops carry unique paper types that can elevate your calligraphy work, like handmade papers or those designed specifically for pen use. Following calligraphy forums or social media groups can also keep you updated on the latest accessories; members often share their finds and recommend rare items.
Lastly, consider looking for local workshops or calligraphy classes. These can be fantastic places not just to improve your skills but also to discover great products that others are using and loving. Access to community expertise can steer you toward the best tools to refine your art. Whether you are just starting or looking to refine your craft further, making the right accessory choices will help you find your unique calligraphy style and achieve stunning results.
Join the Calligraphy Community: Share Your Work
Joining the calligraphy community can transform your creative journey. Sharing your work not only boosts your confidence but also fosters connections that inspire and educate. Whether you’re a seasoned artist or just starting out, the feedback and encouragement from fellow calligraphers can make a world of difference. Imagine crafting a piece, taking a moment to snap a photo, and then posting it online for others to see. The excitement of receiving comments, tips, and praise is incredibly motivating.
Participating in community platforms, like Instagram or specific Facebook groups, can offer you valuable exposure. You might encounter challenges and triumphs shared by others that mirror your own experiences. These platforms are filled with artists showcasing their styles, techniques, and innovations. Contributing to these conversations can lead to collaborations, new friendships, and even invitations to join workshops or group shows. Plus, the sense of belonging is unbeatable; you’ll find yourself part of a larger narrative of creativity.
Another excellent way to share your work is by participating in challenges and contests frequently organized by calligraphy organizations or online communities. These events encourage you to try new techniques or styles, pushing your skills and creativity. Not to mention, there’s often a chance to win prizes or gain visibility in the calligraphy world. You can also keep an eye on local meetups or workshops, where you can share your work in person. These gatherings can provide feedback in real-time and introduce you to mentors who can guide you on your artistic path.
Don’t just keep your creations to yourself-show the world what you can do! Embrace the calligraphy community; share your triumphs, struggles, and techniques. Together, we can elevate the craft, inspire each other, and spread the beauty of handwritten art.
Faq
Q: How do I know if my calligraphy pen is properly prepared for writing?
A: Your calligraphy pen is properly prepared when the nib glides smoothly across the paper without skipping or dragging. Check for ink flow by doing test strokes on scrap paper. If the ink is consistent and flows easily, your pen is ready for use.
Q: Why is it important to clean my calligraphy pen before using it?
A: Cleaning your calligraphy pen before use removes any residual ink or debris that could affect performance. This ensures a smooth writing experience and prevents ink contamination, which can lead to poor line quality. Regular maintenance is key for optimal results.
Q: What should I do if my calligraphy pen won’t load ink?
A: If your calligraphy pen won’t load ink, check the nib for clogs or air bubbles. You can try submerging the nib in warm water for a few minutes, then gently shake it. If the issue persists, ensure you’re using the right ink type for your pen.
Q: When should I replace the nib on my calligraphy pen?
A: You should replace the nib on your calligraphy pen when it becomes worn down, damaged, or starts to produce inconsistent lines. Regularly inspect the nib for any signs of wear, as a good nib is crucial for quality lettering.
Q: Where can I find the best accessories for calligraphy pens?
A: The best accessories for calligraphy pens can be found at art supply stores or online retailers specializing in calligraphy. Look for replacement nibs, specialty inks, and cleaning kits. Consider reviewing community recommendations for reliable sources to ensure quality.
Q: How can I improve the ink flow in my calligraphy pen?
A: To improve ink flow, ensure the nib is clean and free of obstructions. Dipping the nib in warm water can help soften dried ink. Additionally, using high-quality ink compatible with your pen will enhance flow and performance.
Q: What type of paper works best for calligraphy?
A: The best paper for calligraphy is often smooth, non-bleeding, and thick enough to handle ink without bleeding through. Look for specialty calligraphy paper or practice pads designed specifically for inking. Test different types to find your preferred smoothness and weight.
Q: Can I use any type of ink with my calligraphy pen?
A: No, not all inks are suitable for calligraphy pens. Always use ink specifically designed for calligraphy to avoid clogging the nib and to achieve the best results. Check the manufacturer’s recommendations for compatible ink types.
The Way Forward
Now that you’re equipped with the right steps to prepare your calligraphy pen, you’re ready to unleash your creativity and start writing beautiful letters and designs. Remember, mastering your tools is the first step in becoming a calligraphy expert! If you have questions or need further guidance, don’t hesitate to dive into our related articles on choosing the best calligraphy supplies or techniques to enhance your style.
Join our community of calligraphy enthusiasts by signing up for our newsletter! You’ll receive tips, inspiration, and exclusive content delivered straight to your inbox. Ready to explore more? Check out our guide on “Essential Calligraphy Techniques” or learn how to maintain your pens for lasting performance. Each step you take now pushes you closer to your calligraphy goals. Don’t wait-let’s get writing!