Have you ever marveled at the elegant flow of calligraphy? Writing with a glass calligraphy pen can transform your handwritten notes into beautiful works of art. This guide on mastering smooth flowing techniques will help you unleash your creativity while enhancing your penmanship skills. Whether you’re looking to add a personal touch to invitations or simply enjoy the meditative process of writing, learning to wield a glass pen opens up a world of artistic expression. You’ll discover simple tips to improve your grip, choose the right ink, and cultivate a fluid writing style that captivates readers. Let’s dive in and make your writing truly shine!
Understanding Glass Calligraphy Pens: The Basics Explained

Glass calligraphy pens are a unique and inspiring way to express creativity through writing. Unlike traditional nib pens, glass dip pens are crafted from beautiful hand-blown glass, which not only makes them visually stunning but also allows for a smooth writing experience. Many enthusiasts appreciate their ability to create elegant letters and designs, making them perfect for invitations, cards, and personal embellishments. The beauty of glass pens lies not just in their aesthetic appeal, but also in their fluid writing capability, which stems from the glass’s ability to hold ink and deliver it seamlessly to the paper.
When you first hold a glass calligraphy pen, you may notice its lightweight design. This characteristic enhances comfort during prolonged use, reducing the strain that can come with heavier metal pens. Glass pens typically feature a pointed tip that can create varying line widths depending on the pressure applied, making them versatile for different styles of writing. Many beginners are drawn to glass pens because they often come with a ready-to-use dipped ink, such as black ink, which simplifies the setup process and encourages experimentation with techniques and letterforms.
To get started, it’s essential to understand how to care for your glass pen. Proper maintenance will extend the life of your pen and ensure a consistently smooth writing experience. After each use, clean the tip with water to remove any residual ink. Avoid using abrasive materials, as the glass can scratch easily. Store your pen upright in a protective case to prevent damage when not in use. This simple care routine will keep your glass pen in prime condition, ready for your next creative endeavor.
Whether you’re a seasoned calligrapher or just embarking on your artistic journey, understanding the fundamentals of glass calligraphy pens will enhance your ability to create beautiful, flowing letters that captivate and inspire. As you explore different ink colors and techniques, the possibilities for your artistic expression are endless.
Choosing the Right Glass Calligraphy Pen for Your Style

When it comes to choosing a glass calligraphy pen, there are several factors to consider that can dramatically affect your writing experience and the overall quality of your work. One of the most important aspects is the pen’s design and functionality. While many glass calligraphy pens are visually stunning, it’s crucial to assess how different shapes and sizes align with your personal style. For instance, some pens offer a straight design for stability, while others come with curves that provide aesthetic appeal but might be less comfortable for extended periods of use. Finding a balance between style and comfort can make a big difference as you hone your skills.
In addition, consider the tip of the pen. The tip’s shape and size can greatly influence the line thickness and the ease of creating various styles. Generally, a pen with a more pointed tip allows for finer lines and detailed work, perfect for intricate designs. Conversely, broader tips can provide bolder strokes, which are great for larger pieces or signage. Think about what you plan to create – whether it’s delicate invitations or larger artworks – and choose a pen that complements your intended projects.
Ink Compatibility is another vital factor. Not every glass pen will perform equally well with all types of ink. While most casual users stick with basic water-based inks, exploring oil-based or metallic inks can add unique flair to your creations but may require a pen specifically designed to handle them. Always check whether your chosen glass pen is suitable for the ink you want to use, as improper combinations can lead to frustrating results and diminished performance.
Finally, don’t overlook the joy of personalization. Many artists love selecting glass pens that reflect their personality. Some manufacturers offer customization options – from the color of the glass to decorative patterns – which can make for an inspiring writing tool. Remember, your calligraphy pen isn’t just a tool; it’s an extension of your artistic self. Select one that resonates with you both in function and form, and you’ll find that your desire to create beautiful calligraphy will flourish.
When embarking on your journey with glass calligraphy, it’s about finding that perfect pen that feels right in your hand and enhances your unique voice as an artist.
Essential Supplies for Glass Calligraphy Success

To truly excel in glass calligraphy, having the right supplies at your fingertips can make all the difference. While the elegant glass pen is undoubtedly the star of the show, it’s the support tools and materials that create an environment conducive to creativity and smooth writing. Imagine settling down to write with a beautifully crafted glass pen, only to find yourself struggling with inadequate ink or a subpar workspace-the whole experience can quickly become frustrating. So, let’s dig into what you need to set yourself up for success.
Start with quality ink. Not all inks are created equal, and the choice of ink can significantly affect your flow and the finished look of your work. Opt for water-based inks as a reliable starting point; they’re easy to clean and suitable for most projects. If you’re feeling adventurous, metallic or oil-based inks can add eye-catching flair, but ensure your pen is compatible to prevent clogs. A cleaning cup or pot is also essential to keep your pen in top condition, especially if you switch colors frequently. This prevents any build-up that might disrupt that smooth flow we all strive for.
Next, consider your writing surface. Smooth, high-quality paper can enhance your experience by allowing the nib to glide effortlessly across the page. Look for papers specifically designed for calligraphy-these often have the right texture that allows the ink to flow beautifully without bleeding or feathering. Additionally, a flat and stable writing surface is crucial; a well-lit, uncluttered area will help you focus on your penmanship.
Lastly, don’t underestimate the power of practice tools. A calligraphy practice pad can help build your skills without the pressure of creating a perfect piece every time. You might also find it helpful to invest in guides or templates that can align your letters and maintain a consistent style. Remember, high-quality materials don’t just elevate your work; they enhance the joy of the process itself. With the right supplies, you’re not just writing; you’re creating masterpieces.
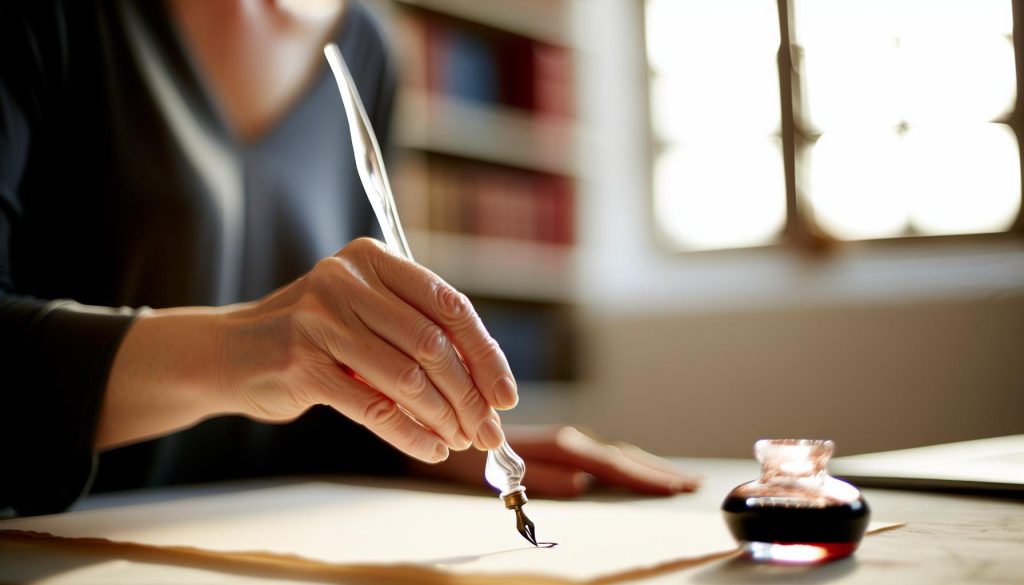
Mastering the Grip: How to Hold Your Glass Pen
When you pick up a glass calligraphy pen, it can feel like holding a delicate work of art. But the way you grip it can drastically impact your writing experience and the quality of your output. A strong grip isn’t just about control; it affects your flow, your letterforms, and ultimately, your enjoyment of the process. Here’s how to master the grip for smooth flowing techniques.
Start by holding the pen in a relaxed yet firm manner. Your fingers should be positioned about a third of the way down the barrel, allowing for optimal balance. This positioning provides stability without restricting your movement. Avoid gripping too tightly-overexertion leads to tension, which translates to shaky lines. Instead, think of it as holding a small bird; you want enough pressure to keep it from flying away but not so much that you harm it.
As you guide the pen across the page, maintain a relaxed wrist. Your wrist should pivot smoothly, enabling your hand to move freely while the pen stays in contact with the surface. A common mistake is locking the wrist or using too much finger movement, which can result in uneven line quality. Imagine your hand as an artist’s brush; fluidity is key to achieving graceful strokes. To encourage this flow, practice light pressure when beginning, and add intensity only where necessary to highlight or shade.
Also, experiment with different grips and angles. Some calligraphers prefer a 45-degree angle to the paper for optimal ink flow; others tilt slightly to find their comfort zone. Don’t hesitate to find what feels right for you. Incorporating these adjustments into your practice will help you discover your unique style while enhancing your writing technique.
Lastly, remember that mastering the grip is a personal journey. Spend time getting to know your pen, and allow yourself the freedom to iterate on your technique. With continual practice and minding these tips, you’ll soon see a noticeable improvement in both the aesthetics of your writing and the joy you experience through creating beautiful calligraphy.
Achieving Smooth Flow: Techniques for Practice

To create smooth, flowing lines with a glass calligraphy pen, practice is key-but so is understanding the right techniques. The flow of your ink is influenced by your grip, the angle of your pen, and your choice of ink. Start by experimenting with different paper types to find one that complements your style. For instance, smooth, heavyweight papers allow for easier gliding, while textured papers can offer interesting effects but may require more pressure.
One effective technique for achieving smooth flow is to practice with simple strokes. Begin with basic lines, circles, and loops. Focus on maintaining an even pressure and speed. This will help you understand how the pen interacts with the ink and the paper. A consistent speed is essential; moving too quickly can lead to skipped strokes, while moving too slowly may cause the ink to blot. As you become comfortable, gradually incorporate more complex letter forms.
Another tip is to always keep your ink supply and pen nib clean. A clogged nib can disrupt the flow and lead to uneven lines. If you notice the ink isn’t flowing smoothly, pause to clean your pen before continuing your work. Remember, consistent practice with clean tools leads to consistent results.
To truly master the art of smooth calligraphy with a glass pen, challenge yourself by practicing different pressure techniques. Press harder for thicker strokes and lighter for finer ones. This dynamic range will add elegance and flair to your writing. Over time, linking these strokes together will enhance your overall flow, leading to more natural and beautiful lettering.
Creating Beautiful Letter Forms with Glass Calligraphy
Creating elegant letter forms with a glass calligraphy pen is both an art and a skill that can turn everyday writing into beautiful expressions. One of the most exciting aspects of using a glass pen is the unique character each stroke can convey, making your work stand out. While it may seem daunting at first, the key lies in understanding the relationship between your hand movements, the pen, and the ink flow.
Start by practicing basic shapes and forms. Focus on smooth, consistent movements as you create loops, curves, and straight lines. This allows you to familiarize yourself with the pen’s control and responsiveness. As you get comfortable, begin integrating these shapes into letters. For instance, the loop in the letter “l” can be a great transition into crafting the swirls of a cursive “a.” Remember to maintain a steady hand and keep the same angle-this will ensure uniformity across your lettering.
Building on consistent practice, explore different styles of lettering. Experiment with variations by altering the pressure you apply with the pen. Light touches can give you fine, delicate strokes, whereas a firmer grip results in bolder, thicker lines. Mix these techniques to develop a style that feels true to you. Incorporating a playful mix of both thick and thin lines emphasizes elegance and draws the viewer’s eye.
Tools and Techniques
Make sure you’re using the right paper, as its texture significantly impacts your penmanship. Smooth papers allow the ink to flow freely, giving you that fluid motion that’s essential for beautiful letter forms, while rougher papers can introduce textures that add personality to your designs. Don’t hesitate to explore different ink types and colors, too. Just like a painter chooses their palette, your choice of ink can elevate your calligraphy.
Ultimately, the journey of mastering beautiful letter forms with a glass calligraphy pen is about finding your voice. Each flourish, curve, and stroke tells a part of your story. Keep practicing, remain patient with yourself, and soon enough, your letters will not only flow smoothly but also captivate those who see them.
Color and Ink: Choosing the Best Options for Your Work
Choosing the right inks and colors for your glass calligraphy practice can make a significant difference in your final results. Not only does the ink impact how smoothly your pen glides, but it also shapes the overall aesthetic of your work. A common starting point is to select inks specifically designed for use with glass pens; these are often more fluid and provide a smoother flow. Let’s break down the essentials to enhance your calligraphy experience.
When it comes to color selection, consider the purpose of your project. Are you creating invitations, greeting cards, or personalized art pieces? Your choice of color palette should align with the tone and message you wish to convey. For instance, soft pastels can evoke a sense of elegance and calmness, while vibrant hues can bring energy and excitement to your work. Experimenting with a variety of colors can help you identify which ones resonate with your personal style and the sentiments of your audience.
Inks also come in different formulations, such as dye-based and pigment-based. Dye-based inks are generally more vibrant and ideal for smooth, fluid lines. On the other hand, pigment-based inks provide more durability and are less likely to fade over time. In many cases, using a combination of both can offer you the flexibility to achieve different effects in your lettering. It’s worth noting that you’ll want to test different inks out on your chosen paper before committing them to your project, as the interplay of ink and paper can vary significantly.
Lastly, don’t hesitate to incorporate metallic or shimmering inks for added flair. These can highlight aspects of your work and lend a unique touch to your lettering. Just remember to shake or stir them well before use to ensure even application. Whatever combinations you explore, be intentional about your choices-each color and ink can tell its own story and reflect your artistic voice. Keep practicing and experimenting, and you’ll soon find the perfect match for your glass calligraphy.
Troubleshooting Common Issues with Glass Calligraphy
Using a glass calligraphy pen can feel like wielding a magic wand, but it’s not without its hiccups. Whether you’re a novice or a seasoned artist, encountering issues is part and parcel of the learning process. Let’s dive into some common challenges and how to overcome them, keeping your creative flow uninterrupted.
One of the most prevalent problems is the pen’s inability to maintain ink flow. You might find that the ink just won’t activate or that it dries too quickly on the nib. This often happens if the ink is too thick or your paper isn’t compatible. To tackle this, make sure to use a liquid ink specifically designed for glass pens, which generally has better consistency. If the ink seems too thick, try diluting it slightly with water. Also, ensure your paper is smooth and absorbent-watercolor paper can be a great choice as it allows smooth gliding.
Another frustrating issue is ink blotting, which can mar your beautifully crafted letters. This usually happens when too much ink collects at the nib. To combat this, dip the pen lightly in the ink-just enough to coat the nib without overloading it. It’s better to re-dip frequently as you write, rather than risk an unsightly blot. Adjusting your writing pressure can help too; inconsistent pressure can lead to uneven lines and excess ink, so practice finding the right balance.
Lastly, if you’re struggling with your grip or the angle of the pen, it can hinder the control you have over your strokes. Experiment with different grips to find what feels comfortable. Ideally, hold the pen at about a 45-degree angle to the surface while keeping it relaxed in your hand. Practice writing basic shapes and letters to get accustomed to how the pen responds at this angle.
By addressing these common issues head-on and embracing the learning curve, you’ll find that the beauty of glass calligraphy comes with time and patience. Keep your workspace tidy, your tools calibrated, and don’t hesitate to experiment until you find your rhythm. Remember, every stroke is a step towards mastery.
Advanced Techniques for Stunning Calligraphy Effects
Experimenting with a glass calligraphy pen can lead to stunning results that will make your work truly stand out. Let’s dive into some advanced techniques that offer a world of creativity at your fingertips. The beauty of glass calligraphy lies in its versatility and the myriad of effects you can achieve with a bit of practice and exploration.
One effective way to create unique textures is by varying your ink flow. When you dip the pen and start writing, try adjusting the pressure you apply. Lighter strokes will produce thinner lines, often giving a delicate feel to your letters, while firmer pressure can create bold, solid lines that capture attention. Additionally, changing your speed can influence your line quality. Slow strokes give you more control and precision, allowing for detailed embellishments, while faster strokes can result in a more spontaneous and fluid appearance.
Layering colors can introduce depth to your lettering. After laying down a base color, allow it to dry completely before overlaying another hue. This not only enhances visual interest but can also create a shadow effect. For example, using a darker ink on one side of your letters brings them to life, creating an illusion of dimension. Don’t be afraid to mix inks-blending two or more colors can result in beautiful ombré effects that add richness to your work.
Additionally, incorporating different surfaces can greatly affect the outcome of your calligraphy. Experimenting with textured papers, such as handmade or watercolor paper, will create varied ink absorption and line quality. If you’re looking for a vintage feel, consider using parchment or a lightly textured surface. Remember to adapt your ink choices accordingly; some inks behave differently depending on the paper’s texture. It’s all about trial and error, so keep a record of your combinations and techniques for future reference.
To visually enhance your designs, look into techniques like ink splattering or using a brush pen to add additional flourishes and accents around your lettering. This approach not only fills space creatively but adds a dynamic element to your calligraphy projects. Also, don’t shy away from using your pen for doodling or sketching alongside your lettering. The smoothness of a glass pen can turn simple designs into intricate works of art, allowing your imagination to flow freely.
Lastly, consider joining online communities or forums dedicated to calligraphy. Sharing your work and exploring others’ styles can ignite new ideas and motivate you to try new techniques. Remember, the more you practice and engage with the craft, the more stunning your calligraphic creations will become.
Inspiration: Creative Projects Using Glass Calligraphy
When it comes to exploring the creative potential of glass calligraphy pens, your imagination is the only limit. These elegant tools can transform ordinary writing into breathtaking art, allowing you to produce everything from delicate invitations to stunning wall art. Here are some inspiring project ideas that will not only spark your creativity but also showcase the versatility of glass calligraphy.
One popular project is crafting personalized greeting cards. Start by selecting a high-quality watercolor paper to ensure a smooth flow as you write. Experiment with different ink colors to reflect the occasion-use vibrant hues for celebrations or muted tones for more formal events. Adding hand-painted embellishments or watercolor backgrounds can elevate your cards to a new level, making them truly one-of-a-kind gifts.
Another exciting avenue is creating decorative quotes or poetry prints. Choose a meaningful quote or a few lines from your favorite poem, and consider how to layout your text creatively. Make use of varying font sizes and styles, and integrate embellishments like floral designs or geometric patterns to frame the words. The fluid motion of a glass pen can beautifully convey the rhythm of your chosen text, transforming it into a piece of art that can grace any wall.
For those interested in event planning, customized place cards or table signage is a fantastic way to elevate your gatherings. Use your glass pen to write guests’ names in a flowing script, pairing them with decorative elements that match your theme. This small touch can make a big impression, adding an elegant flair to any event from weddings to dinner parties.
Last but not least, consider integrating glass calligraphy into your scrapbooks or Journals. Use it to highlight key moments or thoughts, pairing your writing with doodles or other forms of artistic expression. The tactile experience of the pen against paper can be incredibly satisfying, providing a moment of mindfulness as you create.
Adventuring into these creative projects not only hones your skills but also gives you the chance to share your passion for glass calligraphy with others. Join online communities to showcase your work, get feedback, or find inspiration from fellow artists. Remember, each project is a step towards mastering your craft-embrace the journey and let your creativity flow!
Caring for Your Glass Calligraphy Pen: Maintenance Tips
The right care for your glass calligraphy pen can make a world of difference in your writing experience. These beautiful tools deserve attention and maintenance to keep them performing at their best. A well-maintained glass pen extends its life and ensures that you get that smooth, flowing technique you’re aiming for every time you sit down to write.
First and foremost, cleaning your glass pen after each use is crucial. Letting ink dry inside the nib can lead to clogs, which can ruin the flow of your writing. A simple rinse under warm water usually does the trick. For stubborn ink, gently swabbing the nib with a soft cloth or using a small brush can help. Make sure to run it under the water until you see no color bleeding out, then gently dry it with a lint-free cloth. Avoid using any abrasive materials that could scratch the glass.
It’s also important to store your glass pen correctly. Keeping it upright in a pen holder or a protected case will prevent any accidental breaks, which can be heartbreaking considering the beauty of these instruments. If you have several pens, consider a designated storage area to keep them organized and safe. A padded case not only protects them but can also be a delightful way to display your collection.
Lastly, pay attention to the quality of your inks. Poor-quality or overly viscous inks can create clogs and a less-than-ideal writing experience. Opt for inks specifically designed for dip pens or calligraphy, as they flow better and are easier to clean out of the nib. Experimenting with different brands can help you find the perfect match for your pen.
By incorporating these maintenance tips, you’ll not only enhance the lifespan of your glass calligraphy pen but also elevate the quality of your writing. With a bit of care, your glass pen can turn lettering into a fluid, artistic experience that you’ll cherish every time.
Join the Community: Sharing Your Work and Learning More
Connecting with fellow enthusiasts can be one of the most rewarding aspects of pursuing glass calligraphy. Whether you’re a seasoned pro or just starting out, sharing your work and experiences not only fosters growth but also ignites creativity. Many online communities, social media groups, and forums exist where you can showcase your projects, seek advice, and collaborate with others who share your passion for this elegant art form.
Social media platforms like Instagram and Facebook have vibrant calligraphy communities. Use hashtags like #GlassCalligraphy or #CalligraphyCommunity to discover inspiring work from others and to share your own creations. Engaging in these spaces can lead to valuable feedback and encouragement. Participating in challenges or themed showcases within these communities can also push you to experiment with new techniques or styles, further enhancing your skills.
It’s also worth considering attending local workshops or online classes. Not only do they provide structured learning opportunities, but they allow you to meet like-minded individuals who can become lifelong friends or mentors. Many calligraphy artists share their tutorials and insights through platforms like YouTube or Skillshare, offering a wealth of knowledge right at your fingertips.
Remember, the journey of improving your glass calligraphy skills is always more enjoyable when you’re part of a community. Sharing your struggles, successes, and techniques fosters a supportive environment that benefits everyone involved. Don’t hesitate to reach out, ask questions, and celebrate the art with others. In doing so, you’ll enrich your own practice and perhaps inspire someone else along the way.
FAQ
Q: How can I improve my control when writing with a glass calligraphy pen?
A: To enhance your control with a glass calligraphy pen, practice holding the pen lightly yet firmly. Experiment with different grips and angles to find what feels comfortable. Additionally, try writing on various surfaces to discover which ones allow for smoother ink flow, as this can significantly affect control.
Q: What type of ink is best for glass calligraphy pens?
A: The best ink for glass calligraphy pens is generally a high-quality, fluid calligraphy ink or a specially formulated glass pen ink. These inks provide smooth flow and vibrant color, making your lettering look stunning. Always test your chosen ink on scrap paper first to ensure it behaves well with your pen.
Q: How do I troubleshoot ink flow issues with my glass calligraphy pen?
A: If you’re experiencing ink flow issues, first check if the nib is clean and free of dried ink. If necessary, soak the nib in warm water or an appropriate cleaning solution. Ensure your ink is fluid; adding a drop of distilled water can help if it seems too thick. Adjust your writing angle to see if that improves the flow.
Q: Why is my glass calligraphy pen skipping while I write?
A: Skipping can occur when the nib is clogged, or if the paper is too rough. Ensure your nib is clean, and try using smoother, higher-quality paper designed for calligraphy. Regularly dipping your pen in ink can also help maintain a steady flow. Consider your writing speed; slowing down may improve performance.
Q: Can I use a glass calligraphy pen for everyday writing?
A: While glass calligraphy pens can be used for everyday writing, they are primarily designed for artistic lettering. Their nibs and ink flow are optimized for calligraphy styles rather than quick, casual writing. For everyday use, consider a fountain pen or gel pen for more convenience and efficiency.
Q: How do I select the right nib size for my glass calligraphy pen?
A: Choose a nib size that aligns with your intended lettering style; finer nibs are ideal for intricate details, while broader nibs are better for bold strokes. If starting, a medium nib offers versatility for both thick and thin lines, allowing you to experiment before committing to a specific style.
Q: What maintenance is required for glass calligraphy pens?
A: To maintain your glass calligraphy pen, clean the nib regularly after each use to prevent ink buildup. Store your pen upright or with the nib protected to avoid damage. Periodically check for any chips or cracks in the glass and handle the pen with care to prolong its lifespan.
Q: How long does it take to master writing with a glass calligraphy pen?
A: Mastering glass calligraphy varies by individual but generally takes consistent practice over weeks or months. Regular exercise of writing techniques, experimenting with styles, and seeking feedback can speed up your progress. Remember, patience and persistence are key to developing these artistic skills.
Future Outlook
Now that you’ve mastered the smooth flowing technique with your glass calligraphy pen, it’s time to put it into action! Practice regularly to hone your skills, and don’t hesitate to share your creations in the comments below. Have questions or need tips on selecting the right ink? Check out our guide on Ink Choices for Calligraphy or explore Creative Calligraphy Projects for inspiration. Remember, every stroke you take builds your confidence.
Feeling inspired? Join our newsletter for exclusive tips and resources to elevate your calligraphy art, or dive into our product recommendations to discover the best tools for your artistic journey. Keep writing, keep exploring, and let your creativity soar! Your next masterpiece is just a pen stroke away!