Did you know that the way you hold your calligraphy pen can completely transform your writing experience? The right grip not only enhances your control but also minimizes fatigue and opens the door to more fluid, expressive strokes. Many aspiring calligraphers struggle with their grip, leading to stiffness and frustration. But it doesn’t have to be this way! By mastering the correct pen grip, you can significantly improve your technique and enjoy the art of calligraphy more deeply. In the following sections, we’ll explore simple yet effective ways to position your fingers for optimal comfort and precision. Let’s dive in and discover the grip that really does change everything!
How the Right Grip Impacts Calligraphy
The way you hold your calligraphy pen can dramatically change your writing experience. The right grip not only affects the fluidity of your strokes but also impacts the precision of your lettering. Imagine trying to write a beautiful ‘B’ while awkwardly holding the pen; it’s likely to turn into a scribble. A proper grip helps maintain control, allowing for both bold flourishes and delicate lines. This is something any calligrapher, from beginner to expert, quickly learns.
Getting your grip right means understanding the mechanics of your hand and how they interact with the pen. A relaxed hand will move more fluidly, while a tense grip can hinder your creativity and consistency. Make sure your fingers cradle the pen comfortably, with the nib positioned just right against the paper. Your hand should pivot around the grip, using your fingers rather than your wrist to guide the pen. This control is crucial, particularly when transitioning between different styles, as each one demands slight adjustments in how you hold your tool.
Remember, it’s not just about the grip-it’s about finding your unique stance that works for you. Some artists might prefer a tighter hold for sharper strokes, while others might thrive with a looser, more fluid grip for sweeping curves. Experiment with how you hold your pen until it feels natural; this will boost confidence and ultimately your calligraphy skills. As you practice, your grip will evolve, and with time, you’ll discover the sweet spot that unleashes your creativity on paper.
Understanding Different Calligraphy Pen Types
When diving into the world of calligraphy, the type of pen you choose can dramatically influence your writing experience and the overall outcome of your work. Different calligraphy pens are designed for specific styles and techniques, each offering unique advantages and challenges. Understanding these pen types can help you select the best option to enhance your grip and improve your craft.
Traditional Calligraphy Pens
These typically include dip pens and nib pens, which allow for a variety of line widths depending on the pressure applied. A good dip pen consists of a handle and interchangeable nibs. The flexibility of the nib allows for expressive strokes, but it requires a light touch. The key to mastering these pens is developing a comfortable grip that gives you control without excessive tension.
- Dip Pens: Ideal for projects requiring rich, varied line work. They hold ink in the nib, so re-dipping is necessary.
- Nib Pens: With fixed nibs, these are more consistent for beginners and perfect for practicing foundational skills.
Brush Pens
Brush pens combine the functionality of a traditional brush with the convenience of a pen. They’re filled with ink, and the bristles enable a flow of ink that varies with pressure and angle. These pens are fantastic for calligraphers who love fluid, brush-like strokes. It’s important to adapt your grip slightly to use these pens effectively – a looser grip is often beneficial to allow the brush tip to flex naturally.
Felt Tip Calligraphy Pens
If you’re just starting out, felt tip pens might be your best bet. They’re user-friendly and ideal for practicing letter forms without worrying about nib maintenance. Because they require a more controlled and consistent grip, they can help build muscle memory for the more nuanced controls of traditional pens later on.
Automatic Pens
These pens are less common but can be useful for specific styles where consistent line width is needed without the fuss of traditional nibs. They often have a cartridge system and are perfect for quick, clean scripts.
When selecting a calligraphy pen, consider the style of calligraphy you wish to practice. Each pen type presents different challenges, and finding the right one can help you develop a grip that feels natural and increases your confidence as you create. Test various options until you discover which pen type complements your unique grip and enhances your artistic expression. Remember, the right tools can make all the difference in your calligraphic journey.
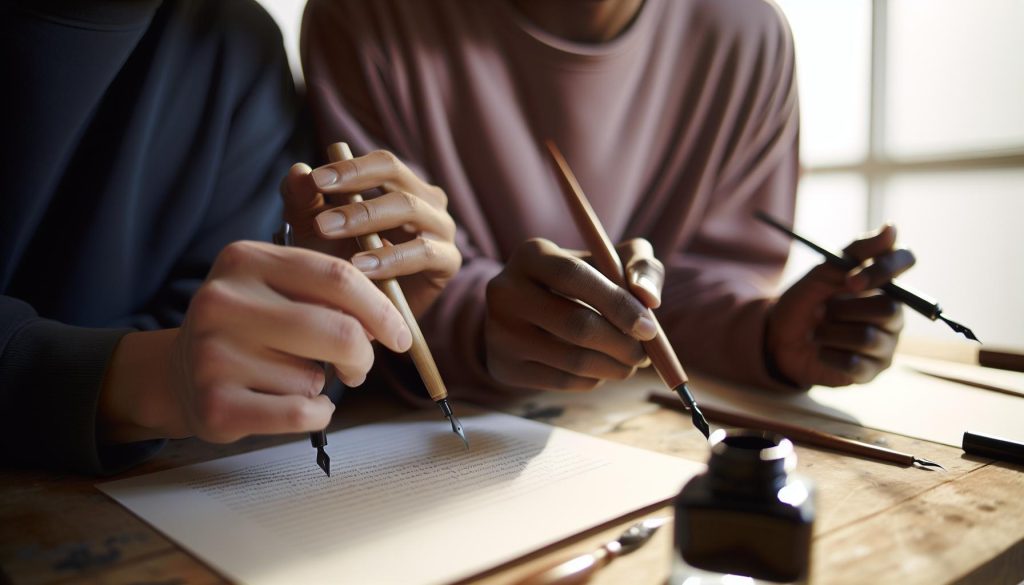
The Essential Components of a Correct Grip
A solid grip can transform your calligraphy experience dramatically. Many beginners overlook this crucial aspect, often leading to frustration or unsatisfactory results. When you hold your pen correctly, you gain better control, allowing for more fluid and precise strokes. So, what exactly makes for an ideal grip in calligraphy?
The key components of a correct grip revolve around relaxation and positioning. First, hold the pen lightly; a rigid grip can lead to cramping and fatigue. Your fingers should wrap around the pen, but there should be no death grip. This relaxed hold allows the pen to move fluidly across the page. Your index finger, typically positioned just below the nib or on the grip, should be slightly bent-not rigid. This slight bend allows for increased sensitivity and control as you maneuver your pen.
Next, consider the alignment of your hand and wrist. Your wrist should remain relaxed, positioned at a comfortable angle. Too much tension will not only restrict movement but also affect your letterforms. A good rule of thumb is to keep your wrist level and let your hand guide the pen with fluid movements.
Lastly, don’t forget about the thumb’s role. Your thumb acts as a stabilizer, providing support for the pen while allowing it to pivot slightly. This dynamic helps in executing smooth curves and sharp angles, essential components in many calligraphy styles.
In summary, achieving that golden grip combines relaxation, proper positioning, and awareness of your body’s dynamics. Practice these fundamentals consistently, and you’ll find your calligraphy skills blossoming with every stroke you create.
Step-by-Step Guide to Holding Your Pen
To truly master calligraphy, how you hold the pen can make all the difference. A proper grip can transform your writing from clumsy to elegant, allowing for precision and fluidity. Here’s a straightforward guide to help you hold your calligraphy pen like a pro.
Start by selecting the right pen for your style. If you’re using an oblique pen, you’ll want to grip it differently than a straight pen. Now, pick up your pen and hold it lightly-think of it as if you’re holding a delicate flower. Your fingers should wrap around the pen gently, avoiding a death grip that leaves your hand tense.
Next, position your index finger: it should sit comfortably just below the nib or on the grip. Aim for a relaxed bend in your finger, allowing for better control and response as you move your pen across the page. Your thumb plays a crucial role too-it stabilizes the pen and allows for slight pivots essential for those artful curves.
Keep your wrist relaxed and level, avoiding any awkward angles. A good tip is to rest your hand on the page, using your fingers to guide the pen while your wrist remains loose. As you practice, experiment with different positions and grips to find what’s comfortable for you. With time and patience, your grip will become second nature, leading to beautiful lettering that reflects your unique style.
Common Mistakes in Calligraphy Grip
Holding a calligraphy pen correctly seems simple, but many aspiring calligraphers make a few common mistakes that can hinder their progress. One of the biggest issues is gripping the pen too tightly. It might feel like you need a firm hold for control, but the opposite is true. A death grip only leads to tension in your hand and wrist, resulting in shaky lines and a rigid, unexpressive style. Instead, visualize your grip as a gentle embrace-light enough to maintain fluidity but steady enough to guide the pen.
Another frequent misstep is positioning the fingers incorrectly. Many beginners place their fingers too far down the barrel of the pen, which can limit movement and create awkward angles. The index finger should rest comfortably just below the nib, allowing proper leverage and flexibility. Ensure your thumb is in a supportive role, stabilizing the pen while still allowing for the necessary pivoting needed for ornate strokes.
It’s also important to keep your wrist relaxed and your hand properly positioned. A stiff wrist can lead to fatigue and restrict your ability to create smooth curves. Consider resting your hand on the page, using your fingers to guide rather than forcing your movements. Check your posture too; sitting up straight can make a world of difference in creating a relaxed yet controlled environment for writing.
Lastly, many people forget to reassess their grip as they progress. As you gain confidence, your grip may need adjustments. Regularly check in on how you’re holding your pen, and don’t hesitate to experiment with slight variations. Grounding yourself in these principles can pave the way for more expressive and elegant typography.
Advanced Techniques for Pen Control
Creating fluid, artful strokes in calligraphy isn’t just about the nib or ink; it’s largely about how you wield your pen. Mastering your grip can dramatically improve your control and the quality of your letters. One advanced technique you can use is practicing varied wrist movements. Instead of just moving your fingers or your whole arm, try using your wrist as a pivot point. This allows for greater fluidity in your movements. While keeping your fingers relaxed on the pen, let your wrist guide your hand, facilitating smooth curves and elegant flourishes that can distinguish your work.
Another effective method is to incorporate light pressure with your fingertips. Experiment with how much pressure you apply as you write; adjustments can produce different line thicknesses and create a fascinating texture in your script. For example, press slightly harder on downward strokes and ease off on upward movements. This kind of pressure control adds life to your lettering and can make even simple letters appear more dynamic.
Taking this a step further, you might want to explore the concept of muscle memory through repetitive practice. Develop a repertoire of exercises focusing on specific letterforms or embellishments, paying attention to how your grip feels throughout. For instance, practice drawing the same letter repeatedly, modifying your grip slightly each time. This practice not only refines your motor skills but also helps you discover the most comfortable and effective grip pattern uniquely suited to your style.
Lastly, observing seasoned calligraphers can lend insights into advanced techniques. Analyze how they hold their pens and execute strokes; informal sketches or even online tutorials can reveal nuances in grip and movement that aren’t immediately obvious to the untrained eye. Remember, adapting what you learn to suit your personal style is key. So, immerse yourself in the practice, be patient with your progress, and let your grip evolve-after all, it’s not just about how you hold the pen, but how you let it dance across the page.
Adapting Your Grip for Different Styles
Adapting your grip for different calligraphy styles can truly transform the way your letters come to life. Each style, from Gothic to Copperplate, has its own nuances that require slight adjustments in how you hold your pen. For instance, when practicing more angular scripts like Gothic, you may find that a firmer grip allows for greater precision and control with those sharper edges. Conversely, for fluid, sweeping styles like Spencerian or modern calligraphy, a looser grip can facilitate the graceful curves and flowing motions typical of those scripts.
Experimenting with the angle of your pen also plays a huge role. In traditional Copperplate calligraphy, you’ll want to hold the pen at a specific angle-usually around 45 degrees-to achieve that signature slant. If you’re transitioning to a more contemporary style, such as brush lettering, you might relax that angle, allowing for broader strokes and more variation in line weight.
Another aspect to consider is your comfort level. As you explore different styles, take note of how the pressure and tension in your fingers change. It’s beneficial to adjust grip pressure based on the style. For instance, while writing with a dip pen for Copperplate, a lighter touch can lead to more delicate lines, while a firmer grip can lend strength to your Gothic lettering.
Ultimately, the key is to stay flexible and attentive to how each style feels as you write. Don’t hesitate to let your grip evolve-what works for one style may not be ideal for another. Keep a journal to track your practice sessions, noting the specific grip and angles you used for each style. This not only helps build muscle memory but also keeps the process engaging as you discover what resonates best for your individual expression in calligraphy.
Ergonomics: Preventing Hand Fatigue
Writing for extended periods can turn even the most passionate calligrapher into a mere scribbler when hand fatigue sets in. Adopting the right pen grip isn’t just a stylistic choice; it can significantly enhance your comfort and stamina. An ergonomic grip fits the natural contours of your hand, reducing muscle strain and preventing discomfort that often derails creative sessions. Imagine effortlessly gliding your pen across the page, with your hand feeling as light as air rather than bearing the weight of your every stroke.
To avoid cramping and fatigue, you should pay attention to three core areas: grip pressure, hand positioning, and writing posture. First, apply just enough pressure to maintain control of the pen without over-exerting your hand. Tension is the enemy here. A relaxed grip allows for fluid movement, which is crucial for creating those elegant flourishes in your calligraphy. Secondly, consider where your fingers are positioned on the pen. Ideally, your fingers should rest comfortably without excessive clenching. When holding the pen, your index finger should be placed along the barrel, while the thumb and middle finger support the pen from the opposite sides.
Lastly, let’s not forget about your overall posture. Sit comfortably with your back straight and your feet flat on the floor to create a solid foundation. A tilted or hunched position can create additional pressure in your hands and arms. Consider using a slanted writing surface; it can help you maintain a more natural wrist position, which reduces strain over time.
By integrating these ergonomic principles into your practice, you’ll not only experience less fatigue but also greater control and precision. As you continue exploring different styles of calligraphy, remember that adjusting your grip and posture is vital in adapting to the demands of each script. So, take a moment to check in with your body as you write; staying aware of how you hold your pen could just be the key to unlocking your potential in this beautiful art form.
Tools to Enhance Your Calligraphy Grip
To truly elevate your calligraphy game, the right tools can make all the difference. A supportive grip is not merely a matter of aesthetics; it can significantly enhance your writing experience, allowing for better control and fewer distractions from discomfort. Whether you’re crafting a delicate script or laying down bold letters, using the right grips and accessories can help you find that sweet spot between comfort and technique.
One of the simplest yet most effective tools you can invest in is a pencil grip designed specifically for calligraphy pens. These grips can help position your fingers correctly, encouraging a relaxed hold that facilitates fluid movements. You’ll find options like the traditional tripod grip that keeps your fingers from slipping or overstressing during those extended writing sessions. If you often feel the need to hold your pen too tightly, consider grips that provide cushioning and guidance, allowing you to apply less pressure without sacrificing control.
Additionally, there are specially designed calligraphy pens that come with ergonomic features built directly into the design. Look for pens with a broader barrel or textured surfaces that naturally fit the contours of your hand. Such pens can alleviate finger strain and promote a more relaxed posture while writing. If you’re using dip pens or other pointed nibs, make sure to choose holders that are comfortable for prolonged use, as they will help reduce fatigue and enhance precision.
Don’t overlook the power of writing surfaces and slant boards. A slanted angle can naturally alter your grip, aiding wrist alignment and making pen strokes smoother. Some calligraphers even personalize their writing environments by adjusting their seating and desk heights to suit their comfort levels, proving that the right tools extend beyond just the pen itself. By experimenting with these tools and finding what feels best in your hand, you’ll not only enhance your grip but also unlock new potentials in your calligraphy work.
Practicing Grip Techniques with Exercises
To take your calligraphy skills to the next level, practicing grip techniques is essential. A proper grip can drastically change how your letters flow, your control over the pen, and ultimately, the beauty of your writing. Imagine being able to glide your pen effortlessly across the page, creating stunning strokes with ease. That’s what a refined grip can do for you.
Start with simple exercises to build muscle memory. One effective technique is the ‘Finger Drill’: hold your pen lightly with three fingers-the thumb, index, and middle finger-while the ring and pinky rest comfortably on your hand. Practice lifting your pen slightly while pressing down gently with your fingers. This will encourage a loose grip and teach your fingers to work independently, allowing you more freedom in your movements. Aim for control, not pressure; even a relaxed grip can provide excellent stability if you practice consistently.
Next, try the ‘Circle Exercise’. On a blank sheet of paper, draw small circles, varying the size as you go. Focus on maintaining that relaxed hold and keep your wrist fluid. This exercise not only helps with grip but also promotes the natural motion needed for dynamic strokes. After you feel comfortable with circles, progress to writing basic strokes or letters, integrating your grip practice into actual calligraphy work.
Finally, remember to check in with your posture and writing surface. Adjust your seating and the angle of your paper to find what feels natural. If you feel tension in your hand or wrist, pause and shake it out. Regular breaks during practice allow you to refresh and reassess your grip, ensuring you maintain comfort and control.
These exercises aren’t just about learning to hold a pen; they’re about cultivating a connection between your hand and the page. So, dive in, keep your grip light and loose, and watch as your calligraphy skills flourish.
Real-Life Tips from Calligraphy Experts
Every calligrapher knows that a perfect grip can make or break your writing experience. Experts agree that how you hold the pen plays a critical role in the fluidity of your lines and the comfort of your hand. Here are some tried-and-true tips from those who have mastered the art of calligraphy:
First, stay relaxed. Many beginners grip their pen as if it’s about to slip away. Instead, you’ll want to cultivate a light touch. An expert calligrapher once shared that they keep their grip so loose that the pen feels like it’s almost floating between their fingers. This allows for smoother strokes and better control. If your hand starts to feel tense, it’s a sure sign you need to loosen up. Regularly checking in with your body will help you develop a more natural, fluid motion.
Next, don’t hesitate to experiment with grip variations for different styles. For instance, if you’re working on a more decorative script, you might find it beneficial to hold the pen at a different angle or with a slight twist. One advanced calligrapher noted that they often switch their grip when transitioning between scripts, which helps maintain the unique characteristics of each style. This adaptability not only enhances your writing but also makes the practice more enjoyable.
Lastly, take advantage of your surroundings. Use a supportive writing surface-this doesn’t just mean a desk; it could be a portable lap desk or an inclined surface. A seasoned calligraphy instructor recommends investing in a few quality tools, such as ergonomic pens or grips that fit your hand comfortably. These small adjustments can significantly impact how your grip translates into your writing.
Incorporate these strategies into your practice sessions. By prioritizing a relaxed grip, experimenting with variations, and aligning your workspace for comfort, you’ll find that calligraphy not only becomes easier but also more enjoyable. Keep refining your technique, and watch as your writing transforms!
Mastering the Mental Game of Calligraphy
It’s easy to overlook the mental aspect of calligraphy amidst focus on strokes and angles, but your mindset can significantly influence your writing. When you pick up your pen, think of it less as a tool and more as an extension of yourself. This mindset shift fosters a sense of flow, enabling your hand to move more naturally across the page. Relaxation is key; if you dread the blank page or feel pressure to perform perfectly, you’re likely to tense up. Take a deep breath before you start and remind yourself that calligraphy is about expression, not perfection.
Another powerful strategy is to visualize your letters before you write them. By imagining each stroke and how the pen flows, you mentally prepare yourself, which often translates into smoother execution. Creating a mental sketch can be a game-changer, especially when tackling intricate designs or new styles. Break down the letters into manageable parts within your mind, focusing on one curve or line at a time, which reduces overwhelm and enhances clarity.
To strengthen your mental focus, establish a consistent practice routine. Set aside time where you can immerse yourself in the process without distractions. Consider playing soft music in the background or using guided exercises that encourage you to concentrate on your pen’s movement. Dedicating this time not only improves your grip and technique but also encourages a deeper connection with your work-turning practice into meditation.
Lastly, remember that it’s okay to make mistakes. In fact, every error is an opportunity to learn. Rather than viewing a smudge or a skipped stroke as failure, use it as a moment to reflect on your grip or your approach. With practice, you’ll build resilience and confidence, transforming any stumbling blocks into stepping stones toward mastery. Embrace the journey as much as the outcome.
Frequently asked questions
Q: What is the best grip for a calligraphy pen?
A: The best grip for a calligraphy pen involves holding it lightly between your thumb and index finger while resting it on your middle finger. This allows for better control and fluidity in your strokes. Remember to maintain a relaxed hand position, keeping your wrist and arm engaged for smooth movement.
Q: How does grip affect calligraphy results?
A: The right pen grip significantly impacts your calligraphy quality. A loose grip helps with fluid writing and reduces hand fatigue, leading to more consistent lines and beautiful letters. Adjusting your grip can also enhance pressure variations, essential for different styles of calligraphy.
Q: Why is it important to use the correct nib angle?
A: Using the correct nib angle-typically around 45 degrees-ensures that ink flows smoothly and allows for better line variation. This angle helps prevent skipping and scratching on the paper, enhancing overall writing comfort and quality in your calligraphy work.
Q: What are common grip mistakes in calligraphy?
A: Common grip mistakes include holding the pen too tightly, which causes tension and fatigue, and using an incorrect finger placement that hinders flexibility. Maintain a relaxed grip and ensure your pen is correctly positioned to achieve smoother strokes and better control [2].
Q: How can I prevent hand fatigue while writing?
A: To prevent hand fatigue, use a relaxed grip and take regular breaks to stretch your fingers and wrist. Ensure your workspace is ergonomic, and consider using cushioned grips or specialized pens designed for comfort. Learning different writing techniques can also help reduce strain [3].
Q: What should I practice to improve my grip?
A: To improve your grip, practice simple strokes and shapes. Concentrate on maintaining a light grip, letting your wrist and arm guide the pen rather than your fingers alone. Incorporating specific grip exercises can enhance muscle memory and control [1].
Q: Can my grip change based on different calligraphy styles?
A: Yes, your grip may vary depending on the style of calligraphy you’re using. For instance, a dip pen requires a different hold compared to a brush pen. Adjust your grip and nib angle according to the style to optimize your writing and achieve desired effects [3].
Key Takeaways
Now that you know how to hold your calligraphy pen for maximum control and grace, it’s time to put this knowledge into action and elevate your lettering game! Remember, the right grip not only enhances your technique but can also make your writing experience more enjoyable. Don’t wait-grab your favorite pen and start practicing today!
For more tips on mastering calligraphy, check out our complete guide on achieving the perfect stroke and techniques for maintaining your tools. If you’re diving deeper into the world of lettering, explore our article on the best calligraphy pens to elevate your craft. To keep receiving valuable tips and updates, consider signing up for our newsletter! Share your progress or ask questions in the comments below; we love hearing from fellow enthusiasts. Keep creating, and let your art shine!