Did you know that over 10% of the world’s population is left-handed? If you’re part of this group, you might face unique challenges when it comes to calligraphy. The way you hold your pen significantly impacts your writing experience and the beauty of your strokes. In this guide, we’ll explore special techniques designed specifically for left-handed calligraphers. You’ll learn how to adapt your grip and posture to create elegant letters effortlessly. Whether you’re a beginner or looking to refine your skills, mastering these techniques can transform your calligraphy practice. So, let’s dive in and unlock the art of beautiful writing for lefties!
How Left-Handed Calligraphy Differs from Right-Handed Techniques
Calligraphy can feel like a dance between the pen and the paper, and for left-handers, this dance requires a unique rhythm. The difference in techniques used by left-handed and right-handed calligraphers isn’t just a matter of hand orientation-it’s about overcoming challenges that arise from the natural movement of the hand. Left-handers often find themselves in a world designed predominantly for right-handers, where ink smudging and awkward angles can hinder the flow of creativity. Understanding how these differences play out can empower left-handed calligraphers to embrace their style and flourish in this expressive art form.
A major distinction lies in the grip and angle at which left-handers hold their pens. While right-handed calligraphers typically hold the pen at a comfortable angle that allows for smooth strokes, left-handers often have to defy that norm. A left-handed calligrapher may need to tilt their hand further to the left to avoid dragging the wrist across wet ink. This creates a geometric challenge. Instead of straightforward upward strokes, lefties often employ a method known as the “hooked grip,” where the hand is positioned more under the body, allowing for better control of angles and pressure.
Moreover, left-handed calligraphy demands a more deliberate approach to letter formation. As ink can easily smudge when writing from left to right, many left-handed artists prefer to write in an upward motion or angle their pen in a way that avoids contact with the freshly laid ink. This adjustment not only helps in preventing smudging but also enhances precision. It can feel awkward at first, but with practice, many find it becomes a natural part of their writing style, shaping graceful letters that are uniquely theirs.
Incorporating these insights into your practice can unlock new possibilities for your calligraphy projects. Whether you’re starting fresh or looking to refine your skills, understanding how left-handed techniques differ can elevate your craft. Embrace these challenges as part of your artistic journey, allowing them to inform your individual style and creativity. Your left-handed perspective is not just a hurdle; it’s a distinctive voice in the world of calligraphy.
Essential Tools for Left-Handed Calligraphy Success
To elevate your left-handed calligraphy game, you need the right tools. While many calligraphy supplies are designed with right-handers in mind, there are options tailored to meet the specific needs of lefties. Understanding these tools can make a significant difference in your practice, helping you achieve smooth strokes while minimizing frustration.
First and foremost, select a pen that complements your unique grip. Look for pens with ergonomic designs that cater to a left-handed hold. A good choice might be an oblique nib holder, which enables you to write at an angle that avoids smudging while allowing for precise control. Additionally, gel pens or fountain pens equipped with fast-drying ink can help prevent accidental smearing, giving you the confidence to create flowing lines without worry.
Paper choice is equally important. Opt for smooth, high-quality paper that promotes good ink absorption without bleed-through. Cotton or specially treated papers designed for calligraphy can enhance your writing experience significantly. Here’s a quick checklist of essential tools to consider:
- Pen Nibs: Choose ones with a fine point for delicate strokes.
- Ink: Fast-drying and vibrant inks that suit your style.
- Paper: Blotter paper can help absorb excess ink.
- Pencil: For sketching out designs before inking.
You should also consider using a writing guide or angled pen rest to maintain consistent posture while writing. This addition can help you develop muscle memory around your grip technique. Ultimately, experimenting with different tools will allow you to find the perfect fit for your hand and style. By investing in these tailored supplies, you can transition from struggling with left-handed calligraphy to confidently crafting beautiful, flowing letters that reflect your artistic voice.
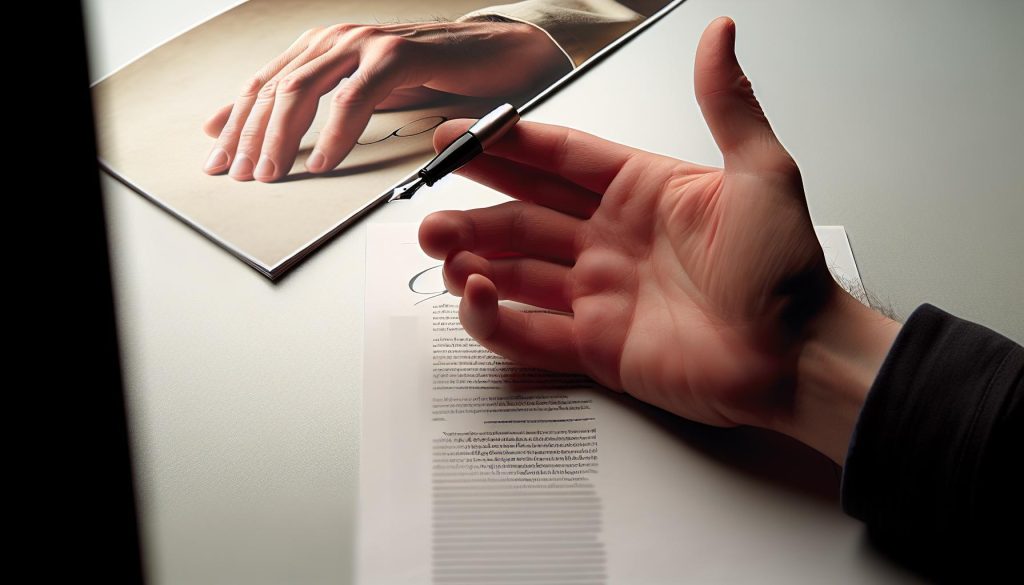
Grip and Angle: Holding the Pen Like a Pro
Finding the right grip and angle when holding your calligraphy pen can make all the difference in your writing experience, especially as a left-handed calligrapher. Each stroke should feel effortless, but without the proper hold, it can lead to unnecessary frustration. Here’s how to nail that perfect grip to unlock your full potential.
Start by holding the pen lightly between your thumb and index finger. A relaxed grip allows for better control and reduces fatigue. The pen should rest comfortably on your middle finger, creating a triangle of support that stabilizes your hold. This triangle grip not only provides balance but also keeps your hand elevated from the paper, minimizing the chances of smudging your work.
Now, let’s talk about angles. Positioning the pen at an angle of about 45 degrees to the paper might feel natural for right-handed writers, but for you as a lefty, try adjusting it to around 30 degrees. This adjustment takes the pressure off your wrist and helps in creating smoother, more elegant strokes while preventing awkward hand positions. Experiment with finding the sweet spot where you feel most comfortable and can move the pen smoothly without straining.
Another essential technique is employing a slight clockwise twist of the pen’s holder, which opens up the nib and allows the ink to flow freely. This twist helps in achieving those delicate, sweeping lines that define beautiful calligraphy. Practice this motion without paper first, ensuring your hand feels natural and fluid. Once you’re comfortable, transfer it to the paper!
Lastly, don’t underestimate the importance of consistent practice with these techniques. Over time, your muscle memory will develop, and soon you’ll find that your grip and angle become second nature, unlocking the joy of calligraphy. Remember, the goal isn’t just to write-it’s to create art with every stroke. Don’t shy away from adjusting these techniques based on what feels right for you; after all, every artist has their unique style!
Common Challenges Faced by Left-Handed Calligraphers
Navigating the world of calligraphy as a left-handed individual often feels like trying to dance with two left feet. Many left-handed calligraphers face unique hurdles that can make the process frustrating. One of the most common challenges is the issue of smudging. Since lefties write from left to right, their hands drag across freshly inked strokes, leading to smears and blurred letters. This requires a conscious effort to position the paper at an angle to minimize contact, often turning your writing experience into a balancing act.
Another significant difficulty is finding the right pen hold. While right-handers can easily adopt a conventional grip, left-handed writers may need to experiment more to avoid awkward positions that impede fluid motion. A relaxed grip is essential, but many lefties struggle to maintain this while finding a comfortable angle for their pen. The need to adjust your grip frequently can lead to fatigue and frustration, often resulting in less than ideal letterforms.
Additionally, left-handed calligraphers frequently contend with the limitation of available resources. Most instructional materials and tutorials cater to right-handed techniques, leaving lefties feeling like they’re navigating without a map. This discrepancy means that many left-handed artists must innovate or adapt methods on their own, often leading to trial and error that can be both time-consuming and disheartening.
Ultimately, it’s about resilience. Understanding these challenges is the first step toward overcoming them. Many calligraphers find that embracing their uniqueness becomes part of their artistic identity. By seeking out communities or resources specifically tailored for left-handed writers, you can gain insights and support that make the journey both enriching and enjoyable. Remember, the objective is not merely to write, but to create something truly beautiful, despite the obstacles you face.
Special Techniques for Smooth Letter Formation
To achieve smooth letter formation as a left-handed calligrapher, you need to master a few essential techniques that cater specifically to your unique writing style. For starters, positioning your paper correctly is crucial. Angling the page to the left can help minimize drag and reduce smudging. Aim for a tilt of about 30 to 45 degrees, which allows your hand to glide comfortably across the surface without interfering with your strokes. It’s all about finding that sweet spot where you can write fluidly while keeping your work pristine.
Next, focus on your grip. While holding your pen, maintain a light yet controlled hold, ensuring that your fingers are relaxed. Having a relaxed grip reduces tension, allowing for smoother movements as you create each letter. Experiment with the placement of your fingers along the pen; some lefties find success holding the pen closer to the tip, while others prefer a more classic grip. The key is to find what feels natural for you. Don’t hesitate to try various grips until you discover the one that enables fluid execution of your strokes.
Practicing consistent strokes can also help with letter formation. Use guides such as lined paper or practice sheets with individual letter outlines. This practice isn’t just helpful for beginners; even experienced calligraphers can benefit from revisiting basic forms to maintain their skills. As you practice, focus on connecting letters smoothly to create beautiful, cohesive words. By breaking down your practice into sections, like focusing only on loops or descenders, you can refine specific areas without getting overwhelmed.
Lastly, use the right tools tailored for left-handed writers. Look for pens with quick-drying ink to combat smudging and paper that supports the ink flow while minimizing bleeding. A good quality pen can make a world of difference in achieving the clean, fluid lines that exemplify great calligraphy. Remember, creating captivating script takes time and patience, but by applying these techniques, you’ll be well on your way to mastering left-handed calligraphy with style and grace.
Mastering the Right Posture for Left-Handed Calligraphy
To produce elegant calligraphy as a left-hander, posture plays a crucial role, often overlooked yet vital for fluid, beautiful strokes. Maintaining a comfortable and relaxed posture not only enhances your writing quality but also helps prevent fatigue during longer practice sessions. Start by sitting up straight in a chair with adequate back support. Position yourself so that your writing surface is at a comfortable height-your elbow should be at approximately a 90-degree angle while writing. This alignment promotes better control and fluidity as you create each letter.
Next, consider the positioning of your paper. For left-handed calligraphy, angling the paper slightly counterclockwise allows you to see your writing clearly while ensuring your hand doesn’t drag across the ink. A tilt of about 30 to 45 degrees is often ideal. This orientation not only helps prevent smudging but also allows your hand to move freely across the page, reducing any awkward wrist angles that may lead to discomfort.
Incorporating proper wrist movement is essential. Instead of relying solely on your fingers to move the pen, engage your whole arm while keeping your wrist relaxed. This technique aids in creating smoother strokes and reduces strain. As you become more comfortable, your body will naturally find its optimal position, but starting with the right posture will lay the foundation for your calligraphy journey.
Remember, practice is key! Take breaks regularly to stretch your fingers, wrists, and arms. This will keep you refreshed and prevent stiffness over longer periods. With the right posture, you can truly unleash the potential of your left-handed calligraphy, turning every stroke into a work of art.
Recommended Ink and Paper for Lefties
When it comes to left-handed calligraphy, choosing the right ink and paper can make all the difference. Lefties often face unique challenges, primarily concerning ink smudging and paper drag, so it’s crucial to select materials that enhance your writing experience. Low-drying and fast-drying inks are a must. Brands like Noodler’s and Dr. Ph. Martin’s offer inks specifically formulated to minimize smudging, allowing you to write smoothly without waiting for the ink to dry. Opt for water-based inks as they provide great flow and vibrant colors, yielding beautifully bold letters.
The type of paper you use is equally vital. Look for smooth, bleed-resistant paper to help your nib glide effortlessly across the surface. Papers like Bristol or Clairefontaine are fantastic options because they offer a slick surface that prevents ink from feathering. You might also want to try grid or ruled papers designed for calligraphy-these can help guide your lettering while ensuring you maintain consistent sizes and angles.
For those of you who prefer a bit of experimentation, don’t shy away from trying different combinations! Some left-handers favor cotton papers due to their texture, while others may enjoy the feel of marker paper, which can be surprisingly effective with certain inks. Whatever you choose, ensure it complements your ink for the best results, creating a feminine touch to your lettering style.
Finally, remember that preparation goes a long way. Before diving into your project, conduct ink tests on your chosen paper to see how they interact. This will help you avoid unexpected surprises and allow you to focus on what you do best-creating stunning left-handed calligraphy.
Tips to Develop Your Unique Calligraphy Style
Developing a unique calligraphy style is an exciting journey, especially for left-handed calligraphers who may face distinct hurdles with ink flow and pen grip. One key aspect is experimenting with different pen angles and grips. Unlike right-handed writers, you need to adapt your technique to avoid smudging. Try holding the pen at a consistent angle that feels comfortable for you-this can significantly influence the flow of your strokes. Don’t be afraid to tilt the pen slightly away from you; this setup can help you see your letters more clearly and maintain control.
Another huge factor is your choice of nib. Different nibs produce varying line widths and textures. A flexible nib might give you beautiful swirls and flourishes, while a firmer nib offers precision. It’s about personal preference and what feels right in your hand. As you practice, keep a journal of your designs. By reflecting on what you enjoy and what techniques yield the best results, you can hone a style that truly represents you.
Additionally, consider incorporating personal motifs or elements that resonate with your aesthetics. Whether it’s combining modern brush lettering with traditional scripts or using specific patterns in your letter transitions, these touches can make your work stand out. Seek inspiration from other left-handed artists-but remember, the goal is not to mimic but to adapt their ideas into your unique vision.
Finally, take advantage of online communities. Sharing your work and learning from others can be incredibly motivating. Engage with fellow left-handed calligraphers through forums and social media. Their feedback can provide fresh perspectives on your style and offer support during those frustrating learning moments. Embrace the adventure of finding your signature look; it’s all part of what makes calligraphy an art form.
Learning Resources and Communities for Left-Handed Calligraphers
Finding the right resources and communities as a left-handed calligrapher can make a world of difference in your journey. The challenges you face-like adjusting your grip and finding techniques that suit your style-are unique. Trust me, connecting with others who understand these nuances can be refreshing and empowering.
Start by exploring online forums and platforms specifically catered to left-handed calligraphy enthusiasts. Facebook groups, Reddit communities, and Instagram hashtags like #LeftHandedCalligraphy can lead you to valuable discussions, tips, and shared experiences that resonate with your challenges. These spaces are often filled with members ready to offer advice on everything from ideal pen grips to product recommendations tailored for lefties.
You might also want to dive into tutorial websites and YouTube channels that focus not just on calligraphy basics but explicitly cater to left-handed techniques. Many seasoned calligraphers share their personal tricks, reviews of various tools, and step-by-step guides on how to adjust methods traditionally designed for right-handers. Personally, I’ve found that watching these tutorials, especially from left-handed creators, provides insights that are often overlooked in standard resources.
Another fantastic avenue is to join local or virtual workshops. Many calligraphy classes now offer sessions specifically designed for left-handed learners. These workshops can provide one-on-one feedback and are a great way to practice your skills alongside others who share your experience. Plus, being part of a class can spark creativity and motivate you to push through any frustrations you encounter.
Lastly, consider keeping a journal of your progress and the tips you gather from these sources. Documenting your journey not only tracks your growth but also helps you refine your unique style. Embrace this connectivity-whether through online communities or hands-on workshops-and watch your calligraphy skills flourish like never before!
Inspiring Left-Handed Calligraphy Artists to Follow
It’s inspiring to see how left-handed calligraphy artists are carving their unique paths, overcoming the challenges that come with being a lefty in a predominantly right-handed world. One of the standout figures in this niche is Molly Suber Thorpe. Known for her elegant scripts, Molly offers a wealth of tutorials aimed specifically at left-handed calligraphers. Her YouTube channel is packed with videos addressing common hurdles like grip adjustments and ink smudging, making her an invaluable resource for anyone looking to refine their style.
Another artist worth following is Laura Hooper, who creates stunning custom calligraphy while sharing tips and tricks that cater to both right- and left-handed learners. Her approach emphasizes the importance of personalized technique, encouraging you to find what feels right for your hand. By sharing her own journey, Laura helps demystify the art, showing that every calligrapher can develop their signature style, regardless of their handedness.
If you’re looking for a community, check out artists like Jenna Rainey, who not only showcases her beautiful work but also engages with her followers through interactive Q&A sessions on Instagram. Jenna frequently touches on the nuances of left-handed calligraphy, making her content relatable and accessible. Engaging with her and others can provide a supportive network, validating your experiences and offering encouragement.
When searching for inspiration, don’t overlook the power of hashtags. Exploring #LeftHandedCalligraphy can lead you to numerous talented artists who are willing to share their processes and tips. This sense of community is vital; it reminds you that you’re not alone in your struggles as a left-handed calligrapher, and that learning from others can spark creativity and enhance your skills.
Practice Exercises to Hone Your Skills
To truly excel in left-handed calligraphy, deliberate practice is key. It’s not just about picking up a pen; it’s about understanding how to position yourself and the tools in a way that feels natural and intuitive. One effective method to hone your skills is to engage in specific exercises that focus on grip, control, and fluid movement.
Start by setting up your workspace. Position your paper at a slight angle to your left-approximately 30 degrees. This helps reduce the awkwardness of your movements and allows for a smoother flow. Use a practice pad or a medium that’s forgiving, allowing your pen to glide without the risk of excessive ink smudging. Begin with basic strokes; practice creating thin upstrokes and thick downstrokes. These foundation strokes are essential, forming the basis of all letters.
Next, incorporate letterforms in your practice. Choose a single letter, such as “o” or “e,” and write it repeatedly. Focus on maintaining consistent pressure and speed. Don’t rush-take your time to ensure each letter looks uniform. Another key exercise is “the drill.” Write out the full alphabet in both lowercase and uppercase, paying special attention to linking letters correctly, which is crucial for achieving fluidity in cursive styles.
You can also experiment with different tools and inks. Each pen has a unique feel; some may suit your style better than others. Try out various nibs and inks to see which offer the best control and visibility. Finally, remember to incorporate breaks into your practice sessions to avoid fatigue-muscle memory is built over time, and consistent, relaxed practice will yield the best results.
By dedicating time to these exercises, you’ll develop a personalized approach to your left-handed calligraphy, allowing you to express your creativity without the frustrations that often come with being a lefty in a right-handed world.
Overcoming Frustration: Staying Motivated as a Left-Hander
Frustration can easily creep in when you’re a left-handed calligrapher. Many lefties face unique challenges that their right-handed peers don’t. The ink smudging, the awkward angles, or simply the feeling of being left out can make learning to master calligraphy feel daunting. However, triumphing over these obstacles begins with a shift in perspective. Embracing your left-handedness as a distinctive asset can transform your approach and motivate you to keep improving.
Try focusing on what makes your left-handed calligraphy unique. While right-handed calligraphers might dictate the conventional styles and techniques, left-handers often develop innovative adaptations. This isn’t just about managing the pen differently; it’s about creating a style that’s entirely your own. Experiment with angles, grips, and even tools that feel comfortable. Utilize left-handed pens or those designed for better fluid movement. It’s all about finding what works best for you, rather than conforming to established norms.
Regular practice is essential, but remember to mix it up. If a style or technique is causing frustration, take a break and try something new-perhaps a different letter style or even an entirely different medium. Incorporate fun into the process; doodle, create greeting cards, or write personal notes. These small shifts can free you from the pressure of perfection and spark your creativity. You’ll find yourself looking forward to your practice rather than seeing it as a chore.
Lastly, connect with fellow left-handed calligraphers. Join online communities or local workshops where you can share experiences and tips. When you see others facing similar challenges, it can spark motivation and remind you that you’re not alone. Learning from one another can provide new insights and keep your passion alive. Celebrate each small victory along the way, and don’t hesitate to share your journey. Your unique perspective can inspire others, creating a supportive environment where left-handers thrive.
Frequently asked questions
Q: What are some tips for finding the right calligraphy pen for left-handed writers?
A: To find the right calligraphy pen, look for pens with a comfortable grip that suit your writing style. Fountain pens with a fine nib and oblique holders can help create clean lines. Testing various inks and nib sizes will also aid in achieving a style that works for you. Explore the section on Essential Tools for Left-Handed Calligraphy Success for more details.
Q: How does grip adjustment affect left-handed calligraphy?
A: Grip adjustment is crucial for left-handed calligraphy as it affects control and stroke fluidity. Experiment with different grips to find one that allows you to maintain a relaxed hand posture while achieving clear letter forms. Refer to the Grip and Angle section for specific techniques.
Q: What are the unique challenges left-handed calligraphers face?
A: Left-handed calligraphers often struggle with smudging and awkward pen angles. They may also find it difficult to see what they are writing. Learning effective techniques and practicing can help you overcome these challenges very easily while improving your skills.
Q: How can left-handed calligraphers avoid smudging their ink?
A: To avoid smudging, use fast-drying inks and practice writing with the pen at a slightly raised angle. Position your hand above written lines to prevent dragging. Additionally, consider using a blotter or a smooth paper surface. Check out the Recommended Ink and Paper for Lefties section for more tips.
Q: What posture should left-handed calligraphers maintain while writing?
A: A good posture involves sitting up straight with your feet flat on the ground. Position your paper at an angle to your body, ideally tilting it counter-clockwise. This reduces strain and promotes better control of the pen. For a detailed guide, see Mastering the Right Posture for Left-Handed Calligraphy.
Q: How can I improve my calligraphy style as a lefty?
A: Improving your style requires regular practice and experimentation with different letter forms. Analyze your work critically and seek feedback from communities or fellow calligraphers. Consider attending workshops to learn new techniques and gain inspiration. More ideas can be found in the Tips to Develop Your Unique Calligraphy Style section.
Q: Are there online communities for left-handed calligraphers?
A: Yes, several online communities exist for left-handed calligraphers, including social media groups and forums. These platforms provide support, share resources, and offer critiques. Visit the Learning Resources and Communities for Left-Handed Calligraphers section to discover the best options for you.
Q: What practice exercises are recommended for left-handed calligraphy?
A: Recommended exercises include practicing basic strokes, forming alphabets, and writing quotes. Focus on the flow and consistency of your letters. Pair practice with recorded tutorials or worksheets designed for left-handed writers for the best results. For specific exercises, refer to the Practice Exercises to Hone Your Skills section.
Insights and Conclusions
Now that you’ve learned the special techniques for holding a calligraphy pen left-handed, it’s time to put your skills into action! Remember, the right grip can dramatically transform your writing experience. Don’t hesitate-grab your favorite pen and start practicing today! If you’re curious about enhancing your calligraphy further, check out our guides on creating beautiful letterforms and mastering strokes.
Got questions or need tips? Drop a comment below; we love hearing from you! And if you found this guide helpful, why not explore our related articles on font design or dive into our video tutorials? Sign up for our newsletter for exclusive tips and resources that take your calligraphy to the next level. Your journey to becoming a skilled left-handed calligrapher is just beginning, so keep exploring and creating!