If you’re diving into the art of calligraphy, you know that a smooth flow of ink is crucial for that perfect stroke. But what happens when you struggle with putting the ink cartridge in your calligraphy pen? It’s a common hiccup that can stump both beginners and seasoned artists alike. Don’t let a simple task derail your creativity! In this guide, we’ll walk you through a quick and easy fix to get your ink flowing in no time. Whether you’re preparing for a special project or just want to practice your letters, mastering this skill will keep your artistic momentum going strong. Keep reading to ensure your calligraphy journey stays beautifully seamless!
Choosing the Right Calligraphy Pen for Ink Cartridges
When it comes to calligraphy, the right pen can make all the difference. Selecting a pen designed for ink cartridges is crucial if you want smooth flow and consistency in your work. There are a variety of calligraphy pens on the market, each compatible with different cartridge types, so knowing which one suits your style is essential. For instance, pens from brands like Pilot or Lamy offer cartridges that fit snugly, reducing the risk of leaks and ensuring a clean writing experience. Be sure to consider the nib size as well, as it affects the width of your strokes-finer nibs are great for detailed work, while broader ones provide bold lines.
Consider your writing style when choosing a pen. If you lean toward classic scripts, a pen with a broad nib will deliver the thick, expressive lines that characterize traditional calligraphy. On the other hand, if you prefer more modern, delicate styles, opt for a pen with a fine point. It’s also worth checking if the pen allows for changing nibs, which can be beneficial for those experimenting with different styles.
Tip: Always Verify Compatibility
Before purchasing your calligraphy pen, always verify that the chosen ink cartridges match the pen model. Most manufacturers specify which cartridges are suitable for their pens-this not only ensures compatibility but also guarantees that the ink performs well without any clogging issues. For example, if you decide on a particular brand, stick with their cartridges for optimal results.
In addition, some pens offer refillable options, which can be both economical and environmentally friendly. Consider the ink characteristics-some are water-soluble and great for washes, while others are waterproof, making them ideal for more permanent works. By understanding these details, you’ll enhance your calligraphy practice, creating works you’ll be proud to showcase.
Understanding Ink Cartridge Types and Compatibility
When diving into the world of calligraphy, understanding ink cartridge types and their compatibility with your pen is more than just a technical detail-it’s the key to a smooth, enjoyable writing experience. The right cartridge can transform your pen from an ordinary tool into an extension of your creativity, allowing for fluid strokes and vibrant colors. Each calligraphy pen is designed to work with specific cartridge types, so let’s unpack the essentials to ensure you’re equipped for success.
First, most calligraphy pens fall into one of two categories: pre-filled cartridges or refillable systems. Pre-filled cartridges are convenient and come ready to use, making them ideal for beginners or those who favor simplicity. Brands like Pilot and Lamy stick to their proprietary cartridges, ensuring a perfect fit and performance. On the other hand, refillable systems allow for greater customization. They let you choose your ink type and color, which can be a game changer for creative projects that require specific shades or characteristics.
It’s crucial to check compatibility before making a purchase. To save you from the frustration of mismatched cartridges, always refer to your pen’s specifications or the manufacturer’s website. Many brands provide lists of compatible cartridges, which can save you both time and money. A simple oversight, like pairing your pen with the wrong cartridge, can lead to issues like leaks or clogging that disrupt your calligraphy flow and frustrate your creative process.
Additionally, consider the ink itself. Different inks have varying properties that can impact your artwork. For instance, if you’re interested in watercolor techniques, you might opt for water-soluble inks. For projects that need to withstand the test of time, waterproof options are preferable. By matching the right ink with compatible cartridges, you not only enhance your pen’s performance but also elevate your overall calligraphy experience. This knowledge empowers you to make informed choices, ensuring every stroke is a delightful one.
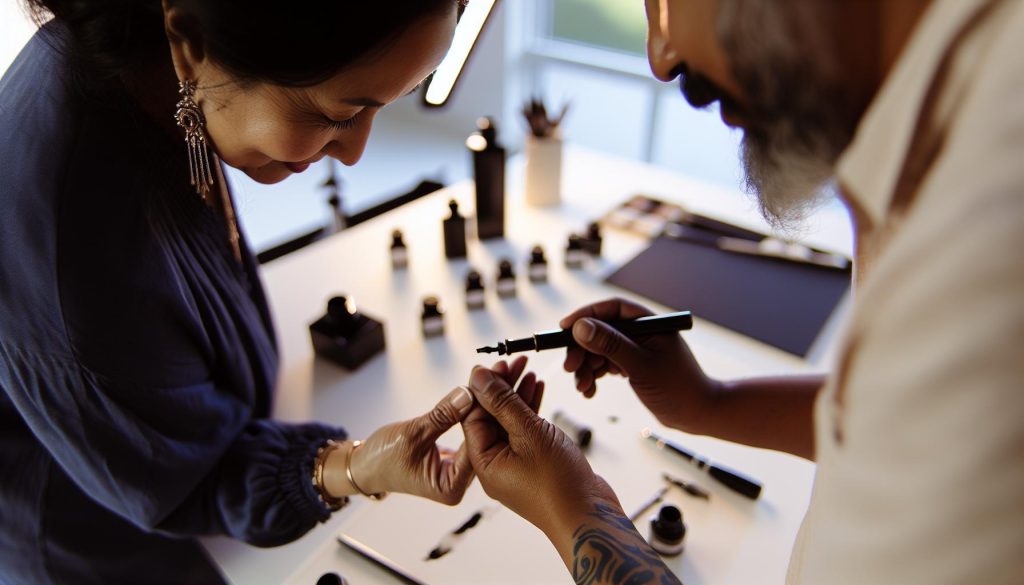
Step-by-Step Guide to Inserting the Ink Cartridge
Getting your ink cartridge inserted correctly can make a world of difference when it comes to your calligraphy experience. Trust me, nothing is more frustrating than trying to write with a pen that simply won’t cooperate because the cartridge isn’t seated right. Here’s a straightforward guide to ensure you get it right every time, so you can focus on what you love-creating beautiful lettering.
First things first, before you begin the insertion process, make sure you have a clean workspace and that your hands are free of ink. You don’t want any mess complicating things. Grab your ink cartridge and your calligraphy pen. Check the cartridge for a small opening; this is typically where the ink flows into the nib.
Now, to insert the cartridge, follow these simple steps:
1. Prepare the pen: If your pen has a cap, remove it so you can access the nib. Take a moment to inspect the nib; it should be clean and free from dried ink. If any remnants are stuck, gently clean it with a soft cloth.
2. Remove the old cartridge (if applicable): If you’re switching out an old cartridge, make sure to pull it out carefully. Some cartridges may need a slight twist to be released, so don’t be afraid to give it a gentle nudge if it doesn’t come out easily.
3. Insert the new cartridge: Align the open end of the cartridge with the opening in the pen. Push the cartridge in firmly but gently until you feel it click into place. You should see or feel it lock in without much resistance. Check to ensure it’s inserted straight; anything wonky can cause issues later.
4. Activate the ink flow: After you’ve inserted the cartridge, give it a moment. Sometimes, you might need to gently squeeze the cartridge (if it’s a soft type) or tap the pen lightly on its side. This action helps the ink flow down to the nib, ready for your artistic strokes.
5. Test it out: Before diving into your project, test the pen on a scrap piece of paper. This step helps ensure that the ink is flowing smoothly and you’re ready to create.
Getting the cartridge installed correctly sets the foundation for a great writing experience. Each step is designed to maximize your efficiency and minimize frustrations with ink flow. Now, you’re ready to unleash your creativity!
Common Mistakes When Installing Ink Cartridges
Getting your ink cartridge seated properly can mean the difference between a smooth calligraphy experience and endless frustration. Many writers overlook simple steps that can lead to problems down the line. Here are some common mistakes to avoid when you’re installing an ink cartridge in your calligraphy pen, and how to correct them, ensuring you get back to expressing your creativity without a hitch.
One major pitfall is skipping the cleaning of the nib before inserting the new cartridge. Leftover ink or dried residue can block the ink flow, causing your pen to skip or blot. Always inspect and, if necessary, clean the nib with a soft, lint-free cloth before you start. This simple step could save you from a multitude of headaches later on.
Another frequent error is misaligning the cartridge. It might seem trivial, but forcing the cartridge in at an odd angle can cause it to jam or even damage the nib. Make sure you align the cartridge correctly with the pen’s opening before applying pressure. If you feel resistance, pull it out and try again; it should slide in smoothly.
Activating the ink flow often gets overlooked. Many users jump straight to testing the pen after installation, but you might need to encourage the flow of ink by gently squeezing the cartridge or tapping the side of the pen. This simple act can prevent premature frustrations, letting your ink flow freely when you put pen to paper.
Finally, don’t forget to test the pen on scrap paper before starting your project. This quick check ensures that everything is working and that the ink is flowing as it should. By avoiding these common mistakes, you’ll ensure a seamless writing experience, allowing your creativity to shine through without interruptions.
Troubleshooting Ink Cartridge Issues: Quick Solutions
When the ink in your calligraphy pen suddenly decides not to flow, it can feel like you’ve hit a wall in your creative process. This happens to all of us, but fear not-troubleshooting ink cartridge issues is often a quick fix. Here are some simple yet effective solutions to get your pen back in action.
First, check the ink cartridge. Sometimes, it’s as easy as ensuring it’s properly seated. A cartridge clicked in at an odd angle can block the flow. Gently pull it out and reseat it, making sure it fits snugly into place. If you still encounter issues, check for a seal that may need removing. Many cartridges come with a protective seal to prevent drying out, and forgetting to remove this can lead to trouble.
Next, consider the ink flow. If the ink’s not coming out, a simple fix is often to give the cartridge a little squeeze or to tap the pen gently against a soft surface. This helps draw the ink down towards the nib. If you’re still met with resistance, it’s worthwhile to check for clogs. A quick dip in warm water can loosen dried ink at the nib’s tip. Just be sure to dry it thoroughly before trying to write again.
Finally, if you have a cartridge that’s clearly low on ink or dried out, don’t hesitate to replace it. Storing your cartridges properly and ensuring they’re capped when not in use can prolong their life. In no time, with these straightforward troubleshooting steps, you’ll be back to crafting beautiful letters and flourishing designs!
Maintaining Your Calligraphy Pen for Longevity
To ensure your calligraphy pen serves you well over time, proper maintenance is key. Like any tool, the better care you take of it, the more reliably it will perform. A few simple practices can keep your pen in top shape and enhance your writing experience.
First, make it a habit to clean your pen regularly, especially if you switch between different ink colors or types. Inks can dry up and clog the nib if left unattended. Use warm water to soak the nib and barrel, flushing out any residual ink. For stubborn blockages, a gentle brush can help. Make sure to dry the pen completely before reassembling it to avoid moisture damage.
Additionally, pay attention to how you store your pen. Keep it capped when not in use and store it in a case that prevents the nib from being scratched or damaged. Avoid leaving it in direct sunlight or extreme temperatures, as these can affect both the ink and the materials of the pen itself. Investing in a good quality pen case might seem like a little detail, but it can save you from bigger problems down the road.
Another tip? Don’t ignore the ink cartridges. Always check their expiration dates and store them upright to prevent leaking. If a cartridge runs dry, replace it before you run into issues during a writing session. Remember, your pen is an extension of your creativity. Treat it well, and it will reward you with the smooth, beautiful writing you seek!
Exploring Alternative Filling Methods: Beyond Cartridges
When it comes to enhancing your calligraphy experience, exploring alternative filling methods beyond cartridges can open up a world of creative possibilities. While cartridges are convenient, they can limit your ink choices and may not provide the best results for every project. If you’re looking to elevate your work, consider the following methods that can enrich your writing and provide a more personalized touch.
One popular alternative is using bottled ink with a converter. Converters are simple devices that fit into the barrel of your nib pen, allowing you to draw ink directly from a bottle. This method not only gives you access to a wider variety of inks but also allows you to mix custom colors for those unique projects. Here’s how it works:
- Fill the Converter: Dip the end of the converter into the ink bottle, then twist the knob or pull the piston to draw ink into the converter.
- Remove Air Bubbles: Gently tap the converter on a hard surface to dislodge any air bubbles, ensuring a smooth ink flow.
- Insert into Pen: Once filled, reattach the converter to your pen, and you’re ready to write.
Another exciting option is the use of modified fountain pens designed for bulk ink. These pens often come with larger ink reservoirs or can be directly filled from a dropper, allowing you to create with even less interruption. Some artists enjoy using syringes to fill their pens, especially when aiming to use thicker or textured inks that might not fit through a traditional converter.
Regardless of which method you choose, keeping your pen clean and maintained is crucial. Inks can vary greatly in viscosity and composition, so regularly cleaning your pen will prevent clogs and ensure that every stroke looks pristine.
Switching to alternative filling methods not only enhances your calligraphy but also allows you to explore endless ink options, from shimmering metallics to vibrant pigments. So next time you’re ready to write, consider stepping beyond cartridges, and see where your creativity takes you!
Enhancing Your Calligraphy Skills with the Right Setup
When it comes to mastering calligraphy, the right setup can significantly impact your results. The tools you choose, from your pen to the type of ink cartridge, play a crucial role in how smoothly and beautifully your letters flow. A well-configured workspace not only enhances your comfort during practice but also fuels your creativity.
First, consider your pen. If you’re using a fountain pen designed for cartridges, ensure it’s compatible with the ink you’re selecting. Most pens will have specific cartridges that fit best, allowing for optimal ink flow and minimizing issues like skipping or blotting. Remember, not all cartridges are created equal. Some are formulated for fine writing, while others are designed for calligraphy, offering richer colors and smoother application. To elevate your experience, keep a selection of cartridges on hand-experimenting with different brands can reveal unique textures and effects that might surprise you.
Your workspace also matters immensely. A clean, well-lit area can help you focus, reducing distractions. Use a comfortable surface, ideally with a non-slip mat to ensure stability while you write. If possible, choose a chair and desk that promote good posture, allowing for longer, more enjoyable practice sessions. And don’t overlook the importance of good-quality paper. The surface texture impacts how the ink flows and dries, affecting your overall results. Invest in some high-quality calligraphy paper or practice pads specifically designed for ink.
Lastly, don’t underestimate the psychological aspect of your setup. Personalize your space with inspirational elements that motivate you-whether that’s artwork, a mood board, or just a fresh bouquet of flowers. Surrounding yourself with things that spark joy can enhance your creativity and make each practice session feel fresh and exciting. By thoughtfully choosing your tools and creating an inviting workspace, you’ll set yourself up for success and enjoy your journey into the art of calligraphy.
Choosing the Right Ink for Your Calligraphy Projects
isn’t just about picking a pretty color; it’s essential for achieving the beautiful, flowing letters you envision. Different inks bring different textures, finishes, and behaviors on paper, fundamentally impacting your writing experience. Think of it like picking paint for a masterpiece-your choice defines the entire look and feel of your work.
First, consider the type of ink that works best with your pen and your artistic goals. There are two primary categories: dye-based inks and pigment-based inks. Dye-based inks offer vibrant colors and smooth flow, making them great for beginners and everyday projects. However, they can be less water-resistant and may fade over time. On the other hand, pigment-based inks provide deeper, richer colors and superior longevity, ideal for archival work or pieces you want to last. They also tend to be more resistant to water and fading. If you’re looking for something unique, explore special formulations like metallic or shimmer inks that can elevate your calligraphy to a whole new level.
Material compatibility is also crucial. If you’re using a fountain pen or a cartridge system, always ensure the ink is suitable for that specific setup. Some inks can clog or damage certain pens, so reading product descriptions or seeking recommendations is invaluable. Furthermore, testing ink on your intended paper is crucial; different papers absorb ink differently, affecting how it dries and appears. Consider keeping a swatch book where you can sample ink on various papers to see how they interact.
Lastly, don’t underestimate the power of quality. Using professional-grade inks may cost a bit more upfront, but they typically provide better performance and results. Quality inks can lead to smoother writing experiences, less skipping, and more satisfying end results. So, take your time to experiment with different ink types, and don’t hesitate to mix and match to discover the perfect combination for your style and projects. The right ink can transform your calligraphy from simple lettering to a true artistic expression.
Repairing Common Calligraphy Pen Problems
Whether you’re a seasoned calligrapher or just starting, dealing with common pen problems can derail your creative flow. It’s vital to recognize the signs early and know how to fix them, especially when your calligraphy pen isn’t performing optimally. A few simple adjustments can keep your pen writing smoothly and reliably.
One common issue is ink flow problems. If you notice your pen skipping or producing inconsistent lines, it could be due to a few factors. First, check that the ink cartridge is correctly inserted and sealed. Sometimes a cartridge can get misaligned, which may restrict ink flow. If it’s a converter, make sure it’s filled properly. A quick twist or gentle shake can help get the ink moving. If the problem persists, try gently cleaning the nib under running water to remove any dried ink or debris. This simple cleaning can work wonders and often resolves flow issues.
Another frequent frustration is leakage. A well-sealed cartridge should not leak, but if it does, ensure that the cartridge is the right type for your pen model. Sometimes, using generic cartridges with compatible pens can lead to leakage issues. If leaks happen after you’ve refilled a cartridge, consider the fill method-overfilling or using the wrong ink viscosity can cause chaos. Check the compatibility of your ink; using thick, non-water-based inks in a cartridge pen designed for thinner inks can lead to leaks and clogs.
Lastly, keep an eye on the nib condition. If your calligraphy pen is dragging or skipping, inspect the nib for bends or damage. A simple realignment can often restore smooth writing. If cleaning and adjustments don’t do the trick, replacing the nib might be necessary. Routine maintenance, like cleaning after each use and storing your pen properly, goes a long way in prolonging its life and performance. Remember, a little care and attention can save you from the frustration of halted projects and help you keep your creative momentum going!
Expert Tips for Ink Cartridge Handling and Storage
Ink cartridges, while incredibly convenient, can be a source of frustration if not handled and stored correctly. Proper management of your ink cartridges can significantly enhance your calligraphy experience by ensuring consistent ink flow and reducing issues like leaks or dry-out. Here are some expert tips that every calligrapher should know.
First, always check the expiration date on your ink cartridges. Most cartridges have a shelf life, and using one that’s expired can lead to poor performance or clogs. Store your cartridges in a cool, dry place, away from direct sunlight. Extreme temperatures can affect ink viscosity, causing it to thicken or evaporate. A simple drawer out of the sunlight can be an ideal spot.
When installing a new cartridge, handle it gently by grasping it at the sides to avoid ink smudges on your hands or clothing. Make sure to remove any seals or protective caps thoroughly-any leftover bits can obstruct the flow of ink. Once installed, store your pen upright. This positioning helps maintain the ink flow and prevents it from drying out in the nib.
Finally, consider investing in a storage solution for your unused cartridges. A dedicated case or holder can protect them from physical damage and environmental factors. Additionally, keeping a log of cartridges-that includes the date of purchase and type of ink-allows you to track usage and ensures you replace them before they expire. With these simple practices, you can maintain a smooth writing experience and keep your creative flow uninterrupted.
Upgrading Your Calligraphy Experience: Accessories to Consider
Upgrading your calligraphy experience can be as simple as choosing the right accessories. When you’re immersed in the graceful art of lettering, having the right tools at your disposal can make all the difference. From pens designed to accommodate various ink cartridges to specialized storage solutions for your supplies, the right accessories can enhance your creativity and workflow.
First off, consider investing in a quality pen holder or pen case. A well-designed holder keeps your pens organized and accessible, making it easier to switch between tools based on the project. Look for options that feature compartments for your pens, cartridges, and even spare nibs if you’re using a dip pen. This neat setup not only speeds up your work process but also protects your equipment from damage.
Another accessory to think about is a comfortable, ergonomic writing surface. Whether it’s a padded mat or a dedicated writing desk, having a supportive surface will reduce strain and help maintain focus during long calligraphy sessions. Pair this with quality paper that suits your ink type and pen style. The right paper not only interacts well with your ink but also enhances the overall appearance of your work.
Don’t overlook cleaning supplies either. Regular maintenance prolongs your pen’s lifespan and ensures optimal performance. A simple cleaning solution can help you care for your nibs and cartridges, preventing clogs and flow issues. If you frequently switch inks, having a cleaning regimen is essential.
Lastly, consider decorative elements. High-quality inks and even bespoke ink colors can elevate your pieces. An ink swatch book can also be a handy tool, letting you experiment before committing to a project. By thoughtfully selecting accessories tailored to your practice, you can transform your calligraphy work from mundane to magical. Embrace these upgrades and watch your skills flourish!
Frequently Asked Questions
Q: How do I know which ink cartridge fits my calligraphy pen?
A: Check your pen’s specifications or refer to the manufacturer’s instructions. Typically, the pen will indicate compatible cartridge types. If you’re unsure, consult the section on Understanding Ink Cartridge Types and Compatibility in our article for guidance.
Q: What should I do if the ink cartridge doesn’t fit properly?
A: If your ink cartridge doesn’t fit, double-check compatibility and ensure you’re inserting it correctly. Refer to the Step-by-Step Guide to Inserting the Ink Cartridge in our article for detailed instructions.
Q: Can I use bottled ink instead of cartridges in my calligraphy pen?
A: Yes, many calligraphy pens can be filled with bottled ink. Ensure your pen is compatible with this method. For details on alternative filling methods, see the section Exploring Alternative Filling Methods: Beyond Cartridges.
Q: How often should I replace the ink cartridge in my calligraphy pen?
A: Replace the ink cartridge when it’s empty or the ink flow is inconsistent. Regular checks can enhance your writing experience. For maintenance tips, check out our Maintaining Your Calligraphy Pen for Longevity section.
Q: What are common issues when inserting an ink cartridge?
A: Common issues include misalignment or failing to remove the protective seal. For troubleshooting, refer to Troubleshooting Ink Cartridge Issues: Quick Solutions in our article for help.
Q: Is there a specific technique for inserting an ink cartridge into a calligraphy pen?
A: Yes, align the cartridge with the pen’s feed and apply gentle pressure until it clicks into place. Consult our Step-by-Step Guide to Inserting the Ink Cartridge for precise techniques.
Q: How can I clean my calligraphy pen after using an ink cartridge?
A: Clean your pen by flushing it with water until it runs clear. Proper cleaning extends your pen’s life. Detailed care tips are outlined in Maintaining Your Calligraphy Pen for Longevity in our article.
Q: What can I do if my calligraphy pen is skipping after installing a new cartridge?
A: If your pen skips, check if the ink is flowing properly. Remove and reinsert the cartridge or try a different one. Refer to our Common Mistakes When Installing Ink Cartridges section for further assistance.
In Retrospect
Now that you’ve mastered how to put the ink cartridge in a calligraphy pen, you’re all set to bring your creative ideas to life! Remember, a well-installed cartridge ensures smooth writing and beautiful ink flow, so don’t hesitate to revisit these steps anytime you need a quick refresher. Want to dive deeper into the world of calligraphy? Check out our guides on selecting the best calligraphy pens and tips for achieving stunning lettering styles.
Feeling inspired? Why not subscribe to our newsletter for more tips, tricks, and exclusive offers straight to your inbox? Join our community of calligraphy enthusiasts by sharing your experiences in the comments below or showcasing your art on social media. You’ve got the knowledge-now unleash your artistry!


