Filling a calligraphy pen nib is a crucial skill that transforms your writing experience. Did you know that how you load your nib can greatly affect your ink flow and overall writing smoothness? If you’ve ever struggled with skipping ink or uneven lines, you’re not alone. Many calligraphy enthusiasts face this challenge, but mastering the filling technique can unlock your pen’s potential. In this guide, we’ll walk you through simple steps to fill your nib properly, ensuring a seamless flow that makes your letters come alive. Whether you’re a beginner eager to make your first strokes or an experienced scribe looking to refine your technique, understanding how to fill your pen is key to achieving those stunning results. Let’s dive in and elevate your calligraphic skills!
How to Choose the Right Calligraphy Pen Nib
Choosing the right calligraphy pen nib is crucial for achieving the desired style and fluidity in your writing. The nib acts as the primary interface between you and the ink, transforming simple strokes into beautiful letters, so getting it right can elevate your calligraphy. There’s an overwhelming variety of nibs available, each suited for different styles and techniques, so it’s important to consider your specific needs before making a decision.
Start by evaluating the type of calligraphy you want to pursue. For traditional scripts like Copperplate, you’ll want a pointed nib that allows for fine lines and dramatic flourishes. Nibs such as the Brause 361 or the Nikko G are popular choices among calligraphers for their flexibility and responsiveness. If your interest lies in broader styles, like Gothic or modern brush lettering, a flat nib will provide the necessary width. Nibs like the Speedball B or C series can offer a great starting point for these techniques.
Additionally, consider the nib’s size and stiffness. Beginners might benefit from stiffer nibs, as they provide more control and a steadier flow of ink, while experienced calligraphers may prefer softer nibs that allow for expressive variations in line thickness through pressure control. It’s a dance between your technique and the tool, so don’t hesitate to experiment with different nibs to discover what feels most comfortable in your hand.
Ultimately, the right nib is one that complements your style and enhances your creative expression. Don’t skip testing various options-your ideal nib could be just a stroke away.
Understanding Different Ink Types for Calligraphy
It’s no secret that the ink you choose can make or break your calligraphy experience. Different ink types not only affect the flow and vibrancy of your writing but also how well they pair with the nibs you’ve selected. Understanding these differences ensures you achieve the beautiful, fluid writing you seek.
When choosing an ink for calligraphy, you typically have three main categories: bottled fountain pen ink, dip pen ink, and acrylic ink. Bottled fountain pen ink is consistent, smooth flowing, and often offers a wide range of colors. It’s a great option if you’re looking for something that works well with a variety of nibs, especially if you’re focusing on techniques that require control. Dip pen inks, specifically designed for calligraphy, tend to offer rich pigmentation and smooth application, making them ideal for traditional styles. Brands like Higgins and Dr. Ph. Martin’s are trusted for their vibrant hues and viscosity. Lastly, acrylic inks provide excellent adhesion and color saturation but are best used with dilute mixtures to avoid clogging your nib. They can be a bit trickier to work with, so they’re not always the best choice for beginners.
Another important factor is viscosity. Thicker inks may require more pressure to flow, while thinner inks can yield more control with delicate lines. If you struggle with skipping or inconsistent ink flow, consider experimenting with different inks to find one that suits your nib and writing style best. You might even mix various inks to achieve your desired effects, but be cautious-always test mixes beforehand to ensure compatibility.
Ultimately, take time to sample different ink types to discover what provides not just good flow but also the aesthetics that resonate with your creative vision. Happy inking!
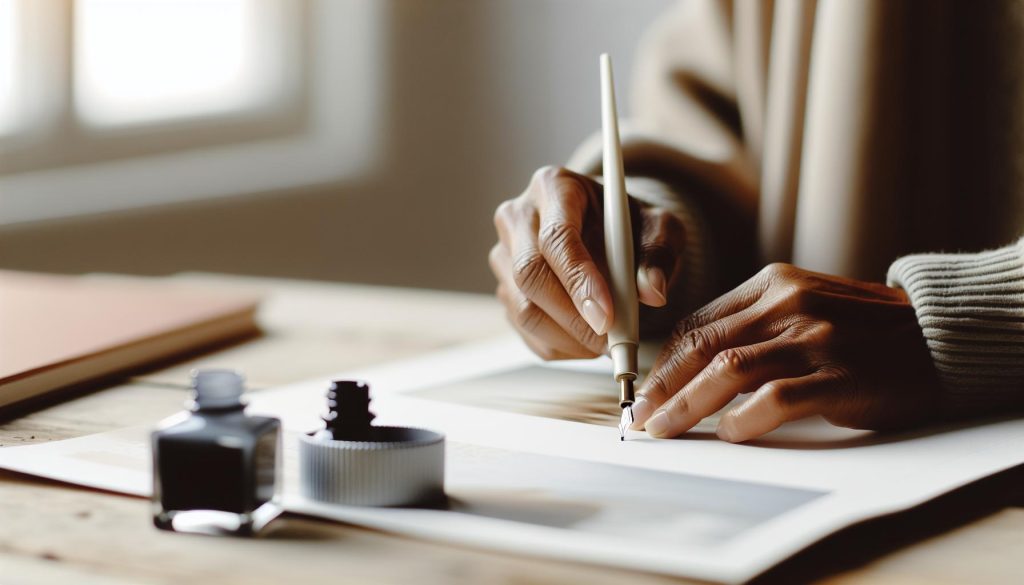
Step-by-Step Guide to Filling Your Nib
Filling your calligraphy nib correctly is crucial for achieving smooth, consistent writing. It may feel daunting at first, but once you get the hang of it, you’ll find the process becomes second nature. Let’s break it down into clear steps that will have you writing beautifully in no time.
Start by gathering your materials: a calligraphy pen nib, a nib holder, your chosen ink, and a clean surface to work on. First, ensure that the nib is securely attached to the holder. If you’re using a new nib, inspect it for any debris or oil and rinse it lightly in water; this removes any manufacturing residues that can interfere with ink flow.
Now, let’s fill that nib! There are several techniques, but here are the most effective:
- Pipette Method: This is one of the cleanest methods. Use a pipette to draw up some ink and then gently squeeze it to fill the nib’s reservoir. Take care to not overfill, as this can lead to ink spilling out while writing.
- Dibbing Method: Dip the nib into the ink about halfway. Pull it out and tap off the excess. This method allows the ink to settle in the nib without overloading it.
- Brush Filling: Use a small brush or a paintbrush to apply ink directly onto the nib. This can be particularly helpful for broader nibs or when you want to control how much ink is applied.
Regardless of the filling method you choose, always wipe the nib’s sides after filling it to prevent ink from running down the nib holder, which can make a mess and affect your grip.
Once filled, don’t rush to write just yet! Allow the ink to saturate the nib. A few moments of patience can make all the difference in achieving that smooth flow. When you’re ready, do a few trial strokes on scrap paper to check the flow and consistency of the ink. Adjust your pressure as needed; too much can cause breaking in your lines and too little may result in skipping.
With practice, you’ll develop a filling technique that works best for you, leading to a more enjoyable and fluid calligraphy experience. Enjoy the process and happy writing!
Common Mistakes When Loading a Calligraphy Nib
Loading your calligraphy nib correctly is more than just a simple task; it’s the key to unlocking your writing style. Yet, many beginners stumble through this stage, often resulting in frustration or uneven ink flow. Let’s dive into the common mistakes that can hinder your loading process and how to avoid them.
One of the biggest blunders is not preparing the nib before use. New nibs often come coated with a protective film that can impede ink flow. If you don’t rinse or wipe the nib properly beforehand, you’ll likely experience skipping or inconsistent writing right from the start. Always give your nib a gentle wash in water to remove any factory residues. This small step can dramatically improve your writing experience.
Another frequent error is overfilling the nib. Many enthusiasts get excited and dip the nib too deeply into the ink, leading to excess ink spilling over. This not only creates a mess but can also cause the ink to pool, making it difficult to control your strokes. Aim to dip the nib only halfway into the ink, then tap off any excess. This method ensures enough ink is loaded without overflowing, allowing for greater control as you write.
Lastly, rushing to start writing is a common misstep that many make. After filling your nib, it’s essential to allow the ink to saturate properly. Skipping this step can lead to dry points in your writing. Take a moment or two for the ink to settle into the nib before putting pen to paper. During this time, try doing a few test strokes on scrap paper to check that the ink flows consistently. This practice helps you adjust your grip and pressure, leading to that smooth, elegant flow you’re aiming for.
By being mindful of these mistakes and taking the necessary steps to avoid them, you’ll set yourself up for a more enjoyable and productive calligraphy session. Happy writing!
Tips for Achieving a Smooth Writing Experience
Getting that smooth, flowing line in calligraphy isn’t just about the fancy strokes-it’s about how you load your nib and your approach to writing. If you want to elevate your lettering game, here are some tips that I’ve found invaluable through my own experience.
First off, choose the right ink. Not all inks are created equal. Thicker inks can clog your nib, while too thin might run too fast. I prefer using high-quality calligraphy ink, which strikes a perfect balance. If you’re trying out different inks, always do a test on scrap paper to see how it flows. This simple step helps in identifying the ink that gives you the smoothest experience.
Next, the nib pressure you apply plays a crucial role. Applying too much pressure can lead to a scratchy sensation, while too little can make your letters look inconsistent. Find a comfortable pressure point. Practice applying varying pressure to see how it affects the line width. You’ll not only achieve smoother strokes, but also a more dynamic style in your letters.
Also, keep your writing surface clean and appropriately textured. A rough or uneven surface can cause your nib to snag and scratch. Use smooth, high-quality paper specifically designed for calligraphy. If you’re on a budget, look for paper that feels silky to the touch. It makes a world of difference in how the nib glides across the page.
Lastly, warm up before starting your piece. Just like a musician tunes their instrument, a few warm-up strokes on scrap paper can help get the ink flowing and settle your hand. Try different strokes and practice basic shapes to get in the zone. This preparation ensures you’re ready for that flawless writing experience.
By integrating these practices into your calligraphy routine, not only will you achieve smooth writing, but you’ll also enjoy the process more. Happy writing!
How to Clean Your Calligraphy Nib After Use
Cleaning your calligraphy nib properly after each use is essential for maintaining its performance and ensuring a smooth writing experience every time. Neglect this step, and you could find yourself dealing with clogged ink, inconsistent ink flow, or even damage to the nib itself. Just like a musician cleans their instrument, a little care goes a long way in calligraphy.
Start with some warm, soapy water. Just a few drops of mild dish soap mixed with warm water will do the trick. Soak your nib for a minute to loosen any dried ink or residue. After soaking, gently scrub the nib tines with a soft brush or an old toothbrush. Make sure to clean between the tines carefully, but don’t apply too much pressure-nibs are delicate and can easily bend or misalign.
After you’ve scrubbed the nib, rinse it thoroughly under running water. Be sure to remove all soap and ink residue, as even a tiny bit left can affect how ink flows the next time you use your nib. Once rinsed, pat it dry with a soft cloth or paper towel. Avoid using anything abrasive, as this can scratch the nib surface.
Lastly, check for any damage. Look for misaligned tines-when you press the nib, they should return to their original position. If they don’t, a gentle adjustment can help. Regular cleaning not only extends the life of your nib but also enhances your overall writing experience. By developing a consistent cleaning routine, you’ll always have a reliable tool ready to bring your calligraphy to life.
Maintaining Your Calligraphy Pen for Longevity
To keep your calligraphy pen in top shape, think of it as a relationship-you’ve got to nurture it to get the best results. Just like with any cherished tool, a bit of maintenance goes a long way in extending the longevity of your nib and ensuring that it performs beautifully every time you sit down to write. Regular upkeep not only preserves your nib but can also enhance your overall writing experience.
First off, always clean your nib after each use. Dried ink can cause clogs and damage, so it’s vital to rinse it under warm, soapy water to remove any residue. A gentle scrub with a soft toothbrush can do wonders, but remember, gentleness is key; nibs are delicate. After rinsing, let it air dry, but never leave it submerged in water for long periods, as that can damage the nib or affect its structure.
Another important aspect is to store your pen properly. When you’re not using it, keep it horizontally or vertically with the nib facing up, ideally in a protective case. This prevents ink from pooling in the nib, further reducing the risk of clogs. Check your nib regularly for any signs of wear or misalignment. If the tines don’t return to their original position after pressing, a gentle adjustment is necessary to ensure smooth writing.
Remember, investing time in caring for your calligraphy pen means you’ll spend less time dealing with issues later. This level of care transforms your writing sessions from frustrating to fluid, allowing your creativity to flourish. Your nib is your primary tool-treat it well, and it’ll serve you faithfully for many masterpieces to come.
Troubleshooting Ink Flow Issues with Your Nib
Every calligrapher, whether beginner or experienced, understands that ink flow issues can be one of the most frustrating hurdles to overcome. There’s nothing worse than preparing to create a beautiful piece only to face skips, blobs, or inconsistent lines. Luckily, troubleshooting these ink flow problems can often be accomplished with a few straightforward strategies and adjustments.
First, check if your nib needs a good cleaning. Over time, oils from your fingers or dried ink can coat the nib, obstructing the flow. To eliminate this, simply wipe down the nib with a clean, dry paper towel. If the problem persists, rinse the nib with warm, soapy water and scrub gently with a soft toothbrush to remove any stubborn residue. This step is crucial because a gleaming nib lays the foundation for smooth writing.
Another common issue lies in the nib’s alignment. Inspect the nib to ensure that the tines (the pointed ends of the nib) are parallel. Misalignment can cause uneven ink distribution and create annoying skipping. If one tine is longer than the other, gently adjust it using tweezers or your fingers. Remember, even a slight tilt can significantly affect flow, so take your time with this adjustment.
Sometimes the ink itself can be the culprit. Different inks have varying viscosities, and not every ink will perform well with every nib. If you’re using a thicker ink, try diluting it slightly with water or switching to an ink that’s better suited for calligraphy. Always test new inks on scrap paper before committing them to your final piece.
Lastly, consider your writing technique; the pressure you apply on the nib can change how ink flows. Lightening your grip may allow more ink to flow freely. The best way to find your sweet spot is through practice-experiment with different pressures to discover how your nib responds.
By following these troubleshooting steps, you’ll be better equipped to tackle ink flow issues head-on, setting the stage for a smooth and enjoyable writing experience. Keep your nib clean, aligned, and suited to the right ink, and you’ll be well on your way to beautiful calligraphy every time you write.
Exploring Advanced Techniques for Ink Loading
Filling your calligraphy pen nib correctly can make the difference between a smooth writing experience and a frustrating one. One advanced technique that I’ve found particularly effective is the reverse filling method. This technique involves dipping your nib into the ink and then gently drawing back, creating a vacuum that pulls ink into the nib. It’s especially useful if you’re using thicker ink or if you’re working with a nib that tends to clog. By positioning the nib at a slight angle while you inhale very gently, you can help draw ink into even the smallest crevices of your nib.
Another method to explore is using a brush to load your pen nib. Instead of dipping directly into the ink, take a fine brush loaded with ink and gently paint it onto the nib. This allows for better control over the amount of ink being used and prevents oversaturation. I’ve found this method particularly useful for intricate work, where precision is key. Always remember to load the ink gradually; it’s easier to add more than to fix a glob of ink that’s making a mess.
Practice with different inks, as their viscosities can drastically change how they load. For instance, using a water-based ink might require a different approach than using a pigment-based ink. Consider diluting thicker inks with a few drops of water to facilitate smoother loading and flow. Test different techniques on scrap paper to find what works best for your nib and the style of calligraphy you’re practicing. Each nib and ink combo can react differently, so experimentation is part of the process.
Lastly, don’t underestimate the power of warming your ink slightly by placing it in your hand for a moment. Warmer ink tends to flow better, which can enhance your overall writing experience. Adding these advanced techniques to your repertoire can elevate your calligraphy, making the process more enjoyable and your results more consistent.
Choosing the Best Paper for Calligraphy
Choosing the right paper for calligraphy is crucial-it can significantly enhance your writing experience and impact the final look of your work. Not all papers are created equal, and the surface texture can influence how your nib interacts with the page. For smoother, more controlled strokes, opt for papers designed specifically for ink, such as Bristol board or watercolor paper. These types often feature a smoother surface that allows the ink to glide effortlessly without bleeding or feathering.
When selecting paper, pay attention to the weight and thickness. Heavier papers (usually 200 gsm and above) can handle more ink and are less likely to buckle, making them a smart choice for ink-based calligraphy. Additionally, consider a paper with a slight texture or “tooth”-this can help grip the nib without making it difficult to draw lines. A paper that’s too slick may cause the ink to pool or run, while overly rough paper can catch the nib, resulting in inconsistent lines.
It’s also worth experimenting with different colors and finishes. Light-colored papers make it easier to see your ink work, while darker papers can add a stunning contrast to metallic or white inks. Try various brands and textures to see which combination feels best for your style. Remember, the goal is to find a balance that complements your writing technique and enhances the expressive quality of your calligraphy.
As you refine your choice, don’t forget about practicality-think about how the paper will interact with your ink type. Some papers are better suited for certain inks, like gel or water-based inks, while others may work well with thicker, pigment-based options. Testing your preferred combination on scrap pieces can save you frustration later on and lead to beautiful results on your final projects. Embrace the exploration, and let your paper choice elevate your calligraphy to the next level.
The Importance of Nib Pressure in Calligraphy Writing
The right pressure on your calligraphy nib can make or break your writing experience. Too little pressure, and you might struggle to get the ink flowing, leading to frustrating skips and uneven lines. Too much pressure, however, can cause the nib to dig into the paper, creating unsightly scratches and an inconsistent ink application. Striking the right balance is critical for achieving beautiful, flowing strokes.
Understanding how nib pressure affects your work is essential. When you’re just getting started, focus on lightening your grip. A gentle touch allows the nib to glide smoothly across the surface, creating elegant, fluid lines. With practice, you’ll develop a feel for how much pressure your nib needs based on the paper and ink you’re using. For example:
- Broad-edged nibs: These require a bit more pressure to maximize their width and achieve the right line thickness.
- Pointed nibs: A lighter touch is usually best; this helps to create delicate, varied strokes.
Don’t be afraid to experiment. Start with gentle curves or single strokes on scrap paper to see how different pressures affect your writing. It’s all about finding that sweet spot where you feel in control without forcing the nib. Also, remember to adjust your pressure based on your angle of approach – tilting your nib can necessitate a change in pressure to maintain even ink flow.
Incorporating varied nib pressure into your practice adds depth and character to your calligraphy. It allows you to express different emotions through your script, whether you’re aiming for the boldness of an invitation or the delicateness of a personal note. So, embrace the exploration of nib pressure-your calligraphy will thank you with every stroke.
Enhancing Your Calligraphy Skills with Practice Exercises
To truly elevate your calligraphy game, practice exercises must become your best friend. Regular, focused practice is essential not just for honing your skills but for building confidence and finding your unique style. You’ll be amazed at how a few dedicated exercises can transform your writing and deepen your understanding of how your nib and ink interact.
Start with warm-up strokes like simple lines, loops, and swirls. These are more than just fun; they help you find the right flow and pressure for your nib. For example, draw long, steady lines to practice maintaining consistent pressure. If you notice any skipping, it’s a sign your nib might not be thoroughly filled, or your pressure needs adjusting. Incorporating shapes, like circles and letters, can also help you understand the capabilities of your specific nib. Here are a few key exercises to include in your practice sessions:
- Basic Strokes: Create consistent, repeating shapes like “o,” “u,” and “s.” This will help you master the nuances of your nib pressure and angle.
- Letter Forms: Focus on individual letters, practicing their variations. Use guidelines to keep your sizes consistent.
- Connecting Letters: Write words or short phrases, which will challenge you to maintain flow and connection.
Don’t underestimate the power of consistency in practice. Aim for short, daily sessions rather than long, sporadic ones. This way, you’ll build muscle memory and develop a more intuitive understanding of your tools. Alongside these structured exercises, make sure to experiment with different speeds and pressures. You’ll discover how varying your technique can dramatically affect your final piece.
Remember, mistakes are part of the learning process. They’re not setbacks; they’re stepping stones. Record your progress over time-taking photos of your work can help you see the growth you might not notice day-to-day. With continual practice, patience, and a nice flow of ink through your nib, you’ll soon find yourself confidently crafting beautiful, fluid calligraphy that reflects your personal touch.
FAQ
Q: How do you use a calligraphy pen for the first time?
A: To use a calligraphy pen for the first time, start by selecting the right nib and ink. Fill the nib as per the instructions in your guide. Practice basic strokes on scrap paper to get a feel for the pen’s flow and pressure. Don’t forget to maintain consistent speed for smoother lines!
Q: Why is my calligraphy nib skipping?
A: If your calligraphy nib is skipping, it could be due to insufficient ink flow or pressure issues. Ensure the nib is properly filled with ink and cleaned regularly. You might also need to adjust your writing speed or the angle at which you’re holding the pen. For tips on troubleshooting, see the “Troubleshooting Ink Flow Issues” section in our article.
Q: Can I use any ink with my calligraphy pen?
A: Not all inks are suitable for calligraphy pens. It’s best to use fountain pen ink or specially formulated calligraphy ink to ensure smooth flow and prevent clogging. Check our “Understanding Different Ink Types for Calligraphy” section for more details on ink selection.
Q: How often should I clean my calligraphy nib?
A: You should clean your calligraphy nib after each use, especially if you’re switching inks. Clean it with water or a nib cleaner to prevent ink buildup and ensure smooth writing. For a detailed cleaning guide, refer to the “How to Clean Your Calligraphy Nib After Use” section.
Q: What paper is best for calligraphy?
A: The best paper for calligraphy is smooth, thick, and has a finish that absorbs ink well without feathering. Look for papers specifically designed for calligraphy, like those made for fountain pens. For more on paper selection, see our section titled “Choosing the Best Paper for Calligraphy.”
Q: How can I improve my calligraphy skills?
A: To improve your calligraphy skills, practice regularly using various techniques. Focus on mastering basic strokes, explore advanced ink loading methods, and learn different styles. Joining a calligraphy community or taking online classes can also provide valuable feedback and inspiration.
Q: What are common mistakes to avoid when using calligraphy pens?
A: Common mistakes include using the wrong ink, applying excessive pressure, and not maintaining your nib properly. Avoid rushing through your practice; take your time to develop control and finesse. For a list of common pitfalls, check out the “Common Mistakes When Loading a Calligraphy Nib” section.
In Conclusion
Now that you’re equipped with the know-how to fill your calligraphy pen nib for smooth writing, it’s time to put that knowledge into action! Remember, practice makes perfect. Don’t hesitate to explore more on our site for specialized calligraphy tools, such as our top-rated dip pens and unique fountain pens that can elevate your writing even further. For tips on maintenance and techniques that will enhance your skills, check out our guides on calligraphy styles and lettering basics.
Feel free to drop a comment below sharing your experiences or questions-your feedback could inspire others! If you’re ready to dive deeper into your creative journey, consider signing up for our newsletter for exclusive tips and discounts on our pen collections. The world of calligraphy awaits; let’s make your writing stand out today!


