Have you ever looked at your keyboard and thought it was a little dull? You’re not alone! Many people seek ways to personalize their tech, and using washi tape is a fun, easy solution. This decorative tape can transform your keyboard into a unique expression of your personality. Not only does it add flair, but it also helps with grip and protection. In this guide, we’ll explore the simple steps to customize your keyboard with washi tape, making it a more vibrant part of your workspace. Whether you want to showcase your favorite colors or simply make typing more enjoyable, keep reading to discover tips and tricks that will elevate your tech game!
Choosing the Right Washi Tape for Your Keyboard Design

can significantly enhance your tech’s personality and your workspace’s ambiance. With countless options available, you might feel overwhelmed, but it doesn’t have to be complicated. Start by considering the width of the tape; for keyboards, a width between 10 to 15 mm is generally ideal. This size allows for great coverage without overwhelming the keys or making it difficult to press them.
Next, think about the design and color of the washi tape. Bold colors and patterns can add a fun pop to a plain keyboard, while more subtle designs can give a chic, minimalist look. If you’re going for a cohesive theme, match the tape with your desk accessories or overall decor. Additionally, it’s worth experimenting with various designs on different sections of the keyboard to see what resonates with you. Don’t forget to check the stickiness; some washi tapes stick better than others. You want a tape that’s sufficiently adhesive to stay in place but not so much that it damages your keyboard when you decide to remove it.
Moreover, consider choosing eco-friendly options if sustainability is important to you. Many brands now offer washi tape made from recycled materials or sustainable practices, making it a greener choice for customization. Once you’ve narrowed down your selections, purchase a few different options to try together; combining prints can yield unique and eye-catching results. This playful approach not only personalizes your keyboard but can also be a fun creative outlet. Remember, the right washi tape can turn your keyboard into a reflection of your style without breaking the bank or committing to permanent changes.
Preparing Your Keyboard: Cleaning and Protection Tips

Before diving into the creative fun of customizing your keyboard with washi tape, you need to make sure your workspace is ready for the job. Cleaning your keyboard isn’t just a chore; it’s essential for ensuring that the tape adheres properly and remains secure over time. A clean surface prevents dust and oils from interfering with the adhesive properties of the tape, ensuring a seamless application and a polished look.
Start by shutting down your device and unplugging the keyboard. This is a quick and easy safety measure. Next, flip the keyboard upside down and gently shake it to dislodge crumbs and debris hiding between the keys. For a more thorough cleaning, use a soft brush or compressed air to blow out dust and particles. You can also dampen a microfiber cloth with a small amount of isopropyl alcohol to wipe down the keys and surface. This not only cleans but also disinfects, making your keyboard look and feel fresh.
Once the surface is dry, think about protection. If you have a particularly favorite design or a delicate washi tape, consider applying a clear sealant over the finished design after taping. This will give an extra layer of protection against wear and tear, keeping your keyboard looking vibrant for longer. Remember, maintaining your keyboard’s integrity is key to enjoying your stylish upgrade. By taking these preemptive steps, you set a solid foundation for a fun and creative customization project.
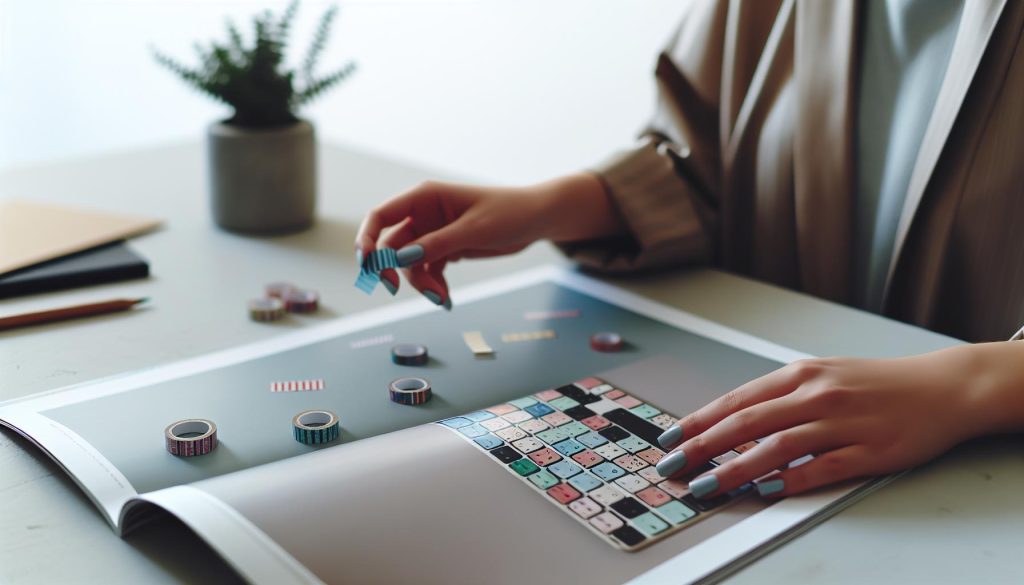
Step-by-Step Guide to Applying Washi Tape
Applying washi tape to your keyboard is not just a fun DIY project; it’s also a fantastic way to breathe new life into your tech setup. With the right approach, you can transform your keyboard into a stylish accessory that reflects your personality. Here’s a straightforward guide to help you get started.
First, gather your materials. You’ll need washi tape in your chosen designs, a pair of scissors, and potentially a craft knife for precise cutting. Once you have everything, it’s time to measure your keyboard key sizes. Simply take a strip of washi tape and lay it across a key. This will give you a sense of how much tape you’ll need for each key and if you’ll need to trim it down.
Next, begin applying the washi tape. Start with one key at a time. Cut a piece of tape slightly longer than the key itself, and position the tape over the key. Gently press it down in the center and smooth it out towards the edges, ensuring there are no bubbles or creases. If you encounter any air bubbles, use a credit card or your fingernail to gently push them towards the edge. This method ensures a smooth finish and helps the tape stick better.
As you progress, pay attention to the design alignment. If you’re using multiple patterns or colors, plan out your design beforehand. You might want to alternate colors or create a gradient effect for a more dynamic look. Once you’ve covered all the keys, take a moment to step back and admire your work. If any edges are lifting, consider applying a small amount of clear sealant to keep everything in place, especially if your keyboard sees a lot of use.
With your washi tape keyboard complete, you’ll not only have a unique piece but also a fun conversation starter. Enjoy typing on your creatively customized keyboard!
Creative Designs: Ideas to Personalize Your Keyboard
Your keyboard can be a canvas for creativity, and using washi tape is one of the best ways to turn a mundane tech accessory into something that reflects your personal style. Think of your keyboard not just as a tool, but as an extension of your personality. With the right designs, you can make your workspace more vibrant and inviting.
To kickstart your creative endeavor, consider the themes that resonate with you. For instance, if you love nature, you might opt for floral washi tapes or prints featuring leaves and trees. If you’re a fan of geometric designs, bright patterns can help you create a tech accessory that feels modern and chic. You can even mix and match different styles to develop a unique look that flows with your workspace’s overall aesthetic.
Design Ideas to Try
Here are a few design ideas to inspire your keyboard transformation:
- Monochrome Magic: Choose varying shades of a single color for a sleek, sophisticated look. This approach is particularly effective if you want a calm, cohesive design.
- Colorful Contrasts: Opt for bold, contrasting colors, like vibrant pinks against deep blues, to create a striking visual effect that grabs attention.
- Pattern Play: Use multiple patterns in a coordinated fashion. For example, you could alternate stripes with polka dots or florals, ensuring they share a color palette for harmony.
- Seasonal Themes: Change your keyboard design with the seasons. For fall, think of using warm colors and leaf patterns, while spring could bring florals or pastel designs.
- Inspirational Quotes: Use washi tape to write or highlight your favorite quotes on certain keys, transforming your keyboard into a source of daily motivation.
Personalization Beyond Looks
While aesthetics are important, personalization can also enhance functionality. Consider using washi tape to color-code your keys. For instance, you could assign color categories to your keys based on specific tasks or preferences-like using red for shortcuts, blue for common commands, and green for rarely used keys. This way, not only does your keyboard look fabulous, but it also improves your productivity.
Ultimately, the best part about washi tape is its versatility. Feel free to shift designs as your tastes change or as holidays roll around. The only limit is your imagination, so dive in, have fun, and make that keyboard truly yours!
Tips for Maintaining Your Custom Washi Tape Keyboard
Taking care of your custom washi tape keyboard is key to keeping it looking fresh and vibrant. With a little attention, you can ensure that your creative expression lasts. First off, avoid exposing your keyboard to excessive moisture. Even though washi tape is relatively durable, water can cause it to peel or warp. When cleaning, use a slightly damp cloth instead of spraying cleaners directly on the keyboard. Gently wipe the surface, being sure not to scrub too hard to avoid lifting the tape.
Regularly check the edges of the washi tape for any signs of lifting. If you notice any corners starting to come up, press them down carefully. You can also use a small amount of mod podge or clear nail polish around the edges for extra adhesion. This can help prevent those annoying lift-ups, especially if you type a lot or use your keyboard frequently.
Another critical aspect of maintaining your washi tape keyboard is protecting it from direct sunlight. Prolonged exposure can fade the colors over time. If possible, keep your keyboard in a shaded area or use a keyboard cover when you’re not using it. Additionally, consider rearranging or replacing the washi tape regularly to give your keyboard a refresh and keep it in top condition.
Lastly, don’t hesitate to showcase your creative designs! Sharing your washi tape keyboard on social media not only inspires others but can also give you new ideas on how to enhance or maintain your design. Remember, your keyboard is a reflection of your personality, and taking care of it makes that expression last longer. Enjoy the process and let your creativity shine!
Troubleshooting Common Application Issues
When customizing your keyboard with washi tape, encountering issues during application is not uncommon. Whether it’s bubbling, lifting edges, or difficulty getting the tape to adhere properly, troubleshooting these problems can make the difference between a professional-looking finish and a frustrating DIY project. Here’s a straightforward guide to help you troubleshoot and overcome these common issues efficiently.
One of the most frequent problems is bubbles forming under the tape. This can occur if the surface of your keyboard isn’t adequately prepared. Make sure to clean the surface thoroughly before applying tape. Use a lint-free cloth with a mild cleaner to remove any dust or oil that could prevent adhesion. If you notice bubbles forming, you can gently lift the tape at one edge and press it down again, starting from the center and pushing outwards to release the air.
Another issue you might face is lifting edges of the tape. This often happens if you’re using a tape that’s too thin or if the surface wasn’t fully cleaned before application. To resolve this, try reinforcing the edges with a small dab of clear glue or mod podge. Additionally, ensure you’re applying the tape smoothly and without tension; pulling too tight can cause it to lift.
In some cases, you might find that the washi tape isn’t sticking well at all. This could be due to high humidity or temperature affecting its adhesive properties. If this is the case, ensure you’re working in a dry, room-temperature environment. If conditions are not ideal, consider using double-sided tape at the edges for a stronger hold.
Lastly, remember that practice makes perfect. If a piece doesn’t stick well or looks off, don’t hesitate to remove it and try again. Mistakes are part of the creative process, and adjusting your approach can lead to even better results. Keep experimenting with different types of washi tape and application methods until you find what works best for your unique style. Happy customizing!
Unique Uses for Washi Tape Beyond Keyboards
Washi tape is a versatile tool that goes far beyond jazzing up your keyboard. Its lightweight, decorative nature makes it perfect for a wide range of creative projects around your home and workspace. Here are some unique and fun ways to use washi tape that can inspire you to explore its potential further.
One of my favorite uses is for organizing cables and chargers. Simply wrap a piece of washi tape around the ends of your chargers to help identify them quickly. You can even color-code your cables or use different patterns to reflect your style. It’s an easy, clutter-free solution that adds a personal touch to mundane tech.
Another brilliant application is in art and craft projects. Whether you’re making greeting cards, scrapbooking, or embellishing photo frames, washi tape can transform ordinary items into stunning works of art. Use it to create borders, frames, or even unique patterns layered on various surfaces. The only limit is your imagination!
If you’re looking to decorate for gatherings, washi tape can also serve as a stylish way to create temporary art or decor. You can design fun banners, or party decor, or even label dishes at a potluck. Its easy removal ensures you won’t damage surfaces, making cleanup a breeze.
Creative Storage Solutions
Consider using washi tape for labeling storage containers. Instead of permanent labels, draw on the tape with a marker or use a small piece to indicate contents. Changing up the contents of your bins? Just peel off the old tape and re-label it. It’s simple, flexible, and adds a touch of creativity to your organization.
Washi tape isn’t just for aesthetics-it’s functional too! By embracing its endless possibilities, you can enhance everyday objects, streamline your workspace, and ignite your creativity in ways you never imagined. So go ahead, grab some washi tape, and let your imagination run wild!
Inspiring Washi Tape Projects: Expand Your Creativity
Washi tape can turn your keyboard into a vibrant canvas, and the creative projects you can explore with it are endless. Let’s dive into imaginative ways to utilize washi tape not just for customizing your keyboard, but also for other fun and productive aspects of your workspace. Whether you’re looking to create functional labels or add personal flair to daily items, embracing this decorative tape will unleash your creativity.
One engaging project is to design custom keyboard shortcuts. Use washi tape to label specific keys for handy reminders or shortcuts that are personal to you. For example, if you often use the “cut” function, you can highlight that key with a distinct pattern that catches your eye. This not only adds an artistic touch but also enhances your workflow. You can even color-code your shortcuts, making frequent commands easy to find at a glance!
Wrap Ideas for Extra Flair
Consider wrapping your keyboard’s edges with washi tape to create a cohesive look. This method can help define your workspace while protecting your keyboard from scratches. Choose bold colors or unique patterns that reflect your personality-maybe even a seasonal theme that matches your decor. This small change can make a big impact on both aesthetics and your mood as you work.
Another innovative use is for custom wrist rests. Repurpose an old wrist rest by covering it with washi tape to match your keyboard or overall desk theme. This not only extends the life of your accessories but also transforms them into personalized pieces. Combine patterns for a playful touch or go with a sleek, monochromatic design for a more sophisticated look.
Collaboration with Other Craft Supplies
Pair your washi tape projects with other materials like stickers and embellishments for a mixed-media approach. Use washi tape to frame your workspace tools-think planner covers, mouse pads, or even notebooks. This method not only amplifies creativity but makes your entire setup a vibrant representation of who you are.
Incorporating washi tape into your workspace opens possibilities for expression and organization. As you personalize your keyboard and surrounding area, you’ll find that the creative journey can be just as enjoyable as the finished result. So grab your favorite rolls and start crafting!
Removing Washi Tape: Best Practices and Tips
When it’s time to remove washi tape from your keyboard, doing it the right way is crucial to avoiding damage and ensuring a smooth transition. Remember, washi tape is designed to be removable, but that doesn’t mean it’ll come off without a hitch every time. Here’s how to make the process as hassle-free as possible.
Start by lifting a corner of the tape gently with your fingernail or a plastic scraper. Don’t rush this step; pulling too hard can tear the tape or even damage your keyboard’s finish underneath. Once you’ve got a good grip, peel the tape back slowly and at a shallow angle. This technique helps reduce the risk of sticky residue or damage to the surfaces beneath.
If the tape leaves behind any adhesive residue, don’t panic. Most washi tape glue is not very strong, so it shouldn’t be a problem. Use a microfiber cloth or a soft, damp cloth with a little rubbing alcohol or warm soapy water to gently wipe the area. Be cautious not to let any liquid seep into the keyboard. For stubborn residue, a bit of adhesive remover can do wonders-but again, ensure it doesn’t get inside your keyboard.
Tips for Success
- Tackle it slowly. Rushing can lead to unwanted damage.
- Use the right tools. A plastic scraper can help if your nails aren’t enough.
- Clean as you go. Keep a cloth nearby for quick cleanup of any residue.
Removing washi tape should be a straightforward task that leaves your keyboard looking just as good as it did before. With these tips in mind, you can refresh your design easily whenever you want a new look!
Essential Tools for Your Washi Tape Project
To elevate your keyboard customization with washi tape, having the right tools is essential. A well-equipped setup not only makes the process smoother but can also yield stunning results that reflect your personal style. Start with high-quality washi tape. Look for tapes that are vibrant, durable, and adhere well without leaving a sticky residue behind. There’s an overwhelming variety out there, so don’t be afraid to mix patterns and colors that resonate with you.
Next, gather some basic crafting tools. A pair of sharp scissors is crucial for clean cuts, especially if you’re working around tight spaces or cutting unique shapes. You’ll also want a ruler or cutting mat to ensure straight lines and precise measurements. A craft knife can be handy for more intricate designs or when you need to trim the tape closely around keycaps. Don’t overlook having a pencil or erasable marker for making any pre-drawings on your keyboard, ensuring you get it right before applying tape.
Moreover, consider investing in a plastic scraper or a credit card. These tools help smooth out any air bubbles or wrinkles as you apply the tape, giving you that professional finish. A microfiber cloth is also useful for keeping your keyboard clean before you start. You’d be surprised how much dust can interfere with the tape’s adhesion.
Finally, have an adhesive remover on hand for any sticky residue when you’re ready to change your design. By gathering these tools, you’re not just preparing for a project; you’re setting the stage for creativity and self-expression through your tech!
Showcasing Your Washi Tape Keyboard: Share with Others
There’s something incredibly satisfying about showing off your custom washi tape keyboard design. It’s more than just a functional tool; it’s a reflection of your personal style and creativity. Once you’ve applied your unique patterns and colors, don’t keep it to yourself! Sharing your creation can inspire others and open up conversations about customization.
Start by snapping high-quality photos of your keyboard from various angles. Good lighting is key, so find a spot where natural light floods in. Consider styling the shot with complementary items, like notebooks or plants, to enhance the aesthetic appeal. You could also create a short video showcasing your keyboard in action, highlighting its design and how it fits into your workspace. Platforms like Instagram, TikTok, or YouTube are perfect for this; they have communities overflowing with enthusiasts eager to see new DIY projects.
Engagement is essential after sharing. Encourage feedback and interaction by asking your followers what they think or if they’d try a similar design. You could set up polls or Q&A sessions to dive deeper into keyboard customization. Another great idea? Join crafting or gaming communities online. Places like Reddit or Facebook groups can be goldmines for inspiration and advice, and sharing your work there develops camaraderie among fellow enthusiasts.
Lastly, consider making a mini-tutorial on how you achieved your design. This not only showcases your skills but provides valuable insights to others looking to undertake a similar project. Remember, the goal is to inspire and connect-your washi tape keyboard isn’t just a personal project; it’s a conversation starter!
Where to Find Washi Tape: Quality and Variety
Finding high-quality washi tape that meets your unique design needs doesn’t have to be a hassle. Whether you’re looking to dive deep into vibrant patterns or more subdued styles, there’s a world of options out there. From local craft stores to online boutiques, you can explore a variety of sources that cater to every aesthetic.
Local craft stores are often treasure troves for washi tape. Stores like Michaels, Joann, or Hobby Lobby typically have a dedicated section for washi tape that includes seasonal and themed designs. It’s a great way to see and feel the tape before you buy, ensuring you’re satisfied with its texture and adhesion. Plus, the in-store discounts and coupons can make your purchase even sweeter.
Online shopping opens up an even wider array of choices. Websites like Etsy offer handmade and unique designs that you won’t find anywhere else, providing an opportunity to support small businesses. Amazon and eBay also host a vast selection, often with user reviews to guide your decisions. If you’re after specific themes-like florals, minimalistic styles, or even custom prints-check out specialized retailers like Washi Tape Crafters or The Washi Tape Shop. These sites are filled with curated collections that can spark your creativity.
Lastly, don’t overlook sources like your local stationery shops or even big-box retailers such as Target. They frequently stock curated collections of washi tape that can range from trendy to classic. Shopping in person allows you to gather inspiration and tactile experiences that online shopping sometimes lacks.
When choosing washi tape, consider not just the color and pattern but also the tape’s width, stickiness, and how well it will adhere to your keyboard surface. With a little exploration, you’ll discover the perfect washi tape that reflects your personality and enhances your tech setup!
FAQ
Q: How can I choose the right washi tape for my keyboard design?
A: To choose the right washi tape for your keyboard design, consider the theme or colors that resonate with you, the size of the tape (width), and its adhesive strength. Opt for tapes featuring vibrant patterns or subtle textures that enhance your tech without overwhelming it. Check out the “Choosing the Right Washi Tape” section for deeper insights.
Q: What are some creative designs for washi tape keyboards?
A: Creative designs for washi tape keyboards can include stripes, floral patterns, or personalized logos. Layer different washi tapes for a unique look, or use contrasting colors to create sections that match your workspace. Explore the “Creative Designs” section for more imaginative ideas!
Q: How do I clean and prepare my keyboard before applying washi tape?
A: Begin by unplugging your keyboard and removing any debris with compressed air. Wipe the surface with a damp cloth and a mild cleaner, then dry it thoroughly. This preparation ensures that the washi tape adheres well and lasts longer. Check the “Preparing Your Keyboard” section for detailed cleaning tips.
Q: Can I remove washi tape from my keyboard without damaging it?
A: Yes, you can remove washi tape safely. Gently lift a corner and pull slowly at a 45-degree angle. If the tape resists, use a hairdryer to warm it slightly for easier removal. For best practices, refer to the “Removing Washi Tape” section for comprehensive guidance.
Q: What tools do I need for a successful washi tape keyboard project?
A: For a successful washi tape keyboard project, you’ll need scissors, a ruler for measuring, a craft knife for precise cuts, and a cutting mat. A soft cloth for cleaning and perhaps a craft pen for finishing touches can help as well. More details are available in the “Essential Tools” section.
Q: How can I maintain my custom washi tape keyboard?
A: To maintain your custom washi tape keyboard, regularly wipe it with a soft, dry cloth to remove dust. Avoid getting it wet and be mindful of areas that experience frequent contact to prevent peeling. Explore the “Tips for Maintaining” section for additional maintenance strategies.
Q: What unique uses does washi tape have beyond customizing keyboards?
A: Beyond customizing keyboards, washi tape is great for decorating phone cases, creating custom planners, or making temporary wall art. It’s also useful for labeling cables and organizing office supplies. Check out the “Unique Uses for Washi Tape” section for more inspiring ideas!
Q: How can I showcase my washi tape keyboard design online?
A: To showcase your washi tape keyboard design online, take clear photographs from different angles and share them on social media or crafting forums. Consider writing a blog post or joining groups that focus on DIY projects. See the “Showcasing Your Washi Tape Keyboard” section for tips on sharing your work effectively.
To Conclude
Ready to transform your keyboard with washi tape? You’ve learned how simple it is to personalize your tech and add flair to your workspace. Don’t wait-grab your favorite designs today and get started! If you’re curious about more DIY tips or tech customization ideas, check out our guide on DIY Desk Decor or explore our article on Maximizing Workspace Productivity.
Feel free to share your own creations in the comments below or tag us on social media! Your feedback not only inspires innovation but builds our community too. Stay tuned for more tips on effortlessly making tech yours, and don’t forget to subscribe to our newsletter for the latest trends and ideas that spark joy and creativity. Let’s keep the inspiration flowing!


