If you’re looking to elevate your crafting game, using a calligraphy pen on your Cricut Maker can make a world of difference. Imagine transforming simple projects into stunning works of art with just the right pen and technique. Many crafters find that integrating calligraphy adds a personal and professional touch to everything from invitations to home decor.
But, let’s face it-getting started can feel daunting. You might have questions about pen selection, font choices, and overall technique. Don’t worry! I’ve got you covered. In this guide, we’ll explore the ins and outs of using the Cricut calligraphy pen, perfect for anyone looking to bring precision and flair to their creations. Stick around to discover tips, tricks, and the confidence to craft beautifully written pieces effortlessly.
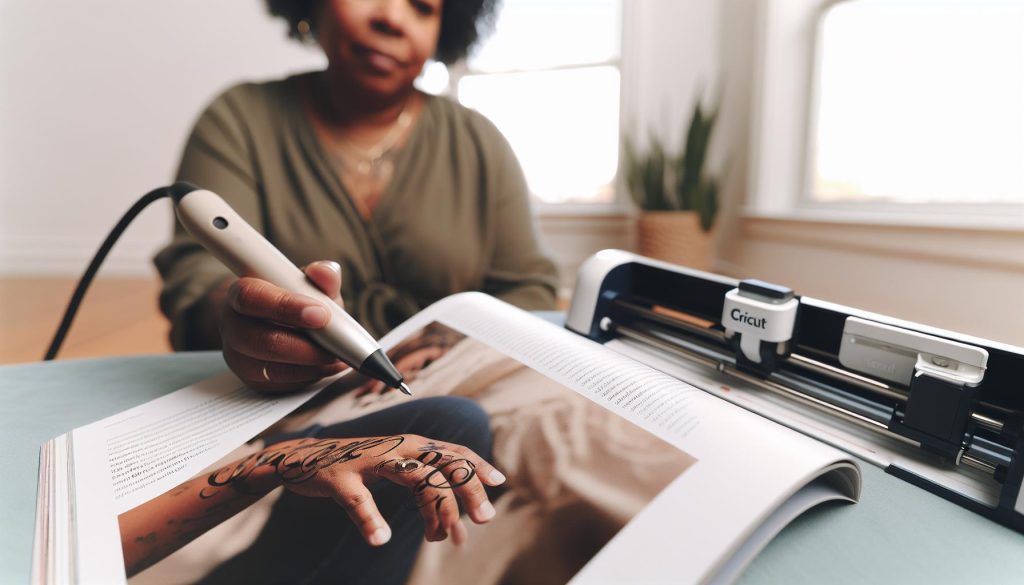
How Calligraphy Pens Work with Cricut Maker
Crafting beautiful calligraphy with your Cricut Maker can elevate your projects drastically, but understanding how calligraphy pens work is key to unlocking their potential. These pens are specially designed to mimic traditional calligraphy tools, offering precision and style without requiring advanced skills. When you load a calligraphy pen into your Cricut Maker, the machine takes on the task of replicating hand-lettering techniques through careful movements. This means you can achieve that elegant, flowing look effortlessly, and with a bit of practice, even create your own unique styles.
Calligraphy pens for Cricut come in various widths and styles, which directly affect the appearance of your final designs. For instance, the Cricut Calligraphy Pen features a flexible tip that allows for varying line thickness based on the speed of the pen’s movement, closely resembling real calligraphy strokes. When using these pens, remember to adjust your settings according to the type of paper you’re using and the effect you want to create-different materials can yield varying results. Always perform a test run to see how your chosen pen interacts with your project material to ensure you achieve the desired effect.
One of the crucial aspects of making the most out of your Cricut pen is understanding the software. The Design Space application provides specific functions for writing and drawing, allowing you to select the font styles that best suit your design. Moreover, utilizing the right writing fonts, often included in newer pen sets, can enhance the elegance of your calligraphy projects significantly. Pay attention to how these fonts are rendered on your chosen material, as this can transform a simple project into a stunning piece of art.
In conclusion, using calligraphy pens with your Cricut Maker is not just about having the right tools; it’s about mastering the techniques and settings that bring your artistic vision to life. Setting your machine up for success involves choosing the right pen, understanding your design software, and experimenting with different materials to discover what works best for you. Dive in, and enjoy creating exquisite calligraphy art with your Cricut!
Choosing the Right Calligraphy Pen for Your Projects

When it comes to crafting beautiful calligraphy projects with your Cricut Maker, choosing the right calligraphy pen is not just a matter of personal preference-it’s essential for achieving the results you envision. With a variety of pens available, each with its unique design and capabilities, knowing what to look for can make all the difference in your projects.
First off, consider the type of calligraphy style you want to achieve. Some pens are designed for traditional styles, like Copperplate, while others are perfect for modern, brush-like lettering. Look for pens with flexible tips if you want to create those beautiful thick and thin strokes that mimic hand-lettering. These pens often adjust line width based on the speed of the pen’s movement, providing that authentic look of calligraphy.
Next, pay attention to the pen width and ink type. Most Cricut calligraphy pens come in various sizes, impacting how bold or delicate your writing appears. For instance, finer pens are great for detailed work on smaller projects, while thicker ones are better suited for larger surfaces or emphasis. Additionally, you’ll want to choose between different ink types-water-based inks are typically easier to work with and dry faster, making them a solid choice for most applications.
Finally, match your pen with the paper type you’re using. Certain pens work better on particular materials. For example, a textured cardstock might yield rough lines if paired with a finer tip. Always do a test run on your chosen material to see how the pen performs. This practice not only helps avoid mistakes but also allows you to experiment with different effects, giving you control over your creative outcome.
In summary, selecting the right calligraphy pen involves understanding your desired style, the pen’s characteristics, and how it interacts with your project materials. Don’t hesitate to experiment; the right pen makes crafting exquisite calligraphy not only easier but much more enjoyable!
Preparing Your Cricut Maker for Calligraphy

To achieve stunning calligraphy results with your Cricut Maker, preparation is key. It’s not just about the right pen; it’s about ensuring your device is set up for success. Start by making sure your Cricut Maker is updated with the latest firmware and software. This ensures you’re using the most recent features and enhancements, which can make a significant difference in your calligraphy projects.
Next, let’s focus on tool selection. While you might have picked the perfect calligraphy pen based on your chosen style, you need to insert it correctly into the machine. Make sure the pen is secure in the holder-this prevents any unexpected shifts that could ruin your work. It’s also wise to practice setting the pen height appropriately. If it’s too high, it may not touch the material well; if it’s too low, it could damage the tip.
Material Preparation
Selecting the right material is equally important. Ensure that the paper or cardstock you’re using is compatible with the pen type. If you’re using a finer pen, opt for smooth or lightly textured surfaces for best results. Always perform test runs on scrap pieces when you’re trying a new combination of pen and material to gauge how they interact.
Lastly, configure your design settings in the Cricut Design Space. Choose a calligraphy font that suits your project and adjust the stroke settings to achieve the desired line thickness. This customization allows for sharper contrasts between thick and thin lines, enhancing the aesthetic appeal of your lettering. Proper setup at this stage can save you time and frustration later on, allowing you to focus on crafting beautiful pieces with your Cricut Maker.
Step-by-Step Guide to Calligraphy Crafting

To create stunning calligraphy with your Cricut Maker, it’s essential to follow a step-by-step approach that ensures precision and creativity. Start by selecting your project in Cricut Design Space. Choose a calligraphy font that resonates with your style-this sets the mood for your entire project. Once you’ve chosen your design, scale it to fit your materials appropriately and adjust the stroke settings to emphasize thick and thin lines. This may require a bit of experimentation, so don’t hesitate to run test designs on scrap materials.
After finalizing your design, it’s time to prepare the Cricut Maker. Insert the calligraphy pen into the appropriate holder, making sure it’s secure and positioned at the correct height. If the pen sits too high, it won’t touch the material properly; too low, and it might damage the tip. A common practice is to gently press the pen against your material before starting to ensure it touches just right.
Next, load your chosen material onto the machine’s cutting mat. Smoothly adhere the paper or cardstock, as any wrinkles can disrupt the pen’s movement. Before starting the main run, perform a test cut on a small corner or scrap piece to observe how the pen interacts with the paper. This step helps confirm that the pen settings, such as speed and pressure, are ideal for your pen type and material.
Once everything is set, start your project. Watch as your Cricut Maker brings your design to life, tracing the beautiful letters you’ve chosen. After the process is complete, don’t rush the removal; let your creation dry if needed, especially if you’ve used ink that smudges easily. Embrace this time to reflect on your work and take pride in your newfound skill-your meticulous attention to detail in each step leads to truly gorgeous calligraphy that impresses every time.
Mastering Calligraphy Techniques with Cricut

To truly elevate your calligraphy projects with a Cricut Maker, understanding and mastering specific techniques can make all the difference. One of the first things to grasp is the importance of selecting the right calligraphy pen and matching it with suitable materials. Each pen has its own unique properties, such as ink flow and line thickness, which directly affect the outcome of your work. Experiment with different pen types-gel pens, felt tips, and even specialized Cricut pens-to discover which works best with your design style and the paper you’re using. Don’t hesitate to create a small library of your favorites for quick reference.
Next, familiarize yourself with your Cricut software. Utilizing features like “Advanced Pen Settings” within Design Space lets you fine-tune the pressure and speed of the pen, resulting in beautifully nuanced strokes. This is key for achieving those delicate thick and thin letterforms typical in calligraphy. Practice makes perfect; run multiple test designs on scrap paper to understand how your chosen pen interacts with various materials. You’ll quickly learn how to adjust the speed and pressure settings to enhance your designs.
Another essential technique is layering. Once you’ve created the base of your calligraphy design, consider adding additional layers or embellishments. This might include adding shadows or highlights in a contrasting color, which can elevate your work significantly. Experiment with different colors and styles to see what complements your primary lettering. A great tip is to incorporate embellishments like flourishes or decorative borders to personalize each piece uniquely.
Finally, don’t overlook the value of patience and practice. Calligraphy, even with the assistance of technology, requires a keen eye for detail and a commitment to refining your skills. Make notes on what works and what doesn’t – over time, you’ll develop a workflow that allows you to create stunning, intricate designs that genuinely reflect your artistic vision. Embrace the journey of learning; the more you practice, the more confident you’ll become in your calligraphy crafting abilities.
Exploring Design Software for Calligraphy Projects
To really make the most of calligraphy projects with your Cricut Maker, tapping into the design software is crucial. Cricut Design Space offers a wealth of features that can help elevate your calligraphy to the next level. You can manipulate text in ways that traditional calligraphy simply can’t match. For instance, the software lets you adjust letter spacing and sizing with just a few clicks, ensuring that your designs have a professional touch.
One of the most important tools you’ll find in Design Space is the “Advanced Pen Settings.” Here, you can customize the pressure and speed of the pen, which is essential for creating those stunning thick and thin strokes characteristic of calligraphy. Whether you’re making elegant invitations or decorative signs, these settings allow you to achieve precise results tailored to your pen and paper choice. Don’t underestimate the importance of running test outputs-this gives you a hands-on understanding of how different pens perform on various materials, helping you fine-tune your designs.
When it comes to embellishing your calligraphy, Design Space shines again. You can layer your text with different colors and styles easily. Want to add a flourish or create a shadow effect? Simply duplicate your text, change its color, and adjust its placement. This kind of layering not only adds depth but also allows for creativity in personalizing each piece. Think of it as giving your designs a little extra sparkle, making them stand out.
Lastly, get comfortable with using images and fonts available in the library. Upload your own designs for a truly unique look or explore the extensive library that Cricut offers. From elegant script fonts to bolder styles that complement your calligraphy, the options are nearly limitless. Experimenting with these resources will spark new ideas and hone your techniques, ensuring that each project is not only unique but also a reflection of your artistic vision. Make it a point to explore and play with the software-who knows what stunning designs you’ll create just by clicking around!
Creating Stunning Calligraphy Designs on Cricut
Creating breathtaking calligraphy designs on your Cricut Maker can be a transformative experience. With just a few strategic steps, you’ll harness the power of precision to create art that looks hand-lettered without the hours of practice that traditional calligraphy demands. One of the best ways to achieve stunning calligraphy designs is to start by choosing the right fonts available either within Cricut Design Space or through other resources.
Begin by selecting a font that resonates with your project. You can find elegant script fonts specifically designed for calligraphy that offer graceful strokes and beautiful flourishes. Experiment with varying styles-perhaps a flowing cursive for wedding invitations or a bold script for a statement piece. Once you’ve picked a font, adjust its size and spacing in the design software. Don’t be afraid to play around; the ability to manipulate text is one of Cricut’s biggest advantages. Also, take advantage of Design Space’s layering features to create depth in your designs. By duplicating your text, changing colors, or adjusting placements, you can add shadows or highlights that make your work pop.
Another critical aspect is your pen choice. Different pens will produce varying effects, so make sure to test a few options on your desired material. In the “Advanced Pen Settings,” you can adjust parameters such as pressure and speed to get those lovely thick and thin strokes characteristic of calligraphy. It’s worth the time to conduct test runs with different materials to see how your chosen pen interacts. This not only saves you from ruining your final piece but also enables you to tweak settings for optimal results.
Embellishments can elevate your designs further. Incorporate florals, borders, or decorative elements that align with your theme. Using images from Cricut’s library can be a game-changer; layering imagery with text can create a beautifully cohesive look. Whether you’re crafting a personalized card, a piece of wall art, or custom labels, each detail contributes to a polished final product. Take your time, know that every piece is a reflection of your artistic vision, and don’t hesitate to let your creativity flow.
Common Mistakes to Avoid in Calligraphy Crafting
Creating beautiful calligraphy with your Cricut Maker is a satisfying project, but it’s easy to trip up on common pitfalls. Avoiding these mistakes will save you time, materials, and frustration, enabling you to produce stunning results.
One major oversight is skipping pen testing. Not all pens work the same on every material, and failure to test can lead to disappointing results. Before you embark on your project, take an hour to test different pens on the actual materials you’ll use. Pay attention to how each pen interacts with the surface-does it bleed? Is the color vibrant? This simple step can ensure your final piece looks polished and professional.
Another frequent issue arises with font selection. Not all fonts produce the charming calligraphy effect you might expect. Some may be too intricate or lack appropriate spacing for the pen to handle gracefully. Stick to fonts specifically designed for writing or calligraphy within Cricut Design Space. A few adjustments to size and letter spacing can make a world of difference in the final appearance of your project. Remember, less can be more; overly ornate fonts can lose definition when executed by the machine.
In addition, not adjusting the machine settings for calligraphy is a common mistake. Ensure that you’ve set the right pressure and speed for your pen in the “Advanced Pen Settings.” If you’re unsure, do a few test runs. Too much pressure can lead to jagged lines, while too little may result in faint strokes that lack the depth and character of traditional calligraphy. Finding that sweet spot will enhance the elegance of your designs.
Lastly, don’t forget about the importance of patience. Rushing through projects often leads to missed opportunities for creative flair. Take your time with each design, ensuring that you’re happy with alignment, spacing, and the overall look. Incorporate pauses to step back and evaluate your progress-this will help you catch any mistakes early on.
By keeping these key points in mind, you’ll sidestep typical mistakes and enhance your crafting experience, enabling your Cricut Maker to produce the beautiful calligraphy you envision.
Enhancing Your Calligraphy with Embellishments
It’s amazing how a few simple embellishments can transform your calligraphy project from ordinary to extraordinary. Whether you’re crafting a handmade card, a personalized gift, or wall art, adding those little details can make a big difference in the final look. Here are some effective ways to enhance your calligraphy using your Cricut Maker.
Start with metallic accents. Using metallic pens or adding foil can create stunning effects that catch the eye. Try incorporating gold or silver for added elegance. Your Cricut Maker can handle foil applications easily, turning simple lettering into a show-stopping design. When working with foil, remember to adjust your settings accordingly; using a lower pressure will help prevent smudging and ensure a clean finish.
Next, think about layering. Layering is a fantastic way to add depth and dimension to your calligraphy. Consider matting your calligraphy work on colored cardstock or patterned paper. You can also cut out decorative shapes or frames with your Cricut to complement your text. Adding a shadow effect by cutting multiple versions of your design in varying sizes and stacking them creates a three-dimensional look that feels professional and polished.
Don’t forget about texture. Incorporating different materials like felt, fabric, or even wood can elevate your calligraphy. For example, using a felt background with your calligraphy cut from heavier paper can add a soft, tactile quality that visitors will love to touch. Experimenting with textures makes your projects not only visually appealing but also interesting to engage with.
Lastly, embellishments like stickers, rhinestones, or sequins can provide that finishing touch. Applying these elements strategically around your calligraphy adds a touch of whimsy and fun. Be mindful not to overcrowd your design-sometimes, less really is more. A few well-placed rhinestones can accentuate a letter or highlight a word without distracting from the main focus.
By introducing these enhancements, you can achieve stunning, polished results that breathe new life into your calligraphy projects. Don’t hesitate to experiment and let your creativity guide you. Ultimately, the goal is to express your personal style, making each piece distinctively yours. Happy crafting!
Maintaining Your Calligraphy Pen and Cricut Maker
Keeping your calligraphy pen and Cricut Maker in top shape is vital for achieving precision in your crafting. After all, a well-maintained tool is your best ally in creating stunning lettering projects. So, let’s dive into some straightforward and effective maintenance tips that will help you get the most out of your calligraphy endeavors.
First off, always store your calligraphy pens properly. When not in use, keep them capped to prevent the ink from drying out. For the Cricut Maker, ensure it’s dust-free by placing it in a cabinet or covering it. Regularly check the cutting blade and the pen holder for any debris or stuck fibers. A clean machine will deliver a cleaner cut or writing each time. When it comes to the pen, clean the tip gently with a damp cloth if you notice any ink buildup. This minor upkeep goes a long way in maintaining the quality of your designs.
Another vital aspect is to keep your equipment calibrated. Over time, the Cricut Maker can lose its precision, affecting how your pen performs. Run simple test cuts or writes regularly. If your designs start to skew or misalign, recalibrate your machine according to the manufacturer’s instructions. It’s also wise to replace the cutting blade when it starts to dull, as a sharp blade ensures clean and accurate cuts that complement your calligraphic work.
Don’t forget to regularly update your design software. Keeping the Cricut Design Space updated not only allows access to new features but also optimizes the performance of your machine with any bug fixes or enhancements. Embrace resources like cleaning wipes designed for electronics to keep the exterior of your Cricut dust-free and functional.
Adopting these maintenance practices not only extends the lifespan of your calligraphy pen and Cricut Maker but also enhances your crafting experience. By investing a little time in upkeep, you set the stage for crafting projects that shine with professionalism and creativity. Happy crafting!
Inspiring Calligraphy Project Ideas for Beginners
Creating beautiful calligraphy projects can be a truly rewarding experience, especially when you’re using a Cricut Maker. The versatility of this machine marries well with the elegant touch of calligraphy, allowing beginners to produce stunning results with ease. Here are some inspiring ideas to jumpstart your crafting journey.
Start with personalized greeting cards. Imagine sending out a birthday card adorned with your friends’ names in elegant calligraphy. Using your Cricut, you can design intricate lettering that adds a professional touch. Simply choose a font from the Cricut library, input your message, and let the machine do the writing! You can even incorporate decorative elements like floral motifs or borders for an extra flair.
Another fun project is crafting custom wall art. With a calligraphy pen and your Cricut Maker, you can create pieces that resonate with your style or home decor. For instance, you could write meaningful quotes, song lyrics, or family names. Frame them for a polished finish, or use them as a centerpiece for your gallery wall. This not only beautifies your space but also showcases your unique personality.
If you’re planning a party or event, think about making place cards. They add an elegant touch to any gathering and are surprisingly simple to create. Use the Cricut to cut out card shapes, then switch to a calligraphy pen to write guests’ names. You can experiment with different colors and ink types to match the theme of your event, making each attendee feel special.
For those looking to make practical items, consider designing a personalized planner or journal. Adding calligraphic elements to your planner can transform an ordinary notebook into a stylish accessory. Write out the days of the week, monthly goals, or motivational quotes for daily inspiration. It’s a creative way to keep organized while practicing your lettering skills.
Finally, don’t forget about holiday decorations. Whether it’s a festive banner for Christmas or elegant tags for gifts, calligraphy adds a special touch. You can create a “Merry Christmas” sign to hang above your mantel or write personalized names on gift tags using your Cricut pen. These thoughtful details make your celebrations feel more personal and heartfelt.
By experimenting with these project ideas, you’ll not only develop your skills but also create beautiful, personal items that reflect your style. Each project is a chance to practice and explore different techniques, ultimately enhancing your confidence in calligraphy. So gather your materials, fire up your Cricut Maker, and let your creativity flow!
Troubleshooting Calligraphy Issues on Cricut
Getting beautiful calligraphy from your Cricut Maker can sometimes feel elusive, especially if you encounter common issues. But troubleshooting these hiccups doesn’t have to be a daunting task-often, the solutions are straightforward and effective. If you’re facing problems like uneven lines, skipping, or ink smudging, there are steps you can take to enhance your results and enjoy your crafting experience.
One frequent issue is inconsistent line thickness or uneven writing quality. This can often stem from the pen not being securely seated in the holder or the wrong pen type being used. Always ensure that the pen fits snugly in the clamp. For best results, choose pens specifically designed for calligraphy or fine writing, as these can create that elegant touch you’re after. You can verify the pen’s functionality by doing a test run on scrap paper before committing to your main project. That way, you can adjust the pressure settings on the Cricut machine if the lines appear too thick or too thin.
Another common problem is ink smudging, especially if the paper type isn’t compatible with the ink or the design isn’t set up correctly. To minimize smudging, always use a paper specifically designed for the type of pen you are using, and ensure it’s properly secured to the mat. It’s also wise to select a design that minimizes chances of smudging by allowing for sufficient drying time between strokes. If possible, try to avoid multi-layer designs where overlapping can occur while the ink is still wet.
If you’re experiencing cutting issues after using the pen, like a misalignment of the cutting blade and the drawn design, it’s likely that the last cut hasn’t been properly registered. To solve this, check that your design is correctly calibrated by running a test cut paper that won’t be visible in your main project. Ensuring that the machine is up to date with the latest software updates can also prevent unforeseen alignment issues, especially with newly added font or design packages.
Ultimately, practice makes perfect. As you build your skills with the Cricut Maker and refine your approach to calligraphy, you’ll likely encounter and solve these challenges with greater ease. Stay patient and keep experimenting with different settings, pen types, and materials to find what works best for your projects. With time and persistence, you’ll master the art of calligraphy, bringing your creative visions to life in spectacular fashion.
Q&A
Q: How do I set up my Cricut Maker for calligraphy?
A: To set up your Cricut Maker for calligraphy, first select “Write” as your operation in the Design Space. Ensure that you’ve installed the calligraphy pen in the clamp A. Adjust your project settings to include the proper pen pressure and speed for a smooth writing experience. Refer to the “Preparing Your Cricut Maker for Calligraphy” section for detailed steps.
Q: Can I use any calligraphy pen with the Cricut Maker?
A: Not all calligraphy pens are compatible with the Cricut Maker. You should use Cricut’s compatible pens designed specifically for the machine. These pens ensure optimal performance and prevent potential damage to your device while crafting. Consider checking the “Choosing the Right Calligraphy Pen for Your Projects” section for more insights on pen selection.
Q: What settings should I use for different calligraphy styles on Cricut?
A: Different calligraphy styles may require varying settings. For finer scripts, use a lower saturation and slower speed to enhance detail. For bold styles, increase the pen pressure and speed. Adjust these settings in your project settings in Design Space, and test on scrap paper to perfect your technique.
Q: How can I troubleshoot common calligraphy issues on Cricut?
A: Common calligraphy issues include skipping or uneven lines. To troubleshoot, ensure your pen is securely in place and check the pressure settings. Verify that your design software settings are correct, as specified in “Troubleshooting Calligraphy Issues on Cricut” for more solutions.
Q: Is the Cricut Maker suitable for beginners in calligraphy?
A: Yes, the Cricut Maker is beginner-friendly, especially with its ability to automate the calligraphy process. By following step-by-step guides and using pre-designed templates in Design Space, beginners can easily create beautiful calligraphy projects without requiring advanced skills.
Q: What are some tips for enhancing calligraphy designs?
A: To enhance your calligraphy designs, consider adding embellishments such as glitter, or layering your calligraphy over textured materials. Use the “Enhancing Your Calligraphy with Embellishments” section for specific techniques to elevate your projects.
Q: How do I maintain my calligraphy pen for Cricut?
A: To maintain your calligraphy pen, clean it regularly after use to prevent ink buildup. Store it horizontally to preserve the nib shape. Check the “Maintaining Your Calligraphy Pen and Cricut Maker” section for complete maintenance tips to prolong the life of your pens.
Q: Where can I find inspiration for calligraphy projects using Cricut?
A: For inspiration, explore Design Space where you find an array of calligraphy templates and projects. Additionally, social media platforms and crafting forums are rich resources for creative ideas. Check out the “Inspiring Calligraphy Project Ideas for Beginners” section for curated suggestions.
Key Takeaways
Now that you’ve mastered the art of using the calligraphy pen on your Cricut Maker, you’re not just crafting; you’re creating stunning personalized pieces that impress! Don’t just stop here-experiment with other creative tools like the Cricut Variety Pen Set or dive into our list of the best Cricut calligraphy fonts to take your projects to the next level. If you have any questions, drop a comment below or share your creations with us!
Ready to elevate your crafting game? Subscribe to our newsletter for insider tips and exclusive content! Explore more about designing with Cricut or check out our detailed tutorials on enhancing your letter crafts. Your journey to crafting perfection starts now-dive in and discover just how easy it is to create beautiful projects!


