Have you ever picked up a calligraphy pen only to feel overwhelmed by how to assemble it? You’re not alone! Understanding the assembly of a manuscript calligraphy pen is crucial for creating beautiful, fluid lettering. This guide will walk you through each step, ensuring you set your pen up correctly for optimal performance. Just imagine the satisfaction of mastering this art form, producing elegant strokes that express your creativity and personality. Whether you’re a beginner or looking to refine your skills, getting your pen ready is the first step to unlocking your potential. Let’s dive into the assembly process and make your calligraphy experience enjoyable and fulfilling!
Choosing the Right Manuscript Calligraphy Pen

Choosing the right pen for manuscript calligraphy can feel overwhelming, especially with the plethora of options available today. But understanding a few key aspects can help you select a pen that is tailored to your style and needs, ensuring that your writing is both beautiful and enjoyable. A good starting point is to consider the nib type-different nibs lend themselves to various styles of writing. For instance, broad nibs create lush, dramatic strokes ideal for formal scripts, whereas fine nibs are fantastic for detailed work and intricate designs.
Next, think about the flexibility of the nib. If you enjoy adding flair to your letters, a flexible nib can offer a broader variation in line thickness with varying pressure. For beginners or those who prefer stability, rigid nibs provide consistent lines without the guesswork. Don’t overlook the size of the pen itself; a comfortable grip is essential for long writing sessions. Try holding several models to see which fits your hand best.
Additionally, consider the ink compatibility. Some pens work better with specific inks, which can affect flow and color vibrancy. It’s worth investing time to test different inks with your chosen pen. Remember, whole calligraphy process is as much about the experience as it is about the final product. Ultimately, the right pen is one that feels right in your hand and inspires you to write beautifully.
Essential Tools for Manuscript Calligraphy Setup

Getting started with manuscript calligraphy can be both exciting and daunting. You’ll find that having the right tools in your setup can make a world of difference in your writing experience. Here’s a brief rundown of essential items you’ll want to gather before you embark on your calligraphy journey.
First and foremost, you’ll need a selection of calligraphy pens. Depending on your style and preference, you might choose traditional dip pens or modern fountain pens. Dip pens offer versatility with interchangeable nibs, allowing for various line widths and styles. If you’re just starting out, a good-quality fountain pen with a fine or medium nib can also be very effective. Don’t forget to also have an assortment of nibs on hand. Different nib shapes and sizes can dramatically affect your writing style, so experiment to find what works best for you.
Next up is ink-this is crucial! Opt for high-quality calligraphy inks that flow well and dry evenly. Consider trying both bottled inks for dip pens and cartridges for fountain pens. Knowing what works best with your pen will enhance your overall experience. You might also want to keep a few ink colors handy to add flair to your work.
A solid writing surface cannot be overlooked. A smooth, thick paper designed for calligraphy or mixed media will provide the best results, ensuring that your pen glides smoothly without bleeding through the pages. Additionally, having scrap paper nearby for practice is beneficial as you refine your technique.
Finally, consider investing in a straightedge ruler and a pencil for guidelines. This helps maintain consistent sizing and spacing in your writing, which is particularly helpful for more structured styles. Some calligraphers also find light boards useful for tracing and perfecting their lettering.
Equipping yourself with these essential tools will set the foundation for your calligraphy practice. Each tool plays a role in delivering a satisfying and successful writing experience, so take time to explore what feels best for you. Happy writing!
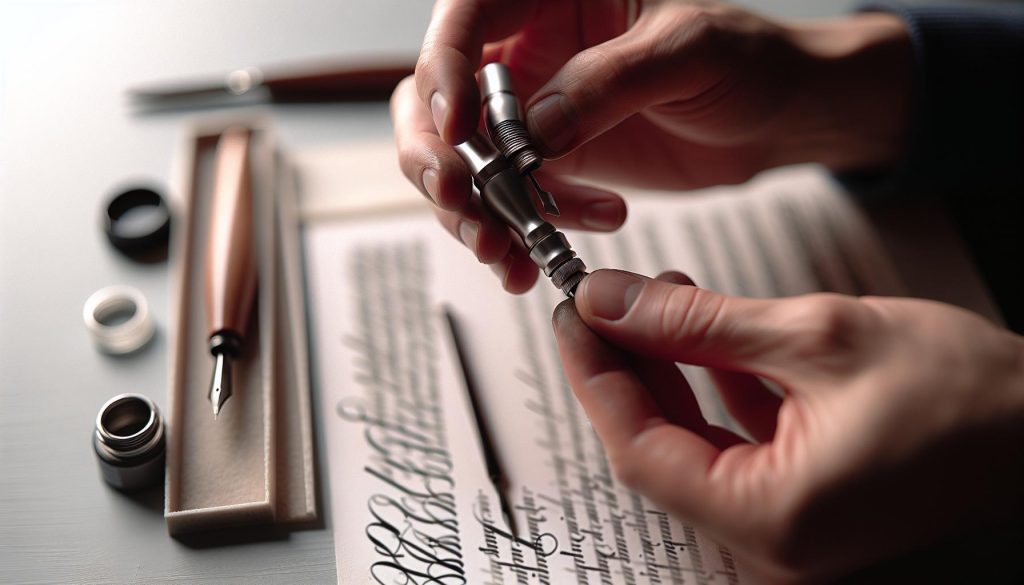
Step-by-Step Assembly Process Explained
Assembling a manuscript calligraphy pen is straightforward but essential for achieving beautiful results in your writing. When you have your pen, nib, and ink ready to go, you’ll want to set everything up for optimal performance. Here’s how to do it step by step.
First, start with your pen body. If you’re using a dip pen, it usually consists of a handle and a holder. Insert the nib into the holder, ensuring it’s secure but not overly tight. When it is seated correctly, you should see the nib protruding slightly from the holder. In the case of a fountain pen, you’ll need to fill the cartridge or converter with your chosen ink. This can vary by model, but typically, you’ll either screw the converter into the pen and draw ink into it or place a pre-filled cartridge directly into the pen.
Next, it’s time to prepare your workspace. Lay down some scrap paper to test the nib and ink flow. As you start writing, gently dip the nib into ink if you’re using a dip pen, making sure it’s coated rather than soaked. For fountain pens, press gently on the paper to get the ink flowing initially. It’s crucial to let your pen acclimatize to the paper you’ll be using. This practice will help gauge the ink’s viscosity and the nib’s responsiveness on different paper types.
Once you’ve got the ink flowing smoothly, adjust your grip on the pen. Your fingers should rest comfortably just above the nib, allowing for a fluid motion. Take a moment to practice basic strokes on your scrap paper. This not only warms up the nib but also helps you get a feel for the weight and balance of your pen.
In sum, careful assembly and preparation can greatly enhance your manuscript calligraphy experience. By ensuring your nib is correctly set up and testing your pen on scrap paper, you’ll avoid common pitfalls and be ready to create beautiful letters. Now you’re all set to let your creativity flow!
Common Mistakes to Avoid When Assembling
Assembling a manuscript calligraphy pen may seem easy, but many beginners trip over a few common pitfalls that can hinder their writing experience. One of the most frequent mistakes is improperly securing the nib. If the nib isn’t inserted firmly or if it’s too loose, it can wobble or even fall out while you’re in the middle of writing. Always double-check that the nib is seated properly in the holder. You should feel a slight resistance, but it shouldn’t be difficult to place in or remove.
Another issue lies in the choice of ink. Using the wrong type of ink can lead to disasters on the page. For dip pens, make sure you’re using ink designed specifically for calligraphy; not all inks have the right viscosity or flow properties. Fountain pen users, pay attention to whether your ink is compatible with your pen’s materials. Incompatible inks can clog the nib or damage your pen. It’s worth investing time in researching which inks yield the best results for your particular pen type.
Moreover, don’t overlook the testing phase. Many newcomers skip this step and dive straight into writing, which can lead to frustration if the pen doesn’t perform as expected. Always take a few moments to test the nib on scrap paper before expressing your creativity. This helps you understand how the nib and ink interact, allowing adjustments to your grip and pressure as necessary. It’s during these tests that you can make vital tweaks that enhance your writing quality significantly.
Finally, be mindful of your workspace. Cluttered areas can distract and lead to messy work. Ensure you have a clean surface and adequate lighting. A well-organized space not only makes the assembly process smoother but also inspires better focus while you write. Creating a productive environment sets you up for success and helps you truly enjoy the art of calligraphy.
Fine-tuning Your Manuscript Pen for Optimal Performance
To get the most out of your manuscript calligraphy pen, fine-tuning is essential. A well-calibrated pen can elevate your writing experience, making every stroke fluid and expressive. It’s about understanding how subtle adjustments can significantly impact your output. Start by ensuring that the nib is not only properly seated but also compatible with your writing style. Different nibs produce varying line widths and character styles. Experiment with a few to find the one that feels right for your hand.
Another vital aspect is the ink flow. The right ink can transform your writing. If you notice skips or inconsistent lines, the ink might be too thick or not suitable for your nib type. Diluting your ink slightly with a compatible medium can improve flow without sacrificing color intensity. Moreover, consider the temperature and humidity of your writing environment. These factors can affect how the ink behaves on the page; warmer, drier conditions can lead to quicker drying times, so always conduct a test on scrap paper before diving into a project.
Lastly, grip and pressure are crucial. Start writing gently, then adjust your grip based on the feedback from the paper and nib interaction. If you feel you’re exerting too much pressure, it might be a sign to lighten your touch. Practice different pressures; some calligraphers achieve beautiful results with a delicate hand, while others prefer a firmer grip for bold lines. Fine-tuning your manuscript pen involves a mixture of technical knowledge and personal feel-don’t hesitate to experiment until you find your perfect writing rhythm.
Maintenance Tips for Longevity of Your Calligraphy Pen
Your calligraphy pen is like an artist’s brush; proper care will keep it performing beautifully for years. To ensure your pen stays in top shape, regular maintenance is key. Start with the most obvious yet often overlooked step: cleaning. After each use, rinse your nib and feed under warm water to remove ink residue. If you switch inks frequently, a thorough clean with a mild soap solution can prevent cross-contamination and maintain ink flow.
Storage is another crucial factor. Always store your pen horizontally or with the nib pointing upwards. This prevents the ink from pooling at one end, which can cause clogging and flow issues. If you know you won’t be using your pen for an extended period, remove the ink cartridge or converter entirely to avoid potential leaks or dried ink.
Consider regular inspections of your nib. Look for wear or bending, especially if you calligraph often. If the nib starts to fray, you’re likely to experience inconsistent line quality. Don’t hesitate to replace the nib or consult an expert if you’re not comfortable doing it yourself. Finally, find a protective case for your calligraphy tools. Not only does it safeguard against dust and damage, but it also keeps everything together, ensuring you’re always ready when inspiration strikes.
By incorporating these simple practices into your routine, you’ll enhance your writing experience and extend the life of your manuscript calligraphy pen significantly. Happy writing!
Advanced Techniques for Mastering Manuscript Styles
Mastering the art of manuscript calligraphy is about more than just technique; it’s about infusing your unique voice into every stroke. One of the best ways to elevate your calligraphy is to experiment with different styles that can transform a simple text into an engaging piece of art. Let’s dive into some advanced techniques that will help you explore the depths of manuscript styles and refine your skills.
Start by understanding the core styles of calligraphy, such as Italic, Gothic, or Copperplate. Each has its own characteristics and flourishes that set it apart. To truly master these styles, practice is crucial. Consider dedicating time to focus solely on one style at a time. Use practice sheets or create your own guides to help you visualize the strokes and forms of each letter. Pay attention to the angle and pressure applied when writing; these factors significantly influence the overall appearance of your work.
Another effective technique is to layer your ink. This approach allows for the creation of depth within each letter. Begin by writing your letters with a lighter ink. Once dry, go over key areas with a darker shade or add embellishments. This technique not only adds dimension but also highlights important elements of your composition. You could also explore the use of metallic inks or colored inks to further differentiate your styles, making your calligraphy pop on the page.
Incorporate the use of binding and layout techniques to enhance your manuscripts. Think about the arrangement of elements on the page. Use border decorations or illustrations alongside your text to create a cohesive piece of art. This will attract viewers’ attention and guide their eyes through the text effectively.
Don’t shy away from innovating your own styles; take inspiration from various sources like ancient manuscripts and modern designs. Try combining elements from different calligraphy styles to create something truly unique. This experimental mindset can lead to the development of a personal style that reflects your artistic voice and skill level.
Finally, connect with other calligraphers through workshops or online communities to exchange tips and showcase your work. Getting feedback from peers can provide fresh perspectives and motivate you to continue pushing your boundaries. Being involved in a community fosters growth and inspires creativity, both of which are vital for mastering manuscript calligraphy.
Embrace these techniques, and watch your calligraphy flourish into a deeper, more expressive art form. Remember, the journey of mastering calligraphy is just as rewarding as the final piece-enjoy every stroke!
Personalizing Your Manuscript Calligraphy Experience
Personalizing your calligraphy experience can transform a simple writing tool into a true extension of your artistic voice. It all starts with the right pen; select one that feels comfortable in your hand and suits the style you’re drawn to. Whether you prefer a flexible nib for luscious swirls or a firmer point for sharp edges, your choice in tools significantly influences your writing experience. Don’t hesitate to test different pens until you find one that feels just right.
Once you’ve chosen your pen, think about how you can customize it further. Decorating your pen can be a fun way to make it uniquely yours. You might wrap the handle in colored tape or apply adhesive decals that resonate with your personal style. This small touch not only enhances the aesthetic but also makes each writing session more enjoyable.
Another way to personalize your experience is through ink selection. Different inks can create vastly different looks, from vibrant colors to subtle shades. Experiment with various hues or even mix your own to develop a signature color palette that represents your style. Additionally, exploring the textures and finishes of various inks can lead you to surprising results that elevate your work.
Lastly, consider how you can make the process more inspirational. Organize your workspace with items that spark creativity-think curated books on calligraphy, artworks you admire, or a vision board filled with ideas. This environment can motivate you every time you sit down to write. Engaging with these personal touches not only makes your pen a tool but also a cherished part of your creative journey. Embrace your individuality and watch how it reflects in your calligraphy.
Exploring Different Ink Options for Your Pen
When it comes to calligraphy, the ink you choose is just as important as the pen itself. Your ink affects the flow, color, and overall appearance of your writing. While many people stick to traditional black or blue inks, there’s a whole world of options waiting to elevate your work. From vibrant hues to metallic finishes, the right ink can make your calligraphy stunning and unique.
First, consider the type of ink the pen is designed for. Most manuscript calligraphy pens work well with either bottled inks or cartridges. Bottled inks offer versatility; you can choose any color you like and mix your own shades. In contrast, cartridges provide convenience and mess-free refills. Look for archival or waterproof inks if your work will be exposed to moisture or sunlight; these inks resist fading and smudging.
Next, explore the texture and finish of the ink. Some inks have a glossy finish, while others might be matte or even shimmery. Here’s where experimentation becomes fun! Try working with inks that contain shimmer or metallic flakes for a unique twist. These can add depth to your pieces, catching the eye with every stroke. Just remember to shake them well before use to ensure an even distribution of the particles.
Lastly, think about the types of projects you’ll create. For formal pieces like invitations or certificates, rich, deep colors convey elegance. For more playful projects, bright or pastel colors can bring a fresh feel. Use a simple chart to identify how different inks look on paper, noting their drying times and application behavior. This knowledge will help you select the perfect ink for each situation.
In short, don’t underestimate the impact of your ink choice. Dive into the array of colors and types, and find the ones that resonate with your artistic voice. By choosing the right ink, you can transform ordinary calligraphy into an extraordinary art form. Happy writing!
Troubleshooting Common Pen Issues
When your calligraphy pen isn’t cooperating, it can be incredibly frustrating. Those moments when the ink refuses to flow or the nib skips on the page can feel like a creative roadblock. But don’t worry-most common issues are easily solvable with a bit of knowledge and some quick troubleshooting steps that can get you back to crafting beautiful scripts in no time.
First, let’s tackle one of the most frequent culprits: dry ink. This typically happens if a pen hasn’t been used for a while or if the ink is old. If your pen has stopped flowing, try gently shaking it (for cartridge pens, make sure to hold it upright) and then draw a few circles on scrap paper to see if the ink starts to flow again. If that doesn’t work, remove the nib and dip it in a bit of water or pen cleaner for a moment, then rinse it and reattach it. This can often break the blockage and revive your nib.
Another common issue is skip lines, where the pen simply doesn’t make a mark at certain points. This usually indicates that the nib is misaligned or damaged. Pull out a magnifying glass and inspect the nib for any bends or irregular points. If you spot anything odd, gently adjust it back into shape with your fingers (don’t force it!). If the nib is too damaged, replacing it might be the best option.
Sometimes, it’s the ink that causes problems. Using the wrong type of ink can lead to clogs or inconsistent flow. Always match your nib with the appropriate ink viscosity and composition. If you’re using a nib designed for light inks, switching to a thicker, more viscous ink might cause problems. For optimal performance, test different inks to find one that suits your writing style and needs without causing gunk buildup.
Finally, let’s not forget about ink level. If your pen is running low on ink, refill it or replace the cartridge. A pen that’s running dry can lead to frustration and inconsistent results. Always have a backup cartridge or bottle of ink ready for those moments when inspiration strikes unexpectedly. Keeping these tips in mind will help you keep your calligraphy flowing smoothly, so you can focus more on the artistry and less on the troubleshooting!
Inspiration: Creative Projects Using Manuscript Calligraphy
There’s something magical about bringing pen to paper, especially when you use a beautifully crafted manuscript calligraphy pen. Not only does it connect you to centuries of writing tradition, but it also opens the door to endless creative projects. Whether you’re a seasoned calligrapher or just starting, there are countless ways to utilize your skills beyond simple writing.
Consider incorporating your calligraphy into personal projects like custom greeting cards or gifts. Handwritten notes adorned with elegant script can transform mundane messages into thoughtful keepsakes. Imagine a friend’s delight upon receiving a handwritten birthday card with their name beautifully rendered in calligraphy. For weddings or special events, you can create invitations or place settings that reflect the occasion’s elegance. Using your pen to add a personalized touch elevates the entire experience and creates lasting memories.
For those looking to showcase their skills, collaborating on art pieces is a fantastic avenue. Combine your calligraphy with mixed media, incorporating watercolor, ink washes, or even digital prints. Create wall art that features inspirational quotes or heartfelt messages nestled within artistic designs. Social media platforms are ripe for this kind of content; sharing your projects can connect you with a broader audience and inspire fellow artists.
Connecting with local or online calligraphy communities can further fuel your creative engine. Think about participating in skill-sharing workshops or challenges where you can refine your technique while inspiring others. These communities can offer support, feedback, and collaboration opportunities that might push your creativity in unexpected directions.
In essence, your manuscript calligraphy pen is more than just a tool-it’s an invitation to explore the art of handwriting in modern contexts. Dive into projects that resonate with you, and don’t hesitate to experiment. Creativity knows no bounds, and wielding a pen opens up countless pathways to expression.
Connecting with Calligraphy Communities for Support
Connecting with calligraphy communities can dramatically enhance your skills and creativity. These groups are treasure troves of support, where you can share experiences, seek feedback, and learn from fellow enthusiasts. Imagine tapping into a vibrant pool of knowledge that helps you perfect the assembly of your manuscript calligraphy pen and explore various techniques. That’s the power of community.
Engaging with local or online calligraphy groups can provide you with valuable insights. You’ll find countless resources, from instructional videos and tutorials to live demonstrations at workshops. Consider joining platforms like Facebook groups or Reddit communities dedicated to calligraphy. Here you can ask questions like, “What’s the best way to maintain my pen?” or “Can anyone recommend the right ink for fine details?” The responses you receive can be instantly beneficial, sparking ideas and solutions you might not have considered.
Moreover, participating in communal projects or challenges is a great way to push your boundaries. Many communities host events, from themed calligraphy challenges to collaborative art pieces. When you share your work, you not only receive constructive criticism but also inspire others with your unique style. This interaction can lead to friendships that extend beyond calligraphy-collaborations that blend your skills with other artists and disciplines, creating beautiful, unexpected results.
Remember, these communities are not just about learning but also about sharing your passion. Get involved in discussions, post your progress, and celebrate others’ achievements. This synergy fosters a supportive environment where everyone thrives. Ultimately, being part of a calligraphy community transforms your individual journey into a shared adventure-one filled with inspiration, creativity, and lasting connections.
Frequently asked questions
Q: What are the essential parts of a manuscript calligraphy pen?
A: A manuscript calligraphy pen typically consists of a nib, a nib holder, and an ink reservoir. Understanding each component helps in proper assembly and use. Visit the Choosing the Right Manuscript Calligraphy Pen section for more details on selecting the best nibs.
Q: How do I adjust the nib of my calligraphy pen for different styles?
A: To adjust your nib, try bending it slightly or using different pressure while writing. Each style may require a specific angle or pressure-experiment to find what works best! Check out the Fine-tuning Your Manuscript Pen for Optimal Performance section for tips.
Q: What type of ink is best for manuscript calligraphy?
A: The best ink for manuscript calligraphy is a pigment-based ink, as it provides vibrant colors and consistency. Always test your ink to ensure it flows well with your nib. Refer to the Exploring Different Ink Options for Your Pen section for more information.
Q: How can I store my manuscript calligraphy pen to prevent damage?
A: Store your pen horizontally or with the nib pointing up to prevent ink leakage. Always clean the nib before storage to avoid clogs. For detailed maintenance suggestions, look at the Maintenance Tips for Longevity of Your Calligraphy Pen section.
Q: Can I use watercolor paper for manuscript calligraphy?
A: Yes, watercolor paper is suitable for calligraphy, as it absorbs ink well. However, test with different nibs and inks to ensure your chosen combination yields the desired results. Visit the Advanced Techniques for Mastering Manuscript Styles for more paper recommendations.
Q: How often should I clean my calligraphy pen?
A: Clean your calligraphy pen after each use, especially if you’ve used pigmented ink. Regular cleaning prevents clogging and ensures smooth writing. Check the Troubleshooting Common Pen Issues section for effective cleaning methods.
Q: What common mistakes should I avoid when using a manuscript calligraphy pen?
A: Avoid applying too much pressure on the nib and using the wrong type of ink. These mistakes can damage the nib and affect ink flow. For a comprehensive list, refer to the Common Mistakes to Avoid When Assembling section.
Q: How can I personalize my manuscript calligraphy writing?
A: You can personalize your calligraphy by choosing unique colors, combining different styles, or adding flourishes. Experimentation is key-don’t hesitate to try new techniques. See the Personalizing Your Manuscript Calligraphy Experience section for more creative ideas.
The Way Forward
Now that you’ve mastered the steps to assemble your Manuscript calligraphy pen, it’s time to put your new skills into practice and unleash your creativity! Remember, a well-assembled pen can transform your writing experience, making it smoother and more enjoyable. If you’re eager to explore more about calligraphy techniques or discover the best inks and papers for your projects, check out our guides on Calligraphy Techniques and Choosing the Right Materials to elevate your artistry.
Feeling motivated? Don’t wait to start your calligraphy journey! Grab your pen and share your first creations with us in the comments below. Your feedback helps others and builds a supportive community of fellow enthusiasts. Also, be sure to subscribe to our newsletter for exclusive tips and resources-let’s keep the inspiration flowing!
Explore further and embrace the joy of writing with a tool that truly feels like an extension of your creativity. You’re on the path to becoming a calligraphy expert, and we can’t wait to see where your skills will take you next!


