Have you ever admired beautiful calligraphy but thought you needed fancy pens to create it? You’re not alone! The truth is, you can achieve stunning lettering using just a regular pen. In this guide, we’ll explore clever hacks that make it easy and accessible for anyone to dive into the world of calligraphy without needing specialized tools. Whether you’re looking to add a personal touch to cards, enhance your journal, or simply enjoy a new hobby, these techniques will empower you to express your creativity effortlessly. So, grab your pen and let’s uncover the secrets of faux calligraphy that will elevate your writing game!
Get Started with Calligraphy: No Pen Needed
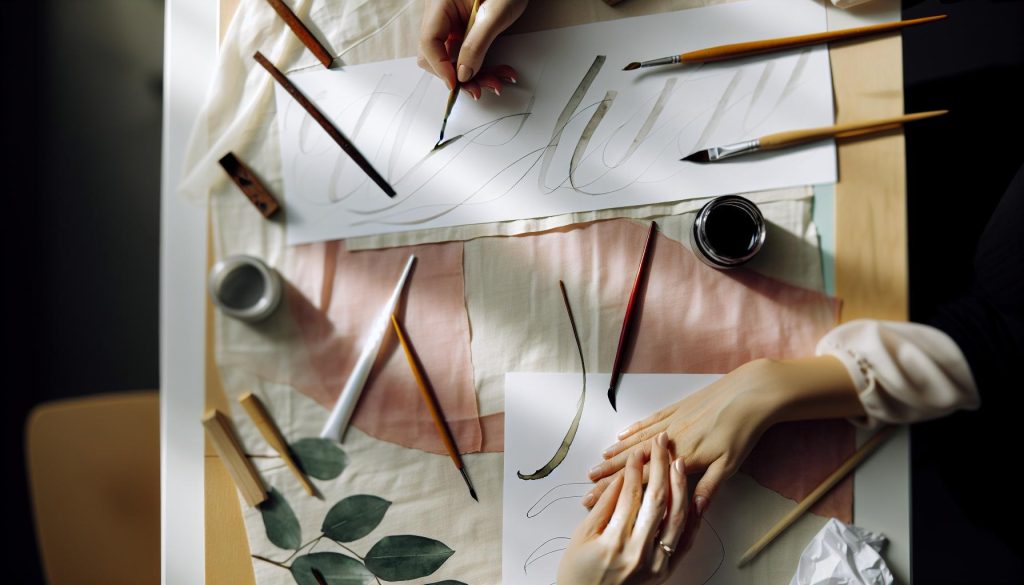
Calligraphy isn’t just about the fancy pens; it’s an art that you can start exploring without the traditional tools. Have you ever considered using everyday items to create beautiful lettering? You can leverage simple household materials to mimic the elegance of calligraphy pen techniques. From markers to brushes, there’s a world of possibilities waiting to be discovered.
To begin, consider using a gel pen or a fine-tip marker, which can give you clean, precise lines. If you want more variation in your strokes, a paintbrush can work wonders. Just dip it in water (or a thinned ink) and practice your strokes on paper. The flexibility of the brush allows for both thick and thin lines, emulating the effects of traditional calligraphy. If you’re feeling adventurous, even a cotton swab or a piece of foam can create unique textures and styles.
Experimenting with Materials
There are countless tools available right in your home that can help you get started:
- Highlighters: Their broad tips can create bold strokes and vibrant fills.
- Pencils: Use them to sketch out your letters before committing to ink.
- Found Objects: Try wrapping a piece of cardboard to create a makeshift pen or stylus.
- Brushes: Different sizes will give varied effects; just remember to experiment with pressure!
Don’t shy away from trying unconventional tools and methods. The beauty of calligraphy lies in its creative expression, and every tool can offer something unique. Think outside the box, have fun with your materials, and you’ll find that wonderful calligraphy can flourish without the need for a specialized pen.
Essential Materials to Mimic Calligraphy Pen Techniques

It’s a myth that you need expensive tools to create beautiful calligraphy. In fact, you can harness everyday materials to mimic the effects of traditional calligraphy pens. The real charm of calligraphy lies in the art of letter formation, which can be achieved with creativity and resourcefulness.
One of the best places to start is with gel pens or fine-tip markers. They easily allow for clean and precise lines, making them ideal for beginners. For more nuanced strokes, grab a paintbrush. Dip it in water or thinned ink and you’ll find the flexibility to produce both thick and thin lines, similar to what you’d achieve with a traditional brush pen. Just practicing with varying pressures can result in stunning calligraphic effects.
Don’t underestimate the tools already sitting in your home. Take highlighters for instance; their broad tips lend themselves to bold strokes and vibrant work. A simple pencil is fantastic to sketch out letters before committing to your final design-this helps in planning your layout without any stress. Found objects can also be creatively repurposed; wrapping a piece of cardboard can create a unique stylus, allowing you to experiment with texture and pressure. And let’s not forget brushes: a variety of sizes will provide different effects and styles, inviting you to discover new techniques.
Ultimately, the key is to explore and experiment with what you have. The art of calligraphy isn’t limited by tools but rather expanded by your willingness to play and discover. So dive in, get those hands dirty, and enjoy the journey of creating stunning lettering without a single calligraphy pen in sight!
5 Creative Tools for Beautiful Calligraphy Effects

There’s a common misconception that creating beautiful calligraphy requires expensive tools and a master’s touch. The truth? You can achieve stunning effects with simple, everyday items. Here are five ingenious tools that can elevate your calligraphy without breaking the bank.
1. Gel Pens and Fine-Tip Markers
These are your go-to essentials. Gel pens glide smoothly across the paper, making it easy to achieve clean lines. Choose a range of colors to add depth and personality to your letters. Fine-tip markers offer precision, perfect for intricate designs. You can play with pressure to create varying line thicknesses, mimicking that elegant calligraphy script.
2. Paintbrushes
A paintbrush might seem like an unconventional choice, but it’s a versatile tool for calligraphy. When dipped in water or thinned ink, you can create both thick and thin lines, very similar to traditional brush pens. Experiment with different brush sizes and pressure techniques to discover a world of texture. Don’t hesitate to mix and match colors for a more dynamic look.
3. Highlighters
Highlighters aren’t just for studying; they make fabulous calligraphy tools! Their broad tips can create bold strokes that stand out, adding vibrancy to your pieces. Use them for outlining or even as a base color before layering with finer tools. The bright colors can really make your letters pop, ensuring your work is eye-catching.
4. Pencils
Never underestimate the power of a simple pencil. Use it to sketch out your designs before committing to the final piece. This makes it easier to visualize your layout and adjust as needed. Plus, the light touch of a pencil can create soft outlines that add a subtle elegance to your work. Once you’re happy, you can go over your design with ink or markers to finalize it.
5. Found Objects
Get creative! Everyday items around your home can become unique calligraphy tools. For instance, wrap a piece of cardboard or plastic to fashion a custom stylus. Experiment with various textures and shapes-you might discover a new favorite tool. This not only enhances your craft but also fuels your creativity, turning ordinary objects into extraordinary artistic instruments.
In the world of calligraphy, your tools shouldn’t limit your creativity; they should inspire it. By incorporating these accessible materials, you’ll expand your repertoire and enjoy the art of lettering without the need for traditional calligraphy pens. So gather your supplies and start experimenting-your unique style awaits!
Step-by-Step Guide: Crafting Letters by Hand

The beauty of crafting letters by hand is that you don’t need a traditional calligraphy pen to produce stunning, personalized work. With just a bit of creativity and patience, you can achieve impressive results using everyday materials. Here’s a practical guide to help you navigate the letter creation process, even if you’re using unconventional tools.
Start by selecting a base tool. This could be a gel pen, a brush, or even a found object like a piece of cardboard wrapped to create a makeshift stylus. Each tool offers different aesthetics, so experiment with what feels right for you. Once you’ve got your tool in hand, gather some high-quality paper which will significantly enhance the smoothness of your writing.
Next, trace out your letters lightly with a pencil. This step is crucial as it allows you to visualize your design and make corrections before committing to ink. Use basic shapes to form the structure of each letter; think of them as outlines. Focus on maintaining consistent height and spacing.
Once your pencil draft is in place, go over it with your chosen ink or marker. Pay attention to pressure: press harder to create thicker downstrokes and lighten your grip for delicate upstrokes. This variance in pressure mimics the elegant qualities of traditional calligraphy. After the ink dries, you can erase any visible pencil lines for a clean finish.
Lastly, take time to practice. Like any art form, proficiency in hand-lettering develops with consistent effort. Set aside a few minutes every day to refine your technique. And don’t shy away from using your letters in personal projects like greeting cards or wall art. The more you incorporate your hand-crafted letters into your life, the more unique and personal your style will become.
Dive in, enjoy the process, and remember: it’s all about crafting your own aesthetic without the constraints of conventional tools!
Using Alternative Inks for Unique Calligraphy Styles

There’s a world of possibilities when you explore different inks for calligraphy, and the beauty is that you don’t need a fancy calligraphy pen to make stunning work. Using alternative inks can not only add richness and variety to your lettering, but it also allows for creativity and personal expression. Think outside the box-styles and colors can transform your letters from simple to extraordinary.
One popular alternative is watercolor inks. They produce vibrant, flowing results that can mimic traditional brush calligraphy techniques. You can use a paintbrush or even a sponge to apply these inks, allowing you to play with saturation and blending to create depth. Another exciting option is gel pens; these come in an array of colors and finishes, including metallic and glitter. Their smooth application makes it easy to achieve crisp lines and bold designs. Combining these inks with different paper types, such as watercolor paper or textured stock, can yield unique effects that will elevate your handwritten pieces.
You might also want to consider acrylic inks or even DIY inks, made from natural ingredients like coffee or beet juice. These can offer a more textured appearance and can be a fun way to craft a personal touch in your calligraphy. Using different applicators-like brushes, cotton swabs, or even the tip of a pencil-will give you varied line thickness and style, which is essential for creating those dramatic thick and thin strokes so characteristic of traditional calligraphy.
Always remember to test any ink on scrap paper first. Every ink behaves differently on various surfaces, and knowing how it flows and dries can save you from frustrating mistakes in your final pieces. So, gather your supplies, experiment, and unleash your creativity-your calligraphy will thank you for it!
Mastering Basic Calligraphy Strokes without a Pen
To create beautiful calligraphy without a pen, mastering basic strokes is essential. You might think it’s all about fancy tools, but it’s really about technique and practice. Even without traditional pens, you can achieve stunning lettering just by understanding the fundamental shapes and movements that comprise each letter.
Start by recognizing the key strokes that form the backbone of calligraphy. These include the upstroke, downstroke, overturn, and compound strokes. Each stroke contributes to the overall flow and elegance of your writing. For example, upstrokes are typically thin, while downstrokes are thicker due to more pressure. You can practice these strokes using simple tools like brushes, markers, or even your fingers dipped in ink.
Techniques for Stroke Practice
- Use a Brush or Sponge: Rather than a calligraphy pen, a brush can help you create the same tapered edges and fluid motions. Dip it in ink or watercolor, and work on making smooth upstrokes and downstrokes. Try to keep your movements consistent in speed and pressure.
- Experiment with Markers: A dual-tipped brush marker can mimic calligraphy pens quite well. The broad side can be used for downstrokes, while the fine tip is perfect for upstrokes and detailing. This helps you to focus on the contrast in line thickness that’s so characteristic of calligraphy.
- Practice on Paper: Regular printer paper works fine, but textured papers like watercolor can enhance the experience by adding interest to your strokes. Sketch out lines lightly to guide your hand, or use practice sheets with faint lines to keep your letters consistent.
- Watch the Angles: Maintaining the right angle (usually about 45 degrees) while writing is crucial to achieving the calligraphic look. You can tilt your paper or rotate the tool you’re using to maintain that angle as you write.
Making It Your Own
Don’t be afraid to add your personal flair to these strokes. Once you’re comfortable with basic movements, explore adding swirls or flourishes to your letters. These additional elements can transform simple strokes into elaborate designs, making your calligraphy feel more personal and unique.
By focusing on these fundamental techniques, you’ll find that you can create beautifully crafted letters without needing traditional calligraphy pens. The key is patience and practice; soon enough, you’ll be able to express your creativity through stunning lettering that’s uniquely your own.
Exploring Digital Calligraphy Options and Software
With the rise of digital tools, there’s no need to feel limited by the physical constraints of traditional calligraphy pens. Digital calligraphy options can open a world of creativity, making it accessible for anyone who wants to express themselves through beautiful lettering without the mess of ink or the need for extensive materials. Whether you’re using a tablet, smartphone, or computer, you can easily create stunning designs and text that emulate traditional calligraphy styles.
One popular digital tool is Procreate, which allows for fluid brush strokes that mimic ink on paper. You can customize brushes to create various effects, adjusting size and opacity with a simple touch. If you’re into hand lettering, apps like Adobe Fresco and Affinity Designer provide versatile options for both bitmap and vector graphics. These programs often come equipped with pressure sensitivity features, allowing you to produce thick downstrokes and delicate upstrokes just like you would with a pen.
For those who enjoy designing fonts, platforms like Calligraphr enable you to turn your handwritten letters into usable digital fonts. By simply downloading a template, writing out your letters, and uploading them back to the site, you can create a custom font that resonates with your unique style. This is a fantastic way to maintain your personal touch in digital formats, and once your font is created, it can be used in any design software that supports TTF or OTF files.
Utilizing online communities and tutorials can also enhance your skills and inspire you to experiment with new techniques. Websites like Skillshare or YouTube have countless resources ranging from beginner to advanced lessons in digital calligraphy. Plus, sharing your work in online groups allows for constructive feedback and encouragement from fellow lettering enthusiasts.
In short, the digital world offers immense possibilities for those wishing to delve into calligraphy without the constraints of traditional tools. With the right software and a bit of practice, you can create breathtaking pieces of art that capture the elegance of calligraphy, all while enjoying the convenience and versatility of digital creation.
Tips for Practice: Building Your Calligraphy Skills
Building your calligraphy skills doesn’t require a fancy pen or inks-just a bit of creativity and dedication. One of the best ways to enhance your abilities is through consistent practice. Set aside a few minutes each day to experiment with different styles and techniques. Whether you’re using a brush, pencil, or digital tool, regular practice helps develop muscle memory, which is crucial for improving your strokes and overall writing fluidity.
Start by honing basic strokes, which form the foundation of most calligraphy. Create an exercise sheet with different lines and curves, practicing each until you feel comfortable. This method not only improves your control but also offers a quick reference for future projects. Incorporate pressure sensitivity if you’re using digital tools in apps like Procreate or Adobe Fresco. This gives you a better understanding of how different pressures affect the thickness of your strokes, similar to traditional calligraphy.
To add a twist to your practice, try incorporating unique tools. Experiment with everything from brushes to household items like cotton swabs or even finger paints. Each tool creates distinct textures and styles, nudging you out of your comfort zone. Don’t shy away from learning through mistakes. Whether you smudge a design or struggle with a letter shape, these moments can offer invaluable lessons that lead to improvement.
Finally, embrace the community. Join online forums, social media groups, or local workshops focused on calligraphy. Sharing your work and receiving feedback helps build motivation and creates a sense of shared learning. Plus, connecting with others can spark inspiration and introduce new techniques that enhance your style. Remember, the goal isn’t just perfection; it’s about enjoying the journey of letter creation, no matter the medium.
Creative Projects: Where to Use Your Calligraphy
Using calligraphy can elevate your creative projects in ways you might not expect. It’s more than just words on a page; it’s an art form that transforms ordinary items into cherished keepsakes. Imagine scrapping the idea of a traditional pen and exploring different tools-each can produce surprising results. Consider what you can create with just a few simple items!
For personalized gifts, nothing beats a custom-made card or piece of art featuring your handwritten calligraphy. Use a pencil or bamboo brush to create beautifully crafted notes for birthdays, weddings, or holidays. You can even decorate gift wrap or boxes, adding a personal touch that recipients will remember. Additionally, using materials like colored pencils or brushes with watercolors brings out a vibrant aesthetic that feels joyful and inviting.
Another fantastic idea is to spice up your home decor. Write out your favorite quotes, affirmations, or song lyrics using unconventional tools like chalk or markers. You can create stunning wall art by layering different colors or textures, using simple techniques to enhance visual interest. If you’re looking for a modern twist, why not try digital calligraphy? Apps like Procreate or Adobe Fresco let you design stunning typography right on your tablet-perfect for social media graphics or printable wall art.
For an interactive experience, consider hosting a calligraphy workshop. Gather friends or family for a creative get-together; supply brushes, inks, and paper and let everyone try their hand at non-pen calligraphy. It’s not just fun; it’s also a fantastic way to learn from each other and share tips on mastering different techniques. Plus, you’ll create memories that are tangible-everyone leaves with their unique creations.
Finally, think about how you can incorporate your calligraphy into everyday life. Labeling jars, making place cards for dinner parties, or even creating your planner can add flair to routine tasks. The key is to let your creativity flow and remember that there aren’t strict rules. Each project is an opportunity to experiment, learn, and enjoy the process. Embrace the journey of calligraphy and watch as your confidence grows, proving that the right mindset is all you need to succeed, no fancy tools required!
Avoiding Common Mistakes in Non-Pen Calligraphy
When stepping away from traditional calligraphy pens, it’s easy to stumble into a few common pitfalls that can dampen your creative spirit. One of the most prevalent mistakes is not experimenting enough with different tools. Just because you’re not using a pen doesn’t mean you should limit yourself! Grab a paintbrush, a pencil, or even markers, and see how each tool affects your strokes and style. Each brings a unique texture and feel, which can transform your writing into something truly original.
Another common misstep is rushing the learning process. Calligraphy, even without a pen, requires practice. You might be tempted to jump right into advanced styles after your first attempt, but take your time. Start with basic strokes and practice consistently. This foundational practice will make it easier to experiment with layers or blends of colors later on. Don’t hesitate to write down notes of your progress; rather than focusing just on the final product, acknowledge the journey of improvement you’re making.
Additionally, be mindful of the surfaces you choose. Many people overlook how different papers or materials can affect the outcome of your writing. Using textured paper with a marker might yield a delightful result, but it could also lead to unexpected smudging or ink bleed. Test various surfaces before committing to a project. Consider how your choice of paper, canvas, or even fabric can complement the tools you’re using.
Finally, don’t forget about planning your composition. Even in non-pen calligraphy, good design matters. Sketch out where your text will go before diving in. This helps prevent awkward spacing and misaligned letters, which can be frustrating after you’ve put your heart into the piece. Use light pencil marks to outline where you want elements to fall. Then, fill in as you go, making adjustments if necessary.
By steering clear of these common mistakes, you’ll find your way to producing stunning non-pen calligraphy that reflects your personal style. Happy crafting!
Inspiration: Showcasing Calligraphy Without a Pen
When you think of calligraphy, do you picture a sleek pen gliding smoothly across paper? Well, here’s a twist: you can create stunning calligraphy effects without traditional tools. Imagine crafting beautifully styled letters using just your imagination and a few unconventional items. The world of non-pen calligraphy offers limitless possibilities for showcasing creativity.
Start by exploring everyday objects to create unique strokes and styles. For instance, a paintbrush can mimic the fluidity of a calligraphy nib, while a bouncy ballpoint pen can introduce character and unpredictability to your letters. Even natural items, like twigs or grasses dipped in ink, can impart an organic feel. Experiment with various surfaces, too. Textured papers or even fabric can elevate your work, providing unexpected results that enhance your creativity.
Another exciting avenue is digital calligraphy. There are several apps and software available that can replicate traditional calligraphy styles without needing a fountain pen. Tools like Procreate or Adobe Illustrator allow for detailed design and easy editing. You can also incorporate unique backgrounds or textures digitally, giving your calligraphy a professional finish.
Finally, share your creations beyond the screen. Consider using your non-pen calligraphy for personal projects, like handmade cards, customized gifts, or even beautiful wall art. No matter your medium, the key is to celebrate your style and enjoy the process. Unleash your creativity, and let each piece reflect your journey-after all, the world of calligraphy without a pen is rich with opportunities just waiting for your personal touch.
Faq
Q: What are some common tools to create calligraphy effects without a traditional pen?
A: You can use markers, brushes, or even household items like forks or straws to create unique calligraphy effects. These alternative tools allow you to experiment with different styles and techniques, giving each letter a distinct personality. Check the section on Essential Materials to Mimic Calligraphy Pen Techniques for more ideas.
Q: Can I use regular ink for calligraphy instead of specialized inks?
A: Yes, regular ink can work, but it may not achieve the same vibrancy or smooth flow as specialized calligraphy inks. Experiment with different types to find what suits your style best. Explore Using Alternative Inks for Unique Calligraphy Styles for tips on blending and using various inks effectively.
Q: How can I practice calligraphy without spending money on supplies?
A: You can practice calligraphy by using digital tools or free online fonts to simulate the strokes. Additionally, try tracing over printed letters with whatever writing utensils you have at home. For more tips, see Tips for Practice: Building Your Calligraphy Skills.
Q: What techniques can I use to improve my handwriting for calligraphy?
A: Slow down and focus on forming each letter distinctly. Use lined paper for guidance, and practice basic strokes repeatedly. This builds muscle memory, which is crucial for developing your calligraphy skills. Check out Mastering Basic Calligraphy Strokes without a Pen for more detailed techniques.
Q: Are there any apps that can help me with digital calligraphy?
A: Absolutely! There are several apps like Procreate, Adobe Fresco, and Calligrapher that allow you to create beautiful digital calligraphy. These platforms offer a variety of brushes and customizable settings to replicate traditional calligraphy styles. For more information, look at Exploring Digital Calligraphy Options and Software.
Q: How do I make my calligraphy unique without a calligraphy pen?
A: Adding personal touches like mixing fonts, using unconventional colors, or integrating illustrations can enhance your work. Consider applying different textures and layers to your calligraphy for a more artistic effect. See Creative Projects: Where to Use Your Calligraphy for inspiring ideas.
Q: What mistakes should I avoid when practicing non-pen calligraphy?
A: Avoid rushing your practice sessions; focus on form and precision instead. Prevent frustration by being patient with your progress, and don’t be afraid to experiment. For common pitfalls and solutions, check out Avoiding Common Mistakes in Non-Pen Calligraphy.
Q: How can I incorporate calligraphy into my daily life creatively?
A: Integrate calligraphy into your journals, greeting cards, or wall art. Use it to decorate personal notes or create custom labels for gifts. This not only enhances your calligraphy skills but also adds a unique touch to your personal items. For project ideas, refer to Creative Projects: Where to Use Your Calligraphy.
Final Thoughts
Now that you’ve discovered clever hacks to create beautiful calligraphy without a traditional pen, it’s time to put your new skills into action! Remember, the beauty of calligraphy lies in your personal touch-experiment with different tools like markers and brushes to find what feels right for you. If you’re looking for more inspiration, check out our guides on DIY calligraphy projects and tips for mastering brush lettering.
Don’t let doubt hold you back! Share your creations with us in the comments below, or follow us for more tips that will elevate your calligraphy game. Ready to take your skills to the next level? Sign up for our newsletter to stay updated on the latest techniques and resources. Your art journey doesn’t have to stop here; dive deeper into the world of lettering and unleash your creativity!


