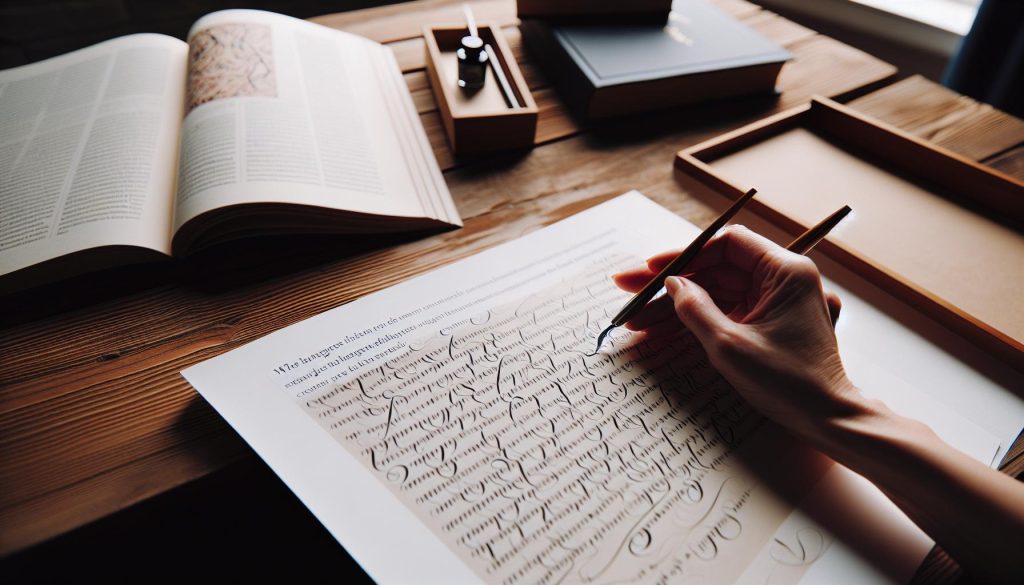
Have you ever marveled at the elegance of handwritten notes or beautifully crafted invitations? With a calligraphy pen set, you can unlock the art of expressive writing and elevate your personal projects. This complete starter kit is designed to help you master the basics of calligraphy, whether you’re creating wedding invitations, greeting cards, or just adding a personal touch to your letters.
In this guide, we’ll explore not just the tools but also the techniques that will transform your writing into art. Many people shy away from calligraphy, thinking it requires inherent talent or expensive tools. The truth is, with the right materials and guidance, anyone can learn to create stunning, personalized pieces. So, if you’re ready to bring your creativity to life and impress others with your unique handwriting, let’s dive in. Your journey into the world of calligraphy starts here!
Selecting the Right Calligraphy Pen for You
Choosing the right calligraphy pen can make all the difference in your lettering journey. It’s not just about aesthetics; the pen you select affects your comfort, control, and the overall look of your work. Each type of pen offers unique characteristics that cater to different styles and preferences. For beginners, starting with a pen that feels good in your hand and matches your learning style is crucial.
Types of Calligraphy Pens
You’ll generally encounter three main types of calligraphy pens: dip pens, fountain pens, and brush pens. Dip pens come with interchangeable nibs, allowing for diverse strokes and styles. They’re an excellent choice if you want to experiment with different types of lettering. Fountain pens offer convenience and a smoother flow of ink, which can be appealing for longer writing sessions. Brush pens are versatile and come with flexible tips, making them perfect for modern calligraphy styles and expressive lettering.
Choosing the Right Pen Size and Nib
When selecting a calligraphy pen, size matters. A finer nib is ideal for intricate details, while broader nibs create bold strokes that stand out. Consider how comfortable you feel defining your letter shapes. If you tend to grip your pen tightly, you might want a pen with a soft grip for better control. If possible, try out various pens at a craft store to see what feels best for you.
Personal Preference and Style
Ultimately, finding the right calligraphy pen is about personal preference. It’s wise to start with a couple of different types to see what aligns with your style. Some might find joy in the traditional feel of a dip pen, while others might fall for the convenience of brush pens. Don’t hesitate to invest in quality tools; they’ll enhance your experience and outputs. Remember, your pen is your partner in creating beautiful artwork!
Essential Calligraphy Supplies Beyond the Pen
To truly dive into the art of calligraphy, it’s essential to equip yourself with more than just a pen. The right supplies can elevate your practice and make your lettering journey more enjoyable and effective. Think of your calligraphy setup like a toolkit; each item plays a crucial role in enhancing your skills and creativity.
One must-have item is high-quality paper. Regular printer paper can fray and bleed, ruining your beautiful strokes. Instead, look for smooth, bleed-proof paper designed specifically for calligraphy. These papers handle ink better, allowing for crisp lines and a polished finish. Additionally, consider using a variety of paper types, such as grids, ruled, or blank sheets, to explore different styles and enhance your versatility.
Another vital component is ink. While many start with bottled ink or cartridges, experimenting with different colors and types can be incredibly rewarding. For example, metallic or shimmering inks can add a unique flair to your projects. Just ensure the ink works well with your chosen pen to avoid clogs or inconsistencies.
Let’s not forget about essential accessories that improve your workflow. A comfortable, adjustable writing surface can alleviate strain during longer sessions. Using a calligraphy guide or practice sheets can also help you master new styles and keep your letters uniform as you learn. Lastly, supplies like nib cleaning cloths or ink brushes can keep your tools in top shape, ensuring that they’re always ready for your next creative endeavor.
Ultimately, investing in the right calligraphy supplies beyond just the pen is critical for nurturing your talent. Each item you choose can inspire and refine your technique, making your exploration of calligraphy an even more fulfilling experience.
Mastering Basic Calligraphy Strokes
To truly embrace the art of calligraphy, mastering basic strokes is your first step. Every elegant letter you’ll eventually create is built on simple lines and curves. So, let’s break down these fundamental strokes that serve as the foundation for your calligraphy journey.
Start with the Basic Strokes. These include the upstroke, downstroke, entrance and exit strokes, and the more pronounced curves. Each stroke teaches you control over your pen and helps you understand how pressure affects the thickness of your lines. For instance, during an upstroke, apply light pressure-think of it as gently lifting. In contrast, downstrokes require a firmer grip, which allows the ink to flow more freely, creating those thick lines iconic in calligraphy.
Practice Makes Perfect
Practice each stroke repeatedly on your chosen paper, varying the speed and pressure as you go. Use practice sheets if you can, as they often include guiding lines that help maintain consistent spacing and alignment. It’s essential to recognize the rhythm of your hand and the natural flow of your movements. Here’s a tip: use a mirror or take photos of your strokes. This can help you see where you might be applying too much pressure or where strokes might need refining.
Combine Basic Strokes
Once you feel comfortable, start combining these strokes into letters. Most calligraphy fonts are built around a core set of strokes. You’ll find that the letter “o” comes from a simple circular shape, while “h” involves a downstroke and an upstroke. By honing these foundational movements, letters will become second nature to you. Practice words, phrases, or even your name; this is where the rhythm of your individual style begins to emerge.
Incorporate Visualization into your practice. Picture the strokes in your mind before putting pen to paper. Visualizing the motion not only builds muscle memory but also develops your artistic intuition. Remember, consistency over perfection is key. With time, you’ll see improvement, and what might have felt awkward at first will soon flow like an extension of your hand.
Embrace the journey of mastering these strokes. As you build this skill set, each letter will come to life under your careful guidance, transforming simple marks into beautiful expressions of art.
Step-by-Step Guide: Writing Your First Letter
Getting started with calligraphy can seem daunting, but writing your first letter can be an exciting milestone that ushers you into this beautiful art form. You’ll find that the key to success lies not just in your tools, but in your mindset and approach. Begin by choosing your calligraphy pen-a flexible nib is excellent for producing varied line thickness. Make sure you have your ink ready; a rich black is a classic choice that makes your letters pop.
Before you dive into writing, warm up with some practice strokes. Create your basic strokes again-upstrokes, downstrokes, loops, and arches. This will help you get a feel for the pen and prepare your hand for the more intricate forms of letter creation. When you feel comfortable, let’s focus on your first letter, perhaps a simple lowercase “a.”
Start by visualizing the shape of the letter in your mind. Lightly set your pen on the paper and begin with a smooth upstroke. As you transition into the downstroke, apply a bit more pressure to achieve that elegant thick line. Lift your pen slightly at the end to create a graceful exit stroke. Don’t rush-take your time and be mindful of your movements. Each stroke adds personality to your letter, so embrace the uniqueness of your style.
Once you feel satisfied with your “a,” try writing a simple word like “art” or “love.” Keep the flow active; let your pen glide across the page. If your letters aren’t perfect-and they likely won’t be at first-don’t get discouraged. Practice frequently, and soon you’ll develop a natural rhythm and style that feels like your own. Remember, every calligrapher starts as a beginner; it’s about enjoying the process and letting your creativity flourish!
Common Mistakes New Calligraphers Make
Jumping into the world of calligraphy can feel overwhelming, especially when you’re faced with the multitude of mistakes that can hinder your progress. One of the biggest pitfalls for beginners is rushing the learning process. Many new calligraphers dive straight into complex letters without mastering the foundational strokes. Remember, calligraphy is an art that requires patience. Focus on perfecting your basic upstrokes, downstrokes, and loops before attempting intricate designs. This foundational practice will pay off immensely down the road.
Another common error is inconsistent pressure applied to the pen while writing. Calligraphy thrives on the contrast between thick and thin lines, so understanding how and when to alter your grip is crucial. Beginners often forget to vary their pressure, resulting in uniform lines that lack the character and finesse typical of beautiful calligraphy. Take time to experiment with pressure during practice sessions; it can make a dramatic difference in your final appearance.
Additionally, many newcomers overlook the importance of proper posture and grip. Sitting in an awkward position or holding the pen incorrectly can lead to discomfort and hinder your fluidity. Position yourself at a comfortable desk height, and keep your hand relaxed while gripping the pen lightly. This not only helps with control but also prevents fatigue during longer practice sessions.
And let’s not forget about ink choice and pen maintenance. Using the wrong type of ink or neglecting your pens can lead to frustration. Always opt for high-quality ink that flows well with your specific nib, and clean your pens regularly to avoid clogs and skipping. When you care for your tools, they’ll reward you with smoother strokes, allowing your creativity to shine through.
Embracing these insights can significantly enhance your calligraphy journey. Don’t let mistakes discourage you; they’re simply stepping stones to mastery. Keep practicing, be aware of these common pitfalls, and enjoy the artistic process. Every stroke you make is a part of your learning, so celebrate your progress along the way!
Tips for Maintaining Your Calligraphy Pens
Taking care of your calligraphy pens is non-negotiable if you want to produce beautiful work consistently. A well-maintained pen can mean the difference between smooth, flowing strokes and frustrating interruptions. The good news? It’s simple to keep your tools in great shape, allowing you to focus on unleashing your creativity rather than cleaning up messes.
First and foremost, always clean your pens after each use. Ink residue can dry and clog your nib, leading to poor performance and uneven lines. For dip pens, gently remove the nib and rinse it under cool water, making sure no ink remains. Apply a soft cloth to absorb excess water, and let it air dry. If you’re using a fountain pen, flush it with clean water until the water runs clear. This routine can prevent buildup that ruins your writing experience.
Storage is equally important. Don’t store your pens upright in a jar with the nib down; this can cause ink to pool at the nib and lead to leaks. Instead, lay them flat in a protective case or holder. If you’re using a pen holder with a nib, ensure that it’s covered to keep dust away. This little precaution extends the life of your nibs and maintains optimal performance.
Finally, invest in quality ink. Cheap ink can cause clogs and staining, making your pens harder to clean. Opt for inks that flow well and are specifically designed for your pen type. And don’t forget to check your nibs regularly for wear and tear. If you notice any rough spots or bent tines, it’s time for a replacement. A little attention to your tools ensures you’ll enjoy the art of calligraphy for years to come.
Inspiration: Calligraphy Projects to Try
There’s something truly magical about watching your letters come to life on the page. If you’ve just unpacked your calligraphy pen set and are itching to dive in, there are plenty of exciting projects to inspire your creativity. Whether you’re a complete beginner or someone looking to refine your skills, these ideas will help you practice and showcase your new talent.
Start with simple greeting cards. Handwritten birthday wishes or thank you notes can turn a generic card into a cherished keepsake. Consider mixing different styles or colors in your lettering to create unique and personalized messages. You can even experiment with flourishes or embellishments to give your words a more artistic flair.
Another fun project is creating a mantra or quote poster. Choose a quote that resonates with you, and use your calligraphy skills to write it out beautifully. You can decorate the background with watercolor techniques or keep it minimalistic with a simple border. Hang it on your wall for daily inspiration or give it as a thoughtful gift to a friend.
For those looking to use their calligraphy in practical ways, try designing custom labels for your jars or containers. Not only does this give your kitchen or workspace a personal touch, but it also helps you stay organized. Use different lettering styles to distinguish between various contents, from spices to sewing supplies.
Lastly, consider seasonal projects, such as crafting holiday decor. Whether it’s writing festive phrases for ornaments or creating place cards for your holiday feasts, combining your calligraphy skills with seasonal themes can enhance your decorations and gatherings.
Each of these projects not only allows you to practice your calligraphy skills but also encourages you to think creatively and enjoy the process. So grab that pen, get inspired, and start making something beautiful!
Exploring Different Calligraphy Styles
There’s a world of beauty in the variety of calligraphy styles, each with its own flair and personality. Exploring these styles not only enhances your skills but also helps you discover your unique artistic voice. Whether you’re drawn to the elegance of traditional scripts or the boldness of modern lettering, there’s something for everyone.
Popular Calligraphy Styles
1. Copperplate: This classic style is characterized by its fluid strokes and elegant loops. It’s known for its fine lines and thick downstrokes, making it a favorite for formal invitations and elegant art pieces. To master Copperplate, focus on the pressure and release technique-press down on the downstrokes, and lighten your grip on the upstrokes.
2. Gothic: Also referred to as Blackletter, this style offers a more dramatic flair with its angular shapes and dense, dark lettering. Ideal for creating bold titles or themed projects, Gothic lettering requires precision and can be more challenging for beginners. Practice each letter slowly to get the intricacies just right.
3. Modern Calligraphy: This style breaks traditional rules, allowing for more freedom and creativity. With its varying line thickness and whimsical forms, modern calligraphy is perfect for casual projects. Start by playing with different pen angles and pressure to create variation in your letters.
Finding Your Style
As you experiment, you may find yourself gravitating toward certain styles. Don’t hesitate to mix and match elements from different techniques! Create a unique blend that resonates with you-this can lead to stunning results in your projects.
Try these practical steps to explore different calligraphy styles:
- Practice Regularly: Dedicate time each week to practice a specific style. Set goals like creating a beautiful greeting card or an art piece.
- Use Resources: Books, online tutorials, and workshops can provide guidance and inspiration. YouTube is a treasure trove of instructional videos.
- Join a Community: Engage with fellow calligraphers through social media or local clubs. Sharing your work and receiving feedback can be incredibly motivating.
Remember, the journey of mastering calligraphy is personal. Enjoy the process, embrace mistakes, and let your creativity flow as you explore these beautiful styles. Each new letter you create adds to your growth and skill, making each stroke a step toward mastering this art form.
How to Set Up Your Calligraphy Workspace
Setting up your calligraphy workspace can make a world of difference in your practice and creativity. A well-organized and inspiring environment not only helps you focus but also enhances your artistic process. Start by choosing a dedicated space where you can spread out your materials and immerse yourself in your calligraphy projects without interruptions.
First and foremost, ensure you have a clean and flat surface to work on. This could be a desk, a table, or even a large board. Consider adding a cutting mat or a soft cloth underneath your work area to protect surfaces and provide a cushion for your pen strokes. Lighting is critical too; find a spot with ample natural light or invest in a good-quality desk lamp. A bright, adjustable light source will reduce eye strain and allow you to see the nuances of your ink and paper.
Organizing your supplies is another essential step. Use containers or drawer organizers to keep your pens, inks, and paper sorted. It’s helpful to have everything within arm’s reach so you won’t waste precious time looking for a specific tool. For example, you might designate specific drawers for different types of pens, brushes, and inks, while keeping your practice paper and finished pieces in separate folders for easy access.
Lastly, create a mood that inspires you. Incorporate elements that motivate your creativity, such as inspirational quotes, beautiful calligraphy projects, or a vision board showcasing your goals. An aroma diffuser or some calming music can also enhance your mood and encourage flow in your work. Remember, your workspace reflects your personality as an artist, so let your style shine through!
Calligraphy Resources: Books and Online Tutorials
When diving into the art of calligraphy, having the right references can make a world of difference in your practice and progress. Whether you’re just kicking things off with a calligraphy pen set or aiming to refine your skills, there’s a treasure trove of books and online tutorials ready to guide you. These resources not only provide foundational knowledge but also inspire your creativity and enhance your technique.
Start with some classic books that have guided countless calligraphers through the intricacies of the craft. For beginners, “The Calligrapher’s Bible” by David Harris offers a comprehensive look at styles and techniques, while “Calligraphy Made Easy” by Margaret Morgan presents a friendly, step-by-step approach to getting started. If you want something a bit more advanced, consider “Mastering Copperplate Calligraphy” by Eleanor Winters, which details the elegant art of Copperplate, ideal for those looking to add a flourish to their writing.
Online tutorials can also be invaluable. Websites like YouTube are brimming with instructional videos that provide visual cues which can be easier to follow than text. Channels dedicated specifically to calligraphy, such as The Postman Knocks and Calligraphy Masters, offer free tutorials covering everything from basic strokes to advanced techniques.
Moreover, various online platforms like Skillshare and Udemy host structured courses that take you through curated learning paths. These platforms often allow you to learn at your own pace, with feedback from instructors who are just as passionate about calligraphy as you are. Searching through hashtags like #calligraphy on social media can also lead you to a wealth of inspiring content and user-generated tutorials that showcase different styles and projects.
To sum it up, don’t underestimate the power of good resources in your calligraphy journey. Books provide essential knowledge and technique, while online tutorials cater to a range of learning styles and preferences. Combine these tools, and you’ll have everything you need to master the art of the pen.
Showcasing Your Calligraphy: Display Ideas
Turning your calligraphy into beautiful displays is one of the most rewarding aspects of this art form. After putting in so much effort to master your penmanship, showcasing your work allows you to inspire others and celebrate your achievements. Here are some engaging ideas for displaying your calligraphy that can make your pieces stand out beautifully.
Start by thinking about the context of your work. Do you want to decorate your home, create a memorable gift, or contribute to a special event? Framing your calligraphy is a classic choice. Consider using frames that complement your style-whether it’s ornate vintage frames for elegant scripts or sleek modern ones for minimalist designs. Use mats to enhance the colors and textures of your paper and ink. Place your framed pieces in prominent areas such as above a mantel, along a gallery wall, or even as a focal point in your workspace.
Another unique way to showcase your calligraphy is through handmade greeting cards or invitations. Personalizing cards for holidays, weddings, or special occasions not only makes a thoughtful gift but also allows your art to be appreciated by friends and family. For a twist, explore creating calligraphy art on various surfaces, such as wood, canvas, or acrylic. These can be turned into signs, quotes, or inspirational pieces that add a warm touch to any room. You could even experiment with using burned or etched techniques for a rustic feel.
Don’t overlook the power of display stands or easels. These work well for showcasing your pieces during events or in your home. For a more interactive display, consider creating a calligraphy book or a portfolio; this lets you curate your favorite works for easy browsing. Engage your audience further by letting them see the process-set up a small station with your pen kit where they can try their hand at calligraphy, too.
Lastly, going digital can expand your reach. Photograph your calligraphy and share it on social media platforms or your personal website. You could even create digital prints that people can download and use. This combination of traditional and modern display methods not only rejuvenates your artwork but also invites others into your creative world.
By exploring these display options, you’ll help your calligraphy shine while encouraging appreciation for this timeless art form.
Advanced Techniques to Elevate Your Skills
The journey into the world of calligraphy can be both thrilling and daunting, especially when you’re ready to elevate your skills beyond the basics. It’s not just about creating beautiful letters; it’s about exploring different techniques that can transform your work into a personal expression of artistry. By pushing the boundaries of what you’ve learned, you can unlock a new level of creativity and finesse.
One of the most powerful ways to enhance your calligraphy is through mastering the use of variation in pressure and angle. This technique allows you to create dynamic, flowing strokes that can add a dramatic flair to your letters. For instance, when you apply more pressure on the downstrokes and lighten your grip on the upstrokes, you create contrasting thick and thin lines that are pleasing to the eye. Practicing these nuanced movements will not only improve your handwriting but also give your pieces a professional, polished look. Use practice sheets that focus specifically on varying stroke pressure to see improvement quickly.
Another advanced technique to consider is experimenting with blending colors. While traditional calligraphy often sticks to a single ink color, introducing various hues can create stunning visual effects. Using gradient techniques, where one color fades into another, can enhance your designs significantly. This is particularly effective for larger pieces or greeting cards. You can use brush pens or even dip pens loaded with different colored inks to create these effects. Don’t hesitate to mix colors directly on your paper to see how they interact and flow together.
To expand your skill set even further, explore the world of decorative elements and embellishments. Incorporating florals, flourishes, or geometric shapes can elevate your calligraphy to a new artistic level. Once you feel confident with your lettering, play around with integrating these elements into your designs. For example, practice adding small floral motifs or elegant swirls to the corner of your work. This not only fills negative space but also helps showcase your unique style. Start subtle, and as you gain confidence, let your creativity run wild.
Finally, don’t underestimate the value of digital calligraphy. Digital tools can provide you with an endless canvas to refine your skills and explore new styles. Applications like Procreate or Adobe Fresco allow you to practice without wasting materials, and they provide an instant undo option, which is a great confidence booster. Plus, you can easily share your work online or create digital prints to sell or gift. Learning to digitize your calligraphy also opens up new opportunities for collaboration and exposure, which can be incredibly rewarding.
By integrating these advanced techniques and exploring new avenues, you can significantly elevate your calligraphy skills. It’s all about experimenting and discovering what resonates with your artistic vision. So grab your pen, and let’s create something extraordinary!
Faq
Q: What is the best way to hold a calligraphy pen for beginners?
A: To hold a calligraphy pen correctly, grip it lightly between your thumb and index finger, allowing your hand to move freely. Rest your other fingers against the paper for stability. Aim for a comfortable angle, typically around 30 to 45 degrees from the surface, which enhances control and fluidity in your writing.
Q: How do I set up my workspace for calligraphy?
A: Create a tidy and well-lit workspace. Use a flat surface, such as a desk or table, and ensure you’re seated comfortably. Lay down a clean sheet of paper, and keep your calligraphy pen set, ink, and any reference materials within easy reach. Consider adding a cushion for your wrist to promote comfort during practice.
Q: What types of paper are best for calligraphy?
A: For calligraphy, choose smooth, bleed-resistant paper to prevent ink from feathering. Look for papers specifically designed for calligraphy or high-quality sketch paper with at least 120 gsm. Experiment with different textures to find the one that best suits your style.
Q: Can I use regular ink with my calligraphy pen?
A: It’s advisable to use inks specifically formulated for calligraphy to achieve the best results. Regular ink may cause skipping or clogging in your pen. Choose non-waterproof fountain pen inks or calligraphy inks designed for your particular pen type.
Q: How can I improve my calligraphy skills quickly?
A: To enhance your calligraphy skills, practice regularly using tracing guides or templates. Focus on mastering strokes and letterforms before moving to full words. Joining online classes or using instructional videos can provide valuable tips and feedback on your technique.
Q: What should I do if my calligraphy pen is skipping?
A: If your calligraphy pen is skipping, first check the ink level and ensure it’s filled. Clean the nib gently with water or a soft cloth to remove any dried ink or debris. If the issue persists, consider adjusting the nib’s angle or pressure applied when writing.
Q: How do I care for my calligraphy pens?
A: To maintain your calligraphy pens, clean them after each use by rinsing the nib under lukewarm water. Avoid scrubbing, which can damage the nib. Store pens upright in a case to protect the nibs and prevent ink leakage.
Q: What are some common mistakes to avoid in calligraphy?
A: Common mistakes include inconsistent pressure, which leads to uneven strokes, and neglecting proper posture. Avoid rushing your practice; take time to understand letter forms. Regularly check your grip and angle to ensure you’re developing a natural writing technique.
In Conclusion
Thanks for diving into our guide on the Calligraphy Pen Set! You’ve now unlocked the essential skills to transform your handwriting into beautiful art. Remember, practice makes perfect-so keep experimenting with different styles and techniques. If you’re feeling inspired, check out our post on Advanced Calligraphy Techniques or explore our Calligraphy Projects for Beginners to elevate your craft.
Don’t miss out! Sign up for our newsletter to receive tips, exclusive resources, and updates on upcoming workshops. Your journey doesn’t end here; let’s continue creating together! Have questions or want to share your progress? Drop a comment below or share your work on social media. We’d love to see how you’re using your new skills!